Free original lessons
How to Draw a Head with a Grid: Proportion and Feature Placement
Learn to draw a head using a proportion grid. Place eyes, nose, and mouth accurately with guided lines, a worked example, and four practice tasks.
Free lesson
Four exercises
Worked answers
Object Drawing Lessons
Drawing a head with a grid turns a complex shape into a set of measurable relationships. Instead of guessing where features belong, you mark key horizontal lines for the eye-line, nose-line, and mouth-line, then use vertical guides to center the face. This lesson teaches a repeatable grid method: you will set up a proportion grid, place the head outline, locate features at consistent fractions of the head height, and check your work with simple arithmetic. The key reference is the total head height measured from chin to crown. All numerical values are hypothetical examples; measure your own paper and tools. The method works for any head size because it relies on ratios, not fixed centimeters.
Practice materials: Printable downloads are not available for this lesson yet. Use the instructions and four exercises below.
Reference illustration
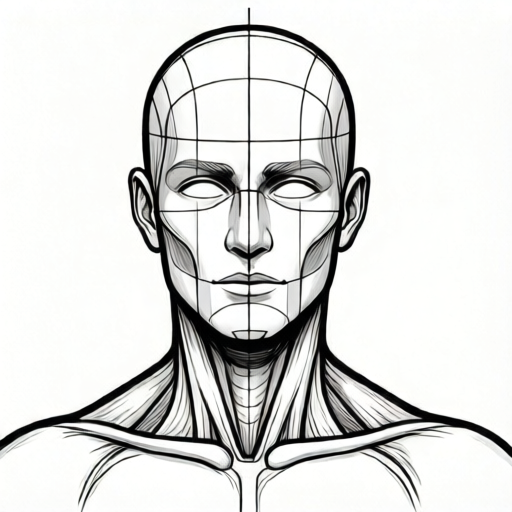
Use the stated measurements and conventions for each exercise.
Setting Up the Proportion Grid
Start with a rectangular grid plate. A practical example is a grid 12 squares wide and 16 squares tall, with each square 1 cm. This is a hypothetical size; choose squares that fit your paper. Label the top edge as crown line and the bottom edge as chin line. The total head height is the distance between these lines. Divide that height into equal parts using horizontal guide lines. A common convention places the eye-line at the halfway point of the head height, the nose-line at three-quarters down from the crown, and the mouth-line about one-eighth of the head height below the nose-line. These fractions are conventions, not universal laws; adjust only if your reference shows otherwise.
Add a vertical center line. This line runs from crown to chin and helps keep the face symmetrical. For a front view, the eyes sit on the eye-line, one on each side of the center line, with a gap between them roughly equal to one eye width. The nose sits on the center line at the nose-line. The mouth is centered on the mouth-line. The ears, in a front view, generally span from the eye-line to the nose-line, but ear placement varies; treat this as a guide, not a rule.
- Draw a rectangle and mark the crown line at the top and the chin line at the bottom.
- Measure the total head height and mark the eye-line at half the height.
- Mark the nose-line at three-quarters of the height from the crown.
- Mark the mouth-line one-eighth of the head height below the nose-line.
- Draw a vertical center line from crown to chin.
- Lightly sketch the head outline inside the rectangle, keeping the chin on the chin line and the crown on the crown line.
Placing Features on the Grid
With the guide lines in place, place each feature by intersection. The eyes are centered on the eye-line. For a front view, divide the width between the left and right edges of the head into five equal parts: the outer two parts are the side margins, and the inner three parts are eye, gap, eye. This five-part division is a convention that works for many front-view heads; it is not a universal rule. The nose tip sits on the nose-line and on the center line. The mouth sits on the mouth-line, centered, with its width often about one-third of the head width. Again, these are starting conventions.
Use the grid squares to count rather than to measure every time. If the eye-line is at square row 8 of 16, then the eyes are on row 8. If the nose-line is at row 12, the nose tip is on row 12. This counting method makes the drawing checkable: you can verify that each feature sits on its intended row and that left-right placement is balanced around the center line.
- Mark the eye centers on the eye-line, one on each side of the center line.
- Check that the gap between the eyes is about one eye width.
- Place the nose tip at the intersection of the nose-line and the center line.
- Place the mouth center on the mouth-line and center line.
- Sketch the ears between the eye-line and nose-line on each side, if the view shows ears.
- Erase or lighten the guide lines only after the features are placed.
Checking Proportions with Simple Arithmetic
A grid drawing is easy to check because the guide lines are measurable. Suppose the head height is 16 cm. The eye-line is at 8 cm from the crown (half of 16). The nose-line is at 12 cm from the crown (three-quarters of 16). The mouth-line is one-eighth of 16 cm below the nose-line, so 2 cm below 12 cm, which is 14 cm from the crown. These are hypothetical numbers for a 16 cm head; use your own measured height. Check that the chin is at 16 cm and the crown at 0 cm. If your feature lines do not match these fractions, adjust the lines before drawing details.
For width, if the head width is 12 cm, the five-part eye division gives each part 2.4 cm. The two outer margins are 2.4 cm each, and the inner three parts are 2.4 cm each: eye, gap, eye. Check that the total is 12 cm. This arithmetic confirms that the eye placement is consistent with the chosen convention. Valid alternatives exist: some artists use a four-part division or place eyes slightly differently. The rubric rewards consistent, checkable placement rather than a single universal answer.
- Measure the total head height and record it.
- Calculate half, three-quarters, and one-eighth of that height.
- Compare your guide lines to these calculated positions.
- Measure the head width and divide by five for the eye convention.
- Check that left and right eye placements are balanced around the center line.
- Record any deliberate deviation and the reason for it.
Adapting the Grid to Different Views
The same grid supports a three-quarter view or a profile with small changes. For a three-quarter view, keep the eye-line, nose-line, and mouth-line at the same fractions of head height, but shift the center line toward the side of the face that is turning away. The eye nearer the viewer may appear wider; the far eye may be partly hidden. For a profile, the center line becomes the profile line, and the eye sits on the eye-line near the front edge. The nose projects beyond the vertical center line at the nose-line. The mouth sits on the mouth-line. In all views, the horizontal guide lines remain the anchor for feature height.
Treat the grid as a scaffold. For head drawing, the chin line is the baseline and the eye-line is the midline in this lesson's convention. Valid alternatives include different eye-line fractions or different mouth-line spacing, as long as the choice is stated and applied consistently.
- Choose front, three-quarter, or profile view.
- Keep the horizontal guide lines at the same fractions of head height.
- Shift the vertical center line according to the view.
- Place features at the intersections of guide lines and the center line.
- Check that the feature heights still match the calculated fractions.
- Note any convention change and apply it consistently across the drawing.
Worked example
A student draws a head 20 cm tall and 14 cm wide on a grid. Calculate the eye-line, nose-line, and mouth-line positions from the crown, and the five-part eye division width. Then state where the nose tip and mouth center should be placed.
Worked answer
Head height 20 cm. Eye-line at half: 10 cm from crown. Nose-line at three-quarters: 15 cm from crown. Mouth-line one-eighth of 20 cm below nose-line: 2.5 cm below 15 cm, so 17.5 cm from crown. Head width 14 cm divided by five: 2.8 cm per part. The five parts are outer margin 2.8 cm, eye 2.8 cm, gap 2.8 cm, eye 2.8 cm, outer margin 2.8 cm. The nose tip sits at 15 cm from the crown on the center line. The mouth center sits at 17.5 cm from the crown on the center line. Check: 10 + 5 = 15, and 15 + 2.5 = 17.5, which is less than 20, so the mouth is above the chin line.
Four practice exercises
Exercise 1
A head is 24 cm tall. Using the convention in this lesson, calculate the distance from the crown to the eye-line, to the nose-line, and to the mouth-line. State each value in centimeters.
Show answer and check
Eye-line: 12 cm. Nose-line: 18 cm. Mouth-line: 21 cm.
Why: Half of 24 is 12. Three-quarters of 24 is 18. One-eighth of 24 is 3, and 18 + 3 = 21. All values are measured from the crown.
Check: Add the intervals: 12 + 6 = 18, and 18 + 3 = 21. Confirm that 21 is less than 24, so the mouth-line is above the chin line.
Exercise 2
A head is 18 cm wide. Using the five-part eye division, calculate the width of each part and state the positions of the two eye centers measured from the left edge of the head.
Show answer and check
Each part is 3.6 cm. The left eye center is 5.4 cm from the left edge, and the right eye center is 12.6 cm from the left edge.
Why: 18 divided by 5 equals 3.6. The parts are margin 3.6, eye 3.6, gap 3.6, eye 3.6, margin 3.6. The left eye center is at the middle of the first eye part: 3.6 + 1.8 = 5.4 cm. The right eye center is at 3.6 + 3.6 + 3.6 + 1.8 = 12.6 cm.
Check: Check symmetry: 18 minus 12.6 equals 5.4, so the right eye center is the same distance from the right edge as the left eye center is from the left edge.
Exercise 3
A student draws a head 16 squares tall on a grid. The eye-line is drawn at square 7 from the top, the nose-line at square 11, and the mouth-line at square 13. Using the lesson convention, state whether each line is correct, and give the correct square number if it is not.
Show answer and check
Eye-line should be square 8, not 7. Nose-line should be square 12, not 11. Mouth-line should be square 14, not 13.
Why: Half of 16 is 8. Three-quarters of 16 is 12. One-eighth of 16 is 2, and 12 + 2 = 14. Each drawn line is one square too high.
Check: Count from the top: 8, 12, and 14. Confirm that 14 is less than 16, so the mouth-line is above the chin line.
Exercise 4
A head is 30 cm tall and 20 cm wide. Calculate the eye-line, nose-line, and mouth-line distances from the crown, and the five-part eye division width. Then describe where the nose tip and mouth center are placed relative to the center line.
Show answer and check
Eye-line: 15 cm. Nose-line: 22.5 cm. Mouth-line: 26.25 cm. Each of the five width parts is 4 cm. The nose tip is on the center line at 22.5 cm from the crown. The mouth center is on the center line at 26.25 cm from the crown.
Why: Half of 30 is 15. Three-quarters of 30 is 22.5. One-eighth of 30 is 3.75, and 22.5 + 3.75 = 26.25. 20 divided by 5 equals 4. The nose tip and mouth center both sit on the vertical center line because they are centered features in a front view.
Check: Add the intervals: 15 + 7.5 = 22.5, and 22.5 + 3.75 = 26.25. Confirm that 26.25 is less than 30. Check the width parts: 5 times 4 equals 20.
Common mistakes
- Placing the eyes above or below the eye-line because the outline was drawn first and the guide lines were ignored. Draw and label the guide lines before the outline, then place the eye centers exactly on the eye-line. Check with a ruler or by counting grid squares.
- Making the gap between the eyes too wide or too narrow. Use the five-part width division as a starting convention: outer margin, eye, gap, eye, outer margin. Measure each part and confirm the total equals the head width.
- Putting the nose tip above or below the nose-line. Mark the nose-line at three-quarters of the head height from the crown, then place the nose tip at the intersection with the center line. Recalculate the fraction if the head height changes.
- Spacing the mouth too far from the nose or too close to the chin. Place the mouth-line one-eighth of the head height below the nose-line. Measure the distance and compare it to the calculated value.
- Treating the grid fractions as universal laws and refusing to adjust for a specific reference. State the convention you are using and apply it consistently. If a reference shows different proportions, record the deviation and adjust the guide lines rather than forcing the standard.
Self-check rubric
- Guide lines for crown, chin, eye-line, nose-line, and mouth-line are drawn and labeled.
- Eye-line is at half the head height, nose-line at three-quarters, and mouth-line one-eighth below the nose-line, or a stated alternative convention is applied consistently.
- Eyes are centered on the eye-line and balanced around the vertical center line.
- Nose tip is on the nose-line and center line.
- Mouth center is on the mouth-line and center line.
- Feature placement is checkable by counting grid squares or by simple arithmetic.
- Any deviation from the stated convention is recorded with a reason.
- Valid alternatives are accepted if they are consistent and checkable.
Questions and answers
Do I need a printed grid to use this method?
No. You can draw a grid with a ruler on any paper. A printed grid plate is planned as a future resource, but the method works with a hand-drawn grid. Measure your paper and choose a square size that fits.
Are the fractions for eye-line, nose-line, and mouth-line fixed?
They are conventions, not universal rules. The eye-line at half the head height, nose-line at three-quarters, and mouth-line one-eighth below the nose-line are common starting points. Valid alternatives exist; the key is to state your convention and apply it consistently.
How do I check my drawing without a ruler?
Count grid squares. If the head is 16 squares tall, the eye-line is at square 8, the nose-line at square 12, and the mouth-line at square 14. Counting is a simple check that does not require measuring tools.
Can I use this grid for a profile view?
Yes. Keep the horizontal guide lines at the same fractions of head height. The vertical center line becomes the profile line, and the nose projects beyond it at the nose-line. The eye sits on the eye-line near the front edge.
What if my head outline does not fill the rectangle exactly?
That is acceptable. The grid is a scaffold for feature placement, not a strict boundary. Keep the chin on the chin line and the crown on the crown line, and place features on their guide lines. The outline can vary in width as long as the proportions are checkable.