Free original lessons
Draw a Paper Wasp Nest: Hexagonal Comb Layout
Learn to draw a paper wasp nest by building a hexagonal cell grid, layering comb tiers, and adding a paper envelope with clear checks.
Free lesson
Four exercises
Worked answers
Object Drawing Lessons
A paper wasp nest is a layered comb of hexagonal cells inside a paper envelope. This lesson teaches a repeatable drawing method: establish a cell unit, tile it in rows, shape the comb boundary, add a protective envelope, and check alignment with simple arithmetic. You will use a defined drawing convention so that valid alternatives are accepted, and you will measure your own paper and tools rather than assume standard sizes. All numerical examples are hypothetical and labeled as such.
Practice materials: Printable downloads are not available for this lesson yet. Use the instructions and four exercises below.
Reference illustration
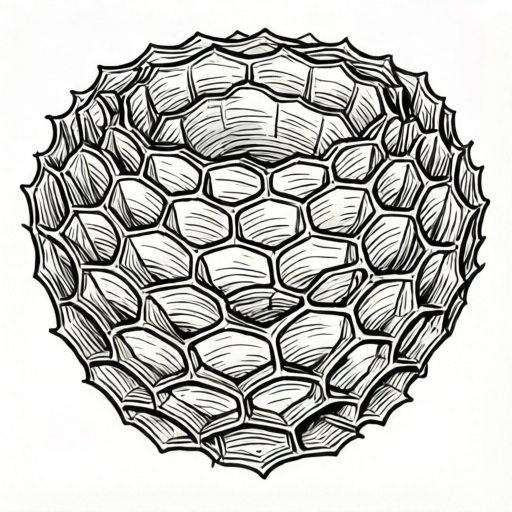
Use the stated measurements and conventions for each exercise.
Set the cell unit and drawing convention
Define one hexagon as a flat-top regular hexagon with side length s. In this convention, the horizontal distance between adjacent cell centers in the same row is 1.5s, and the vertical distance between row centers is about 0.866s. These are geometric relationships, not manufacturing standards. Choose s by measuring your paper: for a hypothetical example, if your sheet is 200 mm wide and you want about 12 cells across, set s near 10 mm and verify with a ruler.
Draw one master hexagon lightly, then use it as a template. Mark cell centers rather than drawing every edge first; centers are easier to check. Keep pencil lines light so the final ink lines can be clean. The convention allows flat-top or point-top hexagons, but choose one orientation and keep it consistent across the comb.
- Measure your paper width and height in millimetres and record them.
- Choose a hypothetical side length s, such as 10 mm, and mark it on scrap paper.
- Draw one regular hexagon with side s using a ruler and compass or a measured template.
- Label the center of the master hexagon and note the center-to-center spacing: 1.5s horizontally and 0.866s vertically.
Tile the hexagonal comb in rows
Build the comb by placing centers row by row. In a flat-top convention, each row is offset horizontally by half the horizontal spacing, so alternate rows shift by 0.75s. Count cells per row and total cells before drawing edges. For a hypothetical example with s = 10 mm, a row of 7 cells spans 6 × 15 mm = 90 mm between first and last centers, plus one cell width for the outer edges.
Draw the shared edges once. A common mistake is drawing each hexagon separately, which doubles lines and creates gaps. Instead, draw the row of top edges, then the zigzag shared edges between rows. Check that every interior vertex meets exactly three edges.
- Mark the first row of cell centers at spacing 1.5s.
- Offset the second row by 0.75s and place centers at vertical spacing 0.866s.
- Continue for the planned number of rows, counting centers aloud.
- Connect centers with the zigzag shared-edge pattern, drawing each interior edge once.
- Check three edges meet at every interior vertex and no edge is doubled.
Shape the comb boundary and add the paper envelope
Real combs are not perfect rectangles; the outer boundary follows the available space and often curves. After tiling a rectangular block, erase outer cells selectively to create a rounded or irregular comb edge. Keep at least two full rows before curving so the hex pattern reads clearly.
The envelope is layered paper around the comb. Draw it as overlapping curved bands that partly hide the comb edge. Use lighter, broader strokes for the envelope and keep some hex cells visible through a gap or cutaway. This contrast helps viewers recognize the nest as a paper wasp structure rather than a flat honeycomb pattern.
- Decide which outer cells to remove to shape the comb boundary.
- Erase removed cells cleanly and redraw any broken shared edges.
- Sketch two or three overlapping envelope bands around the comb, leaving a visible window.
- Add subtle paper texture with short, directional pencil strokes, not random scribbles.
- Ink the comb edges first, then the envelope, and erase pencil guides.
Check alignment and scale with simple arithmetic
Use arithmetic to catch drift. If you planned 6 rows with vertical spacing 0.866s and s = 10 mm, the distance from first to last row center is 5 × 8.66 mm = 43.3 mm. Measure your drawing; a difference of a few millimetres is acceptable for hand drawing, but a large drift means the spacing was inconsistent. For horizontal checks, 5 cells in a row with spacing 15 mm span 60 mm between first and last centers.
Record your chosen s and row count on the page margin. This makes the drawing self-documenting and allows a reviewer to verify the layout without guessing. Label any numerical values as hypothetical examples if they are not measured from your own paper.
- Measure the distance between first and last row centers and compare with (rows − 1) × 0.866s.
- Measure the distance between first and last centers in one row and compare with (cells − 1) × 1.5s.
- Check that every interior vertex has three edges and every outer boundary vertex has two.
- Note s and row count in the margin for later review.
Worked example
A student plans a comb with s = 8 mm, 5 cells in a row, and 4 rows. Calculate the expected horizontal span between first and last centers in a row and the vertical span between first and last row centers. Then state one check for vertex consistency.
Worked answer
Horizontal span = (5 − 1) × 1.5 × 8 mm = 4 × 12 mm = 48 mm. Vertical span = (4 − 1) × 0.866 × 8 mm ≈ 3 × 6.93 mm ≈ 20.8 mm. Check: every interior vertex should have exactly three edges meeting.
Four practice exercises
Exercise 1
Plan a flat-top comb with s = 6 mm, 6 cells in a row, and 5 rows. Calculate the horizontal span between first and last centers in a row and the vertical span between first and last row centers. Describe the center layout in words.
Show answer and check
Horizontal span = (6 − 1) × 1.5 × 6 mm = 5 × 9 mm = 45 mm. Vertical span = (5 − 1) × 0.866 × 6 mm ≈ 4 × 5.20 mm ≈ 20.8 mm. Layout: first row centers spaced 9 mm apart; each next row offset by 4.5 mm horizontally and 5.20 mm vertically.
Why: Use the flat-top spacing rules: horizontal center spacing is 1.5s and vertical row spacing is 0.866s. Multiply by the number of intervals, which is one less than the number of cells or rows.
Check: Measure the drawn first-to-last center spans and compare with 45 mm and about 20.8 mm; confirm every interior vertex has three edges.
Exercise 2
A drawing has 8 cells in a row with s = 5 mm. The measured distance between the first and last centers is 52 mm. Is this consistent with the planned spacing? Show the arithmetic.
Show answer and check
Expected span = (8 − 1) × 1.5 × 5 mm = 7 × 7.5 mm = 52.5 mm. The measured 52 mm is within 0.5 mm of expected, so it is consistent for hand drawing.
Why: Compare the measured span with the planned span using the same formula. A small difference is acceptable in hand drawing; a large difference indicates inconsistent spacing.
Check: Re-measure with a ruler along the row of centers and confirm the difference is small relative to s.
Exercise 3
You want a comb with 4 rows and vertical span between first and last row centers of about 26 mm. Using s = 10 mm, does 4 rows fit? Show the arithmetic and state whether you would adjust the row count.
Show answer and check
Expected vertical span = (4 − 1) × 0.866 × 10 mm ≈ 3 × 8.66 mm ≈ 26.0 mm. Yes, 4 rows fit the target. No row-count adjustment is needed if the measured span is close to 26 mm.
Why: Rearrange the vertical spacing rule to test the plan: span = (rows − 1) × 0.866s. Substitute the planned values and compare with the target.
Check: Measure the drawn vertical span and compare with 26 mm; also check that each interior vertex has three edges.
Exercise 4
After tiling a rectangular block, you erase two outer cells to round the comb boundary. Describe how to redraw the broken edges and state one vertex check for the new boundary.
Show answer and check
Erase the removed cells completely, then redraw the remaining shared edges so each surviving cell is closed by single lines. At the new outer boundary, each boundary vertex should have exactly two edges; interior vertices should still have three.
Why: Removing cells exposes new boundary vertices. Redrawing shared edges once prevents doubled lines, and the vertex count distinguishes interior from boundary points.
Check: Trace each new boundary vertex and count the edges meeting there; confirm two at the boundary and three in the interior.
Common mistakes
- Drawing each hexagon as a separate closed shape, causing doubled edges and gaps. Draw shared edges once using a zigzag row pattern, then verify three edges meet at each interior vertex.
- Using inconsistent center spacing, so rows drift and the comb looks warped. Mark all centers first with a ruler, then check horizontal and vertical spans with the arithmetic in the alignment section.
- Making the envelope so opaque that no hex cells are visible. Leave a deliberate window or cutaway in the envelope so at least a few complete cells remain visible.
- Mixing flat-top and point-top hexagons in the same comb. Choose one orientation at the start and keep the master template fixed for the whole drawing.
Self-check rubric
- Hexagon orientation is consistent across the comb.
- Cell centers follow the chosen spacing within a few millimetres of the planned values.
- Shared edges are drawn once; interior vertices show three edges.
- Comb boundary is shaped deliberately, not left as an unmodified rectangle.
- Envelope is present and leaves at least a few complete hex cells visible.
- Margin note records s and row count for verification.
- Valid alternatives such as point-top orientation or a different cell count are accepted if the spacing arithmetic and vertex check hold.
Questions and answers
Do I need a compass to draw the hexagons?
No. A ruler and a measured template are enough. Draw one master hexagon with side s, then trace or mark centers using the spacing rules.
How many cells should the comb have?
Choose a count that fits your paper. A hypothetical example is 7 cells across and 6 rows, but any consistent count works if the spacing arithmetic checks out.
Can I use point-top hexagons instead of flat-top?
Yes. The convention allows either orientation, but keep one orientation throughout and adjust the horizontal and vertical spacing rules accordingly.
How do I know the drawing is accurate enough?
Use the check method: measure first-to-last center spans and compare with the expected values, and confirm three edges meet at every interior vertex.