Free original lessons
Scale Wing Overlay: Drawing Overlapping Plate Segments
Plan a scaled wing overlay study with labeled plate segments, layered drawing practice, and a simple rubric for checking overlap and proportion.
Free lesson
Four exercises
Worked answers
Object Drawing Lessons
This lesson focuses on a narrow drawing problem: representing a scaled wing as an overlay of overlapping plate and feather-like segments. You will define a scale convention, lay out a wing shape, draw segments in a consistent order, and check the result with simple measurements. The goal is not full dragon wing anatomy or membrane construction; it is the visual logic of layered plates. All measurements below are hypothetical examples unless you measure your own paper and tools. Use one unit system throughout, such as centimeters.
Practice materials: Printable downloads are not available for this lesson yet. Use the instructions and four exercises below.
Reference illustration
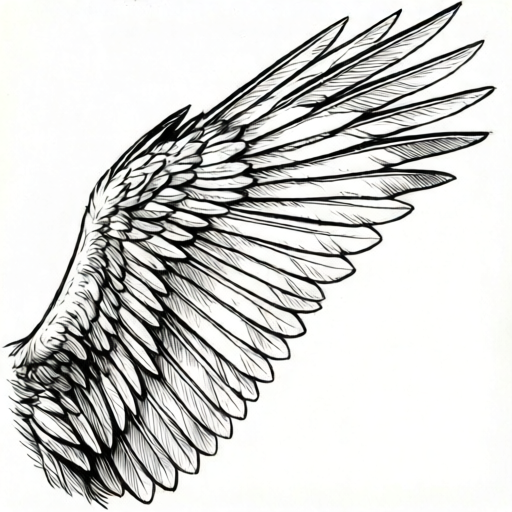
Use the stated measurements and conventions for each exercise.
Set a scale convention before drawing
Choose a simple scale such as 1 cm on paper equals 10 cm on the imagined wing. Write the scale at the top of the page. This makes every later measurement checkable. If you prefer a different ratio, keep it consistent and label it clearly.
Define the plate convention: each plate is a rounded quadrilateral with a visible leading edge, a trailing edge, and an overlap line where the next plate sits on top. Feather-like segments may be narrower and more tapered, but they follow the same overlap rule. X-height is not relevant here; instead, use the plate width and overlap depth as your repeatable measures.
- Write the scale ratio and the paper size at the top of the page.
- Draw a light rectangular boundary for the wing overlay area, for example 18 cm by 12 cm.
- Mark a centerline and a leading-edge curve with three guide points.
- Label the guide points A, B, and C so later checks can refer to them.
Lay out the wing outline and segment rows
The wing outline is a simplified curved triangle. Place the root at the left, the tip at the right, and a curved leading edge above a straighter trailing edge. Divide the outline into three rows of plates: a large root row, a middle row, and a small tip row. Row size decreases toward the tip.
Use a consistent overlap direction. For example, each plate overlaps the one behind it by about one-third of its width. Mark this overlap depth with a small tick so you can repeat it. The overlap direction must stay the same across the whole wing unless you deliberately show a fold.
- Draw the root-to-tip centerline and mark row boundaries at roughly one-third and two-thirds of the length.
- Sketch the leading edge as a smooth curve through points A, B, and C.
- Draw the trailing edge as a shallower curve, then close the tip.
- Lightly divide each row into plate positions, keeping widths consistent within a row.
Draw overlapping plates in a fixed order
Draw from the back of the wing toward the front so each new plate sits on top of the previous one. Start with the trailing-edge plates, then move toward the leading edge. This order makes overlaps readable and prevents accidental gaps.
For each plate, draw the full outline lightly, then darken only the visible portion. The hidden portion stays light or is erased. Add a short overlap line where the plate meets the one beneath it. Keep plate corners rounded rather than sharp so the scale-like reading stays clear.
- Draw the lowest row first, from trailing edge to leading edge.
- For each plate, sketch the full shape, then darken the visible edge only.
- Add an overlap line at the top edge of each plate.
- Repeat for the middle and tip rows, reducing plate width by about one-quarter per row.
Check proportion, overlap, and labeling
Check the drawing with simple arithmetic. Measure the wing length and width on paper, multiply by the scale factor, and compare with your planned dimensions. Count the plates in each row and confirm the overlap depth is consistent. Label at least six segments with letters or numbers and add a short key.
A valid result may use different plate shapes or a different overlap depth, provided the convention is stated and followed. The rubric rewards consistency and clear labeling, not a single universal plate style.
- Measure the drawn wing length and width in centimeters.
- Multiply each by the scale factor and record the imagined dimensions.
- Check that each row has the planned number of plates and a consistent overlap depth.
- Confirm that every labeled segment appears in the key.
Worked example
A wing overlay is planned at 1 cm on paper equals 10 cm imagined. The drawn wing is 15 cm long and 9 cm wide. The root row has 4 plates, the middle row has 5, and the tip row has 3. Each plate overlaps the one behind it by 1 cm on paper. Check the imagined dimensions and the total plate count.
Worked answer
Imagined length is 15 cm times 10 equals 150 cm. Imagined width is 9 cm times 10 equals 90 cm. Total plates are 4 plus 5 plus 3 equals 12. The overlap depth is 1 cm on paper, which equals 10 cm imagined. All values use the same scale and unit system.
Four practice exercises
Exercise 1
A drawn wing is 12 cm long at a scale of 1 cm to 8 cm imagined. What is the imagined length?
Show answer and check
96 cm.
Why: Multiply the drawn length by the scale factor: 12 times 8 equals 96.
Check: Reverse the calculation: 96 divided by 8 equals 12 cm drawn.
Exercise 2
A root row has 5 plates and a middle row has 6 plates. Each plate overlaps by 0.5 cm on paper. What is the total overlap depth across the root row if every plate except the last overlaps once?
Show answer and check
2.0 cm.
Why: Four overlaps occur in a row of five plates. Four times 0.5 cm equals 2.0 cm.
Check: Count the overlap lines in the root row and multiply by 0.5 cm.
Exercise 3
A wing overlay uses a 1 cm to 10 cm scale. The drawn width is 7 cm. A second drawing uses a 1 cm to 5 cm scale and a drawn width of 14 cm. Which imagined width is larger?
Show answer and check
Both imagined widths are equal: 70 cm. Neither is larger.
Why: First: 7 times 10 equals 70 cm. Second: 14 times 5 equals 70 cm. The values are equal.
Check: Divide each imagined width by its scale factor to recover the drawn width.
Exercise 4
You plan three rows with 4, 5, and 3 plates. You label every plate in the middle row and two plates in the root row. How many labeled segments are there, and how many unlabeled plates remain?
Show answer and check
7 labeled segments; 5 unlabeled plates remain.
Why: Middle row labels: 5. Root row labels: 2. Total labeled equals 7. Total plates equal 4 plus 5 plus 3 equals 12. Unlabeled equals 12 minus 7 equals 5.
Check: Add labeled and unlabeled counts: 7 plus 5 equals 12, matching the total plate count.
Common mistakes
- Drawing plates from the leading edge backward, which makes later plates appear underneath earlier ones. Draw from trailing edge to leading edge so each new plate sits on top.
- Using different overlap depths in each row without noting a reason. Choose one overlap depth, mark it with a tick, and repeat it unless a fold is intended.
- Leaving hidden plate outlines dark, which creates visual clutter. Keep hidden outlines light or erase them after darkening the visible edge.
- Labeling segments without a key, so the labels cannot be checked. Add a short key listing each label and its row position.
Self-check rubric
- Scale ratio is written and used consistently.
- Wing outline is closed and divided into three rows.
- Plates are drawn from trailing edge to leading edge with a consistent overlap direction.
- Overlap depth is marked and repeated within each row.
- Hidden outlines are light or erased; visible edges are clear.
- At least six segments are labeled and a key is present.
- Measurements are recorded in one unit system and checked by multiplication.
Questions and answers
Do I need to draw a full dragon wing?
No. This is an overlay study of plate and feather-like segments. Keep the outline simplified and focus on overlap logic.
What scale should I use?
Any consistent ratio works. A hypothetical example is 1 cm on paper equals 10 cm on the imagined wing. Write your chosen ratio at the top.
Can plate shapes vary?
Yes. Rounded quadrilaterals and tapered feather-like shapes are both valid if the overlap direction and depth convention stay consistent.
How many segments should I label?
Label at least six segments across the rows and include a key. More labels are fine if the key stays readable.