Free original lessons
Cross-Contour Pepper Drawing: Wrap Lines Around Lobes
Learn to draw a bell pepper using cross-contour lines that wrap around its lobed form, with guided steps, a worked example, and four practice tasks.
Free lesson
Four exercises
Worked answers
Object Drawing Lessons
Cross-contour lines are lines that travel across a form, like stripes wrapping around a rounded object. Unlike an outline, which only traces the edge, cross-contour lines describe the surface between edges. In this lesson you will draw a bell pepper by imagining lines that hug its lobes, dip into its creases, and curve over its bulges. The goal is not shading or botanical detail but a clear map of the pepper's three-dimensional shape. You will use a simple convention: each cross-contour line is a continuous curve that starts at one edge, crosses the pepper's surface, and ends at another edge. Where the surface bulges toward you, the line curves outward; where it dips into a crease, the line bends inward. Letter styles and line weights may vary, so the rubric rewards consistent wrapping and clear crease behavior rather than a single correct drawing. All measurements and numerical examples below are hypothetical and should be checked against your actual paper and tools.
Practice materials: Printable downloads are not available for this lesson yet. Use the instructions and four exercises below.
Reference illustration
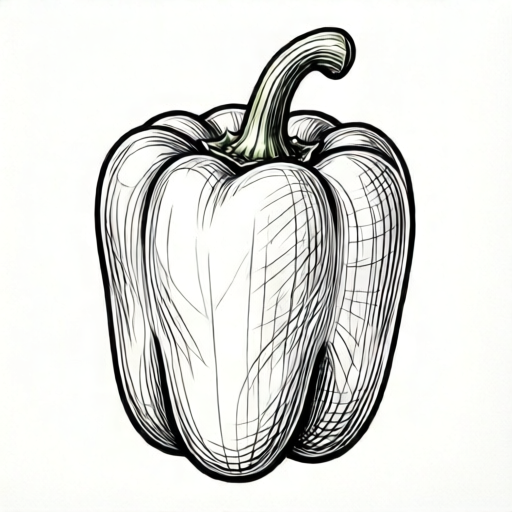
Use the stated measurements and conventions for each exercise.
Understanding cross-contour lines on a lobed form
A bell pepper has several vertical lobes separated by creases. Imagine elastic bands stretched around the pepper from top to bottom. Each band would curve over a lobe and sink into the crease beside it. Cross-contour lines work the same way: they are drawn across the form, not around its silhouette. On a lobe that faces you, the line bows outward. In a crease, the line pinches inward. Near the top stem, lines may curve more tightly; near the bottom, they may flatten slightly.
Use a consistent convention: draw each line as a single smooth curve from one visible edge to another, and let the line change direction only where the surface changes. Avoid stopping mid-surface unless the line reaches a crease. This convention makes your drawing checkable: a reader can follow each line and see whether it wraps logically around the lobes.
- Lightly sketch the pepper's outer silhouette, including the stem and the main lobe edges.
- Mark the creases between lobes with faint dashed guides.
- Draw one cross-contour line from the left edge to the right edge, bowing outward over each lobe and dipping inward at each crease.
- Repeat with three to five more lines spaced roughly evenly down the pepper, keeping the same wrapping logic.
- Check that every line starts and ends on an edge or crease and that no line crosses another without a clear surface reason.
Placing lines and handling creases
Spacing matters. If lines are too far apart, the form looks flat; if too close, the drawing becomes busy. A practical starting point is to place lines at roughly equal intervals along the pepper's height, then adjust where a crease demands a tighter curve. For example, on a pepper about 12 cm tall, you might plan five lines spaced about 2 cm apart as a hypothetical guide, then measure your actual pepper and paper to choose real spacing.
Creases are where cross-contour lines do their most important work. When a line reaches a crease, it should bend inward toward the crease's deepest point, then continue outward over the next lobe. If a line passes straight across a crease without dipping, the crease will look flat. If a line dips too sharply, it may look like a fold rather than a surface curve. Aim for a gentle inward bend that matches the crease's depth.
- Measure your pepper's height and width with a ruler; record the values in centimeters.
- Divide the height by the number of planned lines to estimate spacing; label this as a hypothetical starting value.
- Draw the first line near the top, following the stem's base and the upper lobes.
- At each crease, pause and adjust the curve inward before continuing.
- Compare line spacing across lobes; if one lobe has much wider gaps, add a line there.
Checking your drawing against the form
A good cross-contour drawing can be checked by tracing each line with your finger. Does the line wrap over a bulge and dip into a crease? Does it start and end at a sensible edge? Do neighboring lines stay roughly parallel over the same lobe? These checks do not require shading or botanical accuracy. They test whether the lines describe the pepper's volume.
Another check is to rotate your paper slightly and view it from arm's length. Lines that were meant to wrap may appear to flatten if their curvature is inconsistent. Adjust the curve, not the outline, to restore the wrapping effect. Remember that letter styles and line weights vary; a heavier line is acceptable if it still follows the same wrapping convention.
- Trace each cross-contour line with a finger and say aloud whether it bows outward or dips inward.
- Check that every line begins and ends on an edge or crease.
- Look for lines that cross a crease without dipping; redraw those sections.
- Confirm that no line is a closed loop unless it intentionally circles the stem.
- Compare the drawing to the pepper from two viewing angles to test consistency.
Worked example
A pepper is 10 cm tall and has three visible lobes with two creases. Plan five cross-contour lines and describe where each line dips.
Worked answer
Divide 10 cm by 5 to get a hypothetical spacing of 2 cm. Place lines at about 2, 4, 6, 8, and 10 cm from the bottom. Each line bows outward over the three lobes and dips inward at the two creases. The top line curves more tightly near the stem; the bottom line is slightly flatter. Every line starts at the left edge and ends at the right edge, passing through both creases with a gentle inward bend.
Four practice exercises
Exercise 1
A pepper is 8 cm tall with two lobes and one central crease. Plan four cross-contour lines and state the hypothetical spacing.
Show answer and check
Spacing is 8 cm divided by 4, or 2 cm. Lines are placed at about 2, 4, 6, and 8 cm from the bottom. Each line bows outward over both lobes and dips inward at the central crease.
Why: Dividing height by the number of lines gives even spacing; the single crease means each line has one inward dip.
Check: Verify that 4 times 2 cm equals 8 cm and that each described line includes exactly one crease dip.
Exercise 2
A pepper is 12 cm tall with three lobes and two creases. You want five lines. Where do the lines go, and how many dips does each line have?
Show answer and check
Hypothetical spacing is 12 cm divided by 5, or 2.4 cm. Lines are placed at about 2.4, 4.8, 7.2, 9.6, and 12 cm from the bottom. Each line has two dips, one at each crease.
Why: Five lines over 12 cm gives 2.4 cm spacing; two creases mean two inward dips per line.
Check: Confirm that 5 times 2.4 cm equals 12 cm and that the number of dips equals the number of creases.
Exercise 3
A drawing shows three cross-contour lines that pass straight across a crease without dipping. Describe the fix and how to check it.
Show answer and check
Redraw each line so it bends gently inward at the crease, then continues outward over the next lobe. Check by tracing each line with a finger: it should dip at the crease and bow over the lobes.
Why: Straight lines across a crease fail to describe the surface dip, so the form looks flat.
Check: Trace each line and confirm an inward bend at every crease; compare with the pepper's actual crease depth.
Exercise 4
A pepper is 9 cm tall with two lobes and one crease. You plan three lines. State the spacing and explain why a fourth line might be added.
Show answer and check
Hypothetical spacing is 9 cm divided by 3, or 3 cm. A fourth line might be added if the gaps between lines look too wide on a lobe, improving the wrapping description without changing the convention.
Why: Three lines give 3 cm spacing; adding a line reduces spacing and can clarify a wide lobe.
Check: Check that 3 times 3 cm equals 9 cm; if adding a line, recompute spacing as 9 cm divided by 4, or 2.25 cm.
Common mistakes
- Drawing cross-contour lines as straight horizontal lines across the pepper. Curve each line outward over lobes and inward at creases so it follows the surface.
- Stopping a line in the middle of a lobe. Continue the line to an edge or crease, or erase the partial line and redraw it fully.
- Making every line dip sharply at every crease, creating a zigzag. Match the dip depth to the crease depth; shallow creases need only a gentle bend.
- Spacing lines evenly without regard to lobe width. Add or remove lines so spacing stays roughly consistent across each lobe.
Self-check rubric
- Lines wrap consistently over lobes and dip into creases.
- Each line starts and ends at an edge or crease.
- Line spacing is roughly even across each lobe.
- Crease dips match crease depth without zigzagging.
- Drawing uses the defined convention; valid alternative line styles are accepted if wrapping logic is clear.
Questions and answers
Do I need to shade the pepper?
No. This lesson focuses on cross-contour lines only. Shading is outside the boundary of this task.
Can I use a ruler for the lines?
A ruler can help with spacing marks, but the lines themselves should be freehand curves that follow the form.
How many cross-contour lines should I draw?
Three to six lines are usually enough to describe the lobes. Choose a number that keeps spacing readable on your paper size.
What if my pepper has an unusual shape?
Follow the same convention: lines wrap over bulges and dip into creases. The rubric rewards consistent wrapping, not a standard pepper shape.