Free original lessons
Cupid Figure Drawing: Bow, Wings, and Arrow Construction
Learn to draw a Cupid with a proportion guide, bow shape breakdown, wing attachment diagram, and arrow placement. Includes practice tasks and a rubric.
Free lesson
Four exercises
Worked answers
Object Drawing Lessons
This guide teaches a clear, repeatable way to construct a Cupid figure. You will set a simple proportion guide, build a bow that reads as drawn or relaxed, attach wings so they sit behind the shoulders, and place an arrow that points convincingly. The method uses basic shapes and checkable steps, so you can redraw the figure at different sizes. All measurements are hypothetical examples; measure your own paper and tools. The focus is construction, not facial expression or scene design.
Practice materials: Printable downloads are not available for this lesson yet. Use the instructions and four exercises below.
Reference illustration
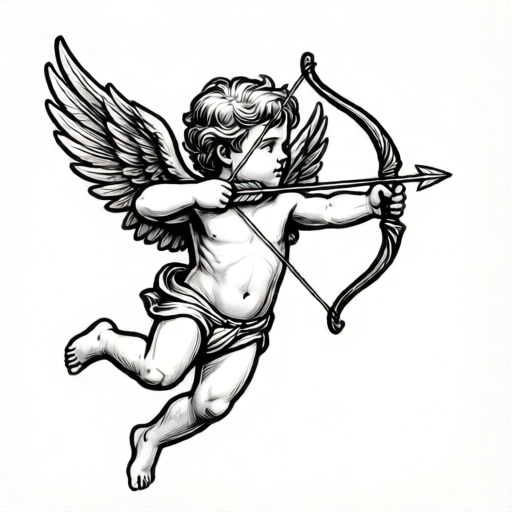
Use the stated measurements and conventions for each exercise.
Set the figure proportion guide
Start with a vertical line for the body axis. Mark a head height, then repeat it to set total figure height. A common approach is a figure of about six head heights, but you can choose five to seven. Label the top mark as the crown and the bottom as the feet. Add a shoulder line about one and a quarter head heights below the crown, and a hip line about three head heights below the crown. These are guides, not final outlines.
Use light marks so you can adjust. Check that the shoulder line is wider than the head and that the hip line is narrower than the shoulder line. This gives a simple, readable body shape for a Cupid figure. Keep the axis straight unless you deliberately want a lean.
- Draw a light vertical axis.
- Mark the crown and feet, then divide the axis into equal head-height units.
- Add shoulder and hip lines at the chosen proportions.
- Check widths: shoulders wider than head, hips narrower than shoulders.
Build the bow shape
A bow reads clearly when it has a curved limb, a grip, and a string. Draw the bow as a shallow arc with a thicker middle and tapered ends. The string is a straight line between the two ends. For a drawn bow, pull the string back toward the body and bend the limbs slightly more. For a relaxed bow, keep the string straight and the limbs gently curved.
Place the bow so the grip sits near the hand. The bow can be vertical or tilted; choose one angle and keep the string and limbs consistent with it. Check that the string does not cross the limbs except at the ends.
- Draw a shallow arc for the bow limb.
- Thicken the middle for the grip and taper the ends.
- Add a straight string between the ends.
- For a drawn bow, pull the string toward the body and increase limb bend.
- Check that the string meets only the ends.
Attach the wings behind the shoulders
Wings should attach behind the shoulder line, not on the chest. Draw two wing shapes that start near the upper back and spread outward. Use a simple feather convention: overlapping curved shapes that get smaller toward the tip. The wing root should sit just inside the shoulder width so the wings read as attached to the body.
Check that the wings do not cover the bow arm completely. Leave space for the bow and arrow to read. If the wings overlap the body, erase the body line where the wing sits in front, or keep the wing behind and redraw the body edge.
- Mark wing roots just inside the shoulder line on the back side.
- Draw the upper wing edge as a smooth curve outward.
- Add overlapping feather shapes that shrink toward the tip.
- Check that wings sit behind the shoulders and leave the bow arm visible.
Place the arrow and check the construction
The arrow is a straight shaft with a tip and fletching. Place it so it aligns with the bow string and the aim direction. For a drawn bow, the arrow rests near the grip and points forward. For a relaxed bow, the arrow can be held loosely or set aside. Keep the shaft straight and the tip clear of the body.
Final check: the figure axis is straight, the bow string meets only the ends, the wings attach behind the shoulders, and the arrow points in a believable direction. Adjust any line that breaks these checks.
- Draw a straight shaft for the arrow.
- Add a tip at the front and fletching at the back.
- Align the arrow with the bow string and aim direction.
- Check that the tip is clear of the body and the shaft is straight.
Worked example
Construct a Cupid figure on a 20 cm by 28 cm sheet using a six-head-height guide. The head height is 3 cm. Place the shoulder line 1.25 head heights below the crown and the hip line 3 head heights below the crown. Draw a relaxed bow with a straight string, attach wings behind the shoulders, and place a straight arrow pointing forward.
Worked answer
The figure is 18 cm tall (6 × 3 cm). The shoulder line is 3.75 cm below the crown (1.25 × 3 cm). The hip line is 9 cm below the crown (3 × 3 cm). The bow is a shallow arc with a thicker grip and tapered ends; the string is a straight line between the ends. Wings attach just inside the shoulder width on the back side and spread outward. The arrow is a straight shaft with a tip and fletching, aligned with the bow string and pointing forward. Check that the string meets only the ends, the wings sit behind the shoulders, and the arrow tip is clear of the body.
Four practice exercises
Exercise 1
On a 15 cm by 20 cm sheet, set a five-head-height guide with a head height of 2.5 cm. Mark the crown, feet, shoulder line at 1.25 head heights below the crown, and hip line at 3 head heights below the crown. Draw only the guide lines and label the measurements.
Show answer and check
Figure height is 12.5 cm (5 × 2.5 cm). Shoulder line is 3.125 cm below the crown (1.25 × 2.5 cm). Hip line is 7.5 cm below the crown (3 × 2.5 cm). The guide shows a vertical axis, crown, feet, shoulder line, and hip line with labels.
Why: Multiply the head height by the number of head heights for total height. Multiply the head height by the shoulder and hip multipliers to place the lines. Keep units in centimeters.
Check: Measure each marked distance with a ruler. Confirm the shoulder line is wider than the head and the hip line is narrower than the shoulder line.
Exercise 2
Draw a relaxed bow on a 10 cm wide space. The bow limb is a shallow arc 8 cm tall. The string is a straight line between the ends. Add a thicker grip in the middle. Describe or draw the bow so the string meets only the ends.
Show answer and check
A shallow arc 8 cm tall with tapered ends, a thicker middle grip, and a straight string connecting the two ends. The string does not cross the limbs except at the ends.
Why: A relaxed bow keeps the string straight and the limbs gently curved. The grip is thicker for readability. The string must connect only the ends to read as a bow.
Check: Trace the string with a finger: it should touch only the two ends. Check that the arc is shallow and the grip is visibly thicker.
Exercise 3
Attach two wings behind the shoulders of a figure whose shoulder width is 6 cm. Place the wing roots 1 cm inside each shoulder end on the back side. Draw overlapping feather shapes that shrink toward the tips. Check that the wings do not cover the bow arm completely.
Show answer and check
Wing roots are placed 1 cm inside each shoulder end on the back side. Feather shapes overlap and shrink toward the tips. The bow arm remains visible.
Why: Wings attach behind the shoulders, not on the chest. Placing roots inside the shoulder width keeps them attached to the body. Overlapping feathers give a simple wing convention.
Check: Measure 1 cm inside each shoulder end. Confirm the wing roots are on the back side and the bow arm is not fully hidden.
Exercise 4
Place an arrow for a drawn bow. The bow string is pulled back 4 cm from the relaxed position. Draw a straight arrow shaft 10 cm long with a tip and fletching. Align the arrow with the string and aim direction. Check that the tip is clear of the body by at least 2 cm.
Show answer and check
A straight 10 cm shaft with a tip and fletching, aligned with the pulled string and aim direction. The tip is at least 2 cm clear of the body.
Why: For a drawn bow, the string is pulled back and the arrow aligns with the string and aim. A straight shaft reads clearly. Keeping the tip clear of the body avoids overlap.
Check: Measure the shaft length and the clearance from the tip to the body. Confirm the shaft is straight and aligned with the string.
Common mistakes
- Drawing the bow string across the limbs. Erase the string and redraw it as a straight line that meets only the two ends of the bow.
- Attaching wings on the chest instead of behind the shoulders. Move the wing roots to the upper back, just inside the shoulder line, and redraw the body edge where needed.
- Making the arrow shaft bent or misaligned with the bow. Use a light guide line for the arrow direction, then draw the shaft straight along it.
- Using unequal head-height units for the proportion guide. Measure each unit with the same tool and mark them before drawing the body.
Self-check rubric
- Figure axis is straight and proportion guide uses equal head-height units.
- Shoulder and hip lines are placed consistently with the chosen proportion.
- Bow has a curved limb, thicker grip, tapered ends, and a string that meets only the ends.
- Wings attach behind the shoulder line and spread outward without hiding the bow arm completely.
- Arrow shaft is straight, has a tip and fletching, and aligns with the bow string and aim direction.
- Valid alternatives are accepted: different head heights, bow angles, wing feather conventions, and relaxed or drawn bow variants, provided the construction checks hold.
Questions and answers
Do I need to use six head heights?
No. Five to seven head heights works. Choose one and keep it consistent. The guide is a construction aid, not a rule.
Can the bow be relaxed instead of drawn?
Yes. Keep the string straight and the limbs gently curved. The arrow can be held loosely or set aside.
How do I know the wings are attached correctly?
The wing roots sit behind the shoulder line, and the wings spread outward without covering the bow arm completely.
What if my paper is a different size?
Measure your actual paper and scale the head-height unit to fit. Label any chosen numbers as examples.