Free original lessons
Draw 3D Solid Figures: Depth Lines and Shading Practice
Learn to draw cubes, cylinders, and cones with clear depth lines and simple light-source shading. Includes steps, common fixes, and four practice tasks.
Free lesson
Four exercises
Worked answers
Object Drawing Lessons
This guide teaches a reliable method for drawing simple 3D solids so they read as solid, not flat. You will use depth lines to show edges that recede and a single light source to plan shading. The convention is explicit: depth lines are drawn as straight segments that connect front features to back features, and shading uses three tonal zones (light, mid, dark) with smooth transitions. Line style can vary; the rubric rewards consistent depth direction and shading logic. All measurements are hypothetical examples; measure your own paper and tools. Work on plain paper with a pencil, eraser, and a straightedge. Keep units consistent (millimeters or centimeters) and label any chosen values as examples.
Practice materials: Printable downloads are not available for this lesson yet. Use the instructions and four exercises below.
Reference illustration
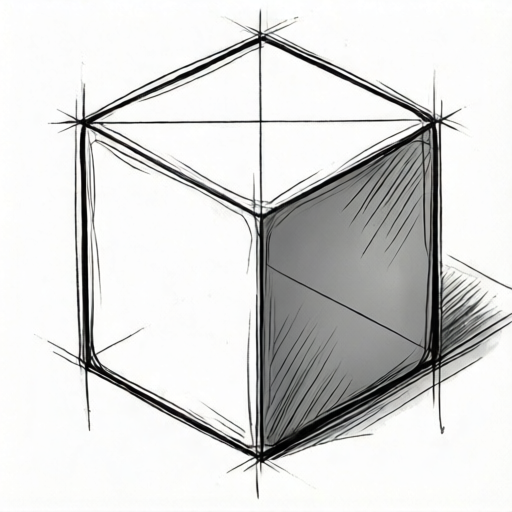
Use the stated measurements and conventions for each exercise.
Set up the page and choose a light source
Place the page so you can see it without tilting your head. Decide one light direction, for example from the upper left. Mark a small arrow in the corner of the page to record it. This arrow is your reference for every figure on the page.
Use a pencil that makes a clear but erasable line. A straightedge helps with depth lines, but freehand is acceptable if the lines are straight enough to check. Keep a consistent scale: if the cube front is 40 mm wide, use 40 mm for the front square and a shorter depth, such as 20 mm, for the receding edges. These numbers are hypothetical examples.
- Draw a light arrow in one corner showing the light direction.
- Draw a faint horizon-free baseline for each figure so they sit on the page consistently.
- Choose a front face size and a depth length; write them small at the page edge as a reminder.
- Keep the pencil sharp and erase construction lines only after the final lines are clear.
Draw the cube with depth lines
Start with a square for the front face. From each front corner, draw a depth line going back in one chosen direction, for example up and to the right; with that direction the lower-left depth line is hidden and should be erased or left very faint. If you choose up and to the left, the lower-right depth line is hidden instead. The depth lines should be parallel to each other and shorter than the front edges. Connect the back ends with a back square, but only draw the edges you would actually see. The depth direction is independent of the light direction; choose one depth direction and keep it the same for every figure on the page.
Check the depth lines by comparing their lengths: all four construction rays use the same depth. In this up-right convention, the lower-left depth ray lies behind the front square and is hidden. Show the back-left vertical only where it emerges above the front face; erase the portion covered by the face. The other visible back edges close the top and right side.
- Draw the front square with four equal sides.
- From all four corners of the front square, draw four parallel depth lines of equal length; the lower-left depth line is hidden if going up-right, and the lower-right depth line is hidden if going up-left.
- Erase or faint any line that would be hidden behind the solid.
- Add shading: the face facing the light is light, the top or side is mid, and the face away from the light is dark.
Draw the cylinder and cone with depth and shading
For a cylinder, draw two ellipses (ovals) for the top and bottom that share the same horizontal major-axis width, then connect their leftmost and rightmost extremes with two vertical sides. The ellipses show the curved top and bottom in perspective; the top ellipse may be drawn slightly flatter (smaller minor axis) than the bottom to suggest viewing angle, but both must keep the same major-axis width so the cylinder does not look tapered. Keep the vertical sides parallel. Shade the side away from the light dark, the middle mid, and the side facing the light light, with a smooth transition.
For a cone, draw an ellipse for the base and a point above it. Connect the point to the widest parts of the ellipse with two straight sides. The depth is shown by the ellipse and by a faint center line from the point to the base center. Shade the side away from the light dark and the side toward the light light, blending through mid tone.
- Cylinder: draw the bottom ellipse, then the top ellipse directly above with the same width.
- Connect the left and right extremes with vertical lines.
- Cone: draw the base ellipse, mark the center, and place the point above it.
- Draw two straight sides from the point to the ellipse edges.
- Add a faint center depth line from the point to the base center.
- Shade in three zones according to the light arrow.
Check your drawing against the convention
Use a simple checklist: depth lines are parallel and equal in length; hidden lines are removed or faint; shading has three clear zones that match the light arrow; and the figure sits on the baseline. Measure the front edges and depth lines with a ruler to confirm equality where required.
Valid alternatives are allowed. For example, you may shade with crosshatching instead of smooth blending, or you may leave construction lines visible if they are clearly lighter. The rubric checks consistency and logic, not a single style.
- Compare all depth lines for parallelism and equal length.
- Confirm the light arrow matches the light, mid, and dark zones.
- Check that the figure rests on the baseline without floating.
- Erase stray marks and confirm the final lines are the darkest.
Worked example
Draw a cube with a 40 mm front square and 20 mm depth lines, light from the upper left. Show depth lines and three shading zones.
Worked answer
Front square is 40 mm by 40 mm. From all four corners, draw four parallel depth lines of 20 mm going back to the upper right. Connect the back ends to form the back top edge, back right edge, and exposed portion of the back-left vertical edge. Erase the hidden back-bottom edge and the lower-left depth line (the hidden depth line for this up-right direction). With the light arrow at the upper left, shade the front face light, the top face mid, and the right side dark. Check that the three visible depth lines are 20 mm and parallel.
Why: The front square establishes the face size. Equal parallel depth lines create the illusion of depth. Removing hidden lines keeps the solid readable. Shading zones follow the light arrow so the form looks three-dimensional.
Check: Measure the three visible depth lines to confirm they are each 20 mm (the hidden fourth is erased or faint). Confirm the front square sides are 40 mm. Check that the light face is toward the upper left and the dark face is opposite, and that the depth direction is consistently up and to the right.
Four practice exercises
Exercise 1
Draw a cube with a 30 mm front square and 15 mm depth lines, light from the upper right. Show depth lines and shading.
Show answer and check
Front square 30 mm by 30 mm. Four parallel depth lines of 15 mm going back to the upper left. Connect back ends to form the back top edge, back left edge, and back-right vertical edge; erase the hidden back-bottom edge and the lower-right depth line (hidden for the up-left direction). Shade front light, top mid, left side dark.
Why: Equal depth lines and a consistent light arrow create a readable solid. The front face faces the light, so it is light; the side away from the light is dark.
Check: Measure the three visible depth lines to confirm 15 mm each and check parallelism (the hidden fourth is erased or faint). Confirm the dark side is opposite the upper-right light arrow and the depth direction is consistently up and to the left.
Exercise 2
Draw a cylinder with a bottom ellipse 40 mm wide and a top ellipse 40 mm wide, height 50 mm, light from the left. Show shading.
Show answer and check
Two ellipses with equal 40 mm major-axis width, connected by two vertical sides 50 mm long (the cylinder height). Shade the left side light, the middle mid, and the right side dark.
Why: Equal ellipse widths keep the cylinder from looking tapered. Vertical sides show the height. Shading follows the left light source.
Check: Measure the widest part (major axis) of each ellipse to confirm 40 mm. Measure the vertical sides to confirm they are 50 mm long and parallel. Check that the dark zone is on the right, opposite the left light source.
Exercise 3
Draw a cone with a base ellipse 50 mm wide and a point 60 mm above the base center, light from the upper left. Show the center depth line and shading.
Show answer and check
Base ellipse 50 mm wide, center marked, point 60 mm above. Two straight sides from the point to the ellipse edges. Faint center depth line from point to base center. Shade upper-left side light, middle mid, lower-right dark.
Why: The ellipse and center line show depth. The straight sides define the cone. Shading follows the upper-left light.
Check: Measure the base width and the height from base center to point. Confirm the center line is faint and the dark zone is opposite the light arrow.
Exercise 4
Draw a cube with a 25 mm front square and 12 mm depth lines, light from directly above. Show depth lines and shading.
Show answer and check
Front square 25 mm by 25 mm. Four parallel depth lines of 12 mm going back to the upper right. Connect back ends to form the back top edge, back right edge, and exposed portion of the back-left vertical edge; erase the hidden back-bottom edge and the lower-left depth line (hidden for the up-right direction). With light from directly above, shade the top face light, the front face mid, and the right side dark.
Why: With light from above, the top face is lightest. Equal depth lines keep the cube consistent.
Check: Measure the three visible depth lines to confirm 12 mm each (the hidden fourth is erased or faint). Check that the top face is the lightest zone, the front is mid, and the right side is darkest, consistent with the light arrow directly above and the up-right depth direction.
Common mistakes
- Depth lines are not parallel or have different lengths. Redraw the depth lines from each corner using the same direction and measure them to be equal.
- Shading is random and does not match the light arrow. Re-check the arrow and assign light, mid, and dark zones before shading; keep transitions smooth.
- Hidden lines are drawn as dark as visible lines. Erase hidden lines or make them very faint so the solid reads clearly.
- The cylinder ellipses have different widths. Measure the widest part of each ellipse and adjust so they match.
Self-check rubric
- Depth lines are parallel and equal in length where required.
- Hidden lines are removed or clearly fainter than visible lines.
- Shading has three distinct zones (light, mid, dark) that match the light arrow.
- The figure sits on the baseline and reads as a solid, not a flat shape.
- Valid alternatives (crosshatching, visible construction lines) are accepted if consistent.
Questions and answers
Do I need a ruler for every line?
A ruler helps with depth lines and front edges, but freehand is acceptable if the lines are straight enough to check. Use the ruler to verify equality, not to force a perfect look.
Can I use crosshatching instead of smooth shading?
Yes. The convention allows any shading method that produces three clear tonal zones matching the light arrow. Crosshatching is valid if the zones are distinct.
How long should the depth lines be?
Choose a length shorter than the front edge and keep it equal for all depth lines. For example, a 40 mm front edge with 20 mm depth lines is a hypothetical example; measure your own page.
How deep should the receding edges be?
Choose a depth length that fits the face and use it consistently for every receding edge; check parallelism and the hidden edge.