Free original lessons
Draw a Stylized Black Hole: Event Horizon, Accretion Disk, and Layered Glow
Learn a repeatable layered method for drawing a black hole with an event horizon, tilted accretion disk, and soft glow bands using simple geometry and shading.
Free lesson
Four exercises
Worked answers
Object Drawing Lessons
This guide teaches a stylized scientific illustration of a black hole. You will construct three clear layers: a circular event horizon, an elliptical accretion disk that passes in front of and behind it, and concentric glow bands that suggest intense light. The method uses a defined drawing convention so that valid variations in line weight, shading, and color are accepted. All measurements are hypothetical examples; measure your own paper and tools before drawing. Work lightly in pencil first, then commit to final lines and shading.
Practice materials: Printable downloads are not available for this lesson yet. Use the instructions and four exercises below.
Reference illustration
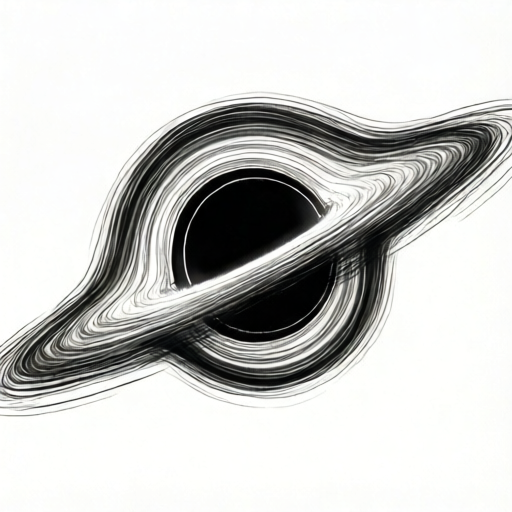
Use the stated measurements and conventions for each exercise.
Set the frame and the event horizon
Choose a drawing area and mark a light rectangular border. Inside it, locate a center point for the black hole. The event horizon is a circle drawn with a compass or a traced round object. Keep this circle clean and dark; it represents the boundary beyond which light cannot escape in this stylized illustration.
Define a convention before you start: the event horizon is a solid black circle with a crisp edge, and the accretion disk is an ellipse whose long axis is tilted. Record your chosen tilt angle and ellipse proportions on the page margin so your layers stay consistent.
- Mark a center point and a light border around your drawing area.
- Draw a circle for the event horizon using a compass or traced round object; label its radius as a hypothetical example such as 3 cm.
- Lightly mark the ellipse long axis at your chosen tilt, for example 20 degrees above horizontal.
- Check that the circle is round by rotating the paper and comparing opposite edges.
Construct the accretion disk as a tilted ellipse
The accretion disk is an ellipse centered on the event horizon. Its long axis is wider than the circle, and its short axis is narrower. Draw the full ellipse lightly, then decide which half passes in front of the event horizon and which half passes behind. In this convention, the front half is drawn with a slightly heavier line and overlaps the black circle; the back half is interrupted by the circle.
Add two or three concentric ellipse guides inside the disk to suggest orbital paths. These guides should share the same center and tilt. Keep spacing even; a hypothetical example is 0.5 cm between guides. Do not add astrophysics equations or real telescope details.
- Draw a full light ellipse centered on the event horizon with a long axis about twice the circle diameter.
- Mark the front half of the ellipse with a heavier line where it crosses the black circle.
- Erase the back half of the ellipse where the event horizon covers it.
- Add two or three inner ellipse guides with consistent spacing and tilt.
Add layered glow bands
Glow bands are concentric rings or partial arcs around the event horizon and disk. Draw them as smooth outlines at increasing distances from the black circle. Use a convention: the innermost glow band is brightest and narrowest, and outer bands become wider and softer. You may show glow as line hatching, stippling, or smooth shading, but keep the band order consistent.
Where the accretion disk crosses a glow band, decide whether the disk or the glow sits in front. In this stylized method, the front half of the disk sits in front of the glow, and the back half is behind the event horizon. This creates a readable layered effect without claiming physical accuracy.
- Draw two or three concentric glow outlines around the event horizon, spaced evenly.
- Shade the innermost band with tight hatching or dark tone.
- Shade outer bands with progressively lighter and wider marks.
- Check that the front disk half overlaps the glow and the back half is hidden by the event horizon.
Refine contrast and finalize the layers
Increase contrast by darkening the event horizon to solid black and strengthening the front edge of the accretion disk. Keep the glow bands lighter than the disk edge so the layers remain distinct. Use an eraser to clean stray guide lines, but preserve the intentional overlap between the front disk and the black circle.
Review the drawing against the convention you recorded. Valid alternatives include different tilt angles, line weights, and shading textures, provided the three layers remain readable: event horizon, accretion disk, and glow bands.
- Darken the event horizon to solid black with a crisp edge.
- Strengthen the front half of the accretion disk outline.
- Soften or lighten outer glow bands to maintain layer order.
- Erase guide lines and check that all three layers are clearly distinguishable.
Worked example
A learner draws an event horizon circle with a hypothetical radius of 3 cm, then draws a full ellipse with a long axis of 12 cm and a short axis of 6 cm centered on the same point. They tilt the long axis 20 degrees above horizontal. Describe the correct layering and one check.
Worked answer
The event horizon remains a solid black circle. The ellipse is drawn lightly, then the front half is strengthened where it crosses the circle, and the back half is erased where the circle covers it. Two inner ellipse guides are added with even spacing. Two glow outlines are drawn around the circle, with the inner one darker and narrower. Check: the front disk half overlaps the black circle, while the back half does not cross it.
Four practice exercises
Exercise 1
On a blank frame, draw an event horizon circle with a hypothetical radius of 2.5 cm. Add a tilted ellipse with a long axis of 10 cm and a short axis of 5 cm. Show the front half overlapping the circle and the back half hidden. Add one glow outline.
Show answer and check
A solid black circle centered in the frame, a tilted ellipse centered on the same point, the front half of the ellipse drawn over the circle, the back half erased where the circle covers it, and one smooth glow outline around the circle.
Why: The circle defines the event horizon. The ellipse defines the accretion disk. The overlap convention makes the front and back halves readable. The glow outline adds the first layered glow band.
Check: Rotate the paper and confirm the circle is round. Confirm the ellipse shares the same center. Confirm the back half does not cross the black circle.
Exercise 2
Draw a black hole with an event horizon circle of hypothetical radius 3 cm and an accretion disk ellipse tilted 30 degrees above horizontal. Add two inner ellipse guides with even spacing and two glow bands. Describe how you keep the layer order clear.
Show answer and check
The event horizon is solid black. The disk ellipse is tilted 30 degrees, with two inner guides sharing the same center and tilt. The front half of the disk is heavier and overlaps the circle; the back half is interrupted. Two glow bands surround the circle, the inner darker and narrower, the outer lighter and wider.
Why: Consistent center and tilt keep the disk guides coherent. The overlap convention separates front and back. Glow bands are ordered by width and darkness to suggest layered light.
Check: Measure the spacing between inner ellipse guides along the long axis; they should be equal. Check that the inner glow band is darker or narrower than the outer band.
Exercise 3
Create a stylized black hole drawing using stippling for the glow bands instead of hatching. Use an event horizon circle and a tilted accretion disk. State your chosen tilt and one hypothetical measurement.
Show answer and check
A solid black event horizon circle, a tilted accretion disk ellipse with the front half overlapping the circle, and two or more glow bands shown by stippling that becomes sparser outward. The chosen tilt and one measurement, such as a hypothetical circle radius of 2 cm, are recorded on the margin.
Why: Stippling is a valid shading alternative if the band order remains clear. Recording the tilt and measurement keeps the construction consistent.
Check: Confirm the stippling is denser in the inner glow band and sparser outward. Confirm the front disk half still overlaps the event horizon.
Exercise 4
Draw a black hole with three glow bands and an accretion disk. Then write a short self-check listing two mistakes you avoided and one valid alternative you used.
Show answer and check
A layered drawing with a solid black event horizon, a tilted disk with correct front and back overlap, and three glow bands ordered from narrow and dark to wide and light. The self-check names avoided mistakes such as a flat disk or equal glow bands, and one valid alternative such as a different tilt angle or shading texture.
Why: The self-check reinforces the convention and shows that alternatives are acceptable when the three layers remain readable.
Check: Verify that all three glow bands are distinguishable and that the disk overlap convention is followed. Read the self-check to confirm it matches the drawing.
Common mistakes
- Drawing the accretion disk as a flat horizontal line instead of a tilted ellipse. Use a full ellipse guide centered on the event horizon and mark a consistent tilt angle before committing to final lines.
- Letting the back half of the disk cross over the event horizon. Erase the back half where the black circle covers it, and keep only the front half overlapping the circle.
- Making all glow bands the same width and darkness. Use the convention that inner bands are narrow and dark, while outer bands are wider and lighter.
- Using inconsistent ellipse spacing for orbital guides. Measure equal spacing along the long axis and keep all guides sharing the same center and tilt.
Self-check rubric
- Event horizon is a clean, solid black circle with a crisp edge.
- Accretion disk is a tilted ellipse centered on the event horizon.
- Front half of the disk overlaps the event horizon; back half is interrupted by it.
- At least two glow bands are present and become lighter or wider outward.
- Layer order is readable: event horizon, disk, glow.
- Valid alternatives in tilt, line weight, and shading texture are accepted if layers remain clear.
Questions and answers
Do I need a compass to draw the event horizon?
A compass helps, but you can trace a round object. Measure the actual object you use and label any numerical radius as a hypothetical example.
Can I use color instead of pencil shading?
Yes. Keep the same layer order: solid dark event horizon, distinct accretion disk, and glow bands that become lighter outward.
How do I know which half of the disk is in front?
Choose one half and mark it with a heavier line. In this convention, the front half overlaps the event horizon and the back half is interrupted by it.
Is this drawing physically accurate?
No. This is a stylized scientific illustration method. It excludes astrophysics equations and real telescope imagery.