Free original lessons
Draw a Bodhi Tree: Heart-Shaped Leaves and Drooping Branches
Learn to sketch the bodhi tree's fig trunk, drooping branch habit, and distinctive heart-shaped leaves with veins, using a clear convention and self-check rubric.
Free lesson
Four exercises
Worked answers
Object Drawing Lessons
The bodhi tree is recognized by three features: a sturdy fig trunk, branches that droop downward, and heart-shaped leaves with a pointed tip and a vein pattern that radiates from the base. This lesson defines a drawing convention so you can build the tree in layers, check proportions with simple arithmetic, and judge your own work with a rubric that allows valid stylistic alternatives. All measurements below are hypothetical examples; measure your own paper and tools before drawing.
Practice materials: Printable downloads are not available for this lesson yet. Use the instructions and four exercises below.
Reference illustration
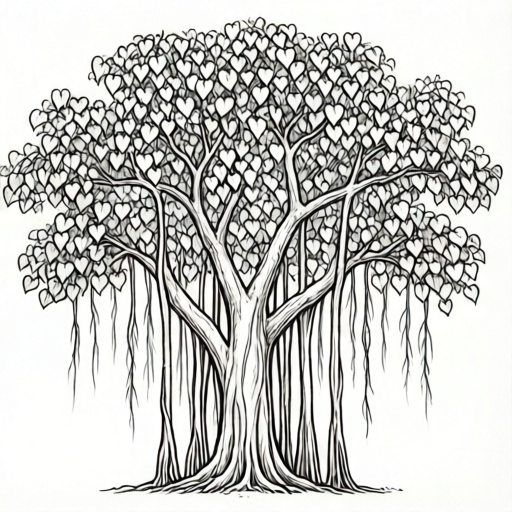
Use the stated measurements and conventions for each exercise.
Define the convention before drawing
Use a single convention throughout: the leaf outline is a heart shape with the notch at the stem end and the point at the far end. The midrib runs from the notch to the point. Side veins branch from the midrib toward the edge. Leaf size is described by length from notch to point, measured in centimeters on your paper.
Drooping branches are drawn as curved lines that leave the trunk upward, then bend outward and downward. The lowest point of a drooping branch should sit below its starting point on the trunk. Trunk width is measured at the base and at the first major branch; record both numbers so the taper is checkable.
- Measure your paper and write the width and height in centimeters at the top corner.
- Draw a vertical center line for the trunk; mark base width and upper width as hypothetical values, for example 4 cm and 2 cm.
- Add three to five drooping branch curves, each starting above the previous one and ending lower than it started.
- Sketch heart-shaped leaves along the outer third of each drooping branch, varying angle but keeping the notch at the stem.
- Add midrib and three to five side veins per leaf, then check leaf length against your chosen range.
Build the trunk and branch habit
The fig trunk is often broad at the base and tapers upward. Draw two gently curved sides rather than a straight rectangle. Mark the first branch point at roughly two-thirds of the trunk height; this is a convention, not a rule.
Drooping branches should read as gravity-driven. A branch that starts at 30 degrees above horizontal and ends 10 cm lower on the page is clearly drooping. Check each branch by comparing its start height and end height in centimeters.
- Mark trunk base width and upper width; connect with curved sides.
- Mark first branch point and draw the main drooping branch outward and down.
- Add secondary drooping branches, keeping spacing uneven but readable.
- Check that at least two branches end lower than they start.
Draw heart-shaped leaves at different angles
A heart-shaped leaf has a notch at the stem end and a point opposite. At a 0-degree angle the point faces right; at 90 degrees it faces up. Rotate the whole shape rather than distorting the notch.
Vein pattern: one midrib from notch to point, then side veins branching outward. Keep vein count between three and five per side for clarity. Leaf length can vary, for example 3 cm to 5 cm, but record your chosen range.
- Draw one leaf at 0 degrees, one at 45 degrees, and one at 90 degrees.
- Label notch, point, midrib, and one side vein on each.
- Measure each leaf length and write it beside the leaf.
- Check that every leaf has a notch at the stem end and a point opposite.
Assemble and self-check the full tree
Place leaves mainly on the outer third of drooping branches so the branch habit remains visible. Leave gaps between leaf clusters to show the branch lines.
Final check: trunk taper is visible, at least two branches droop below their start, every leaf has a notch and point, and vein pattern is consistent. Use the rubric to score each feature from 0 to 2.
- Add leaf clusters to outer branch sections.
- Erase guide lines that confuse the silhouette.
- Score trunk, branch droop, leaf shape, and vein pattern with the rubric.
- Write one improvement note based on the lowest score.
Worked example
On a 20 cm by 28 cm sheet, draw a bodhi tree with a trunk base width of 4 cm tapering to 2 cm at the first branch, three drooping branches, and five heart-shaped leaves of length 4 cm. Check that two branches end 6 cm lower than they start.
Worked answer
Trunk drawn with curved sides from 4 cm to 2 cm; first branch at about 18 cm height. Three branch curves start at 18 cm, 15 cm, and 12 cm and end at 12 cm, 9 cm, and 6 cm, so each ends 6 cm lower. Five leaves of 4 cm length placed on outer thirds, each with notch at stem and point opposite, midrib plus four side veins per side. Rubric score: trunk 2, droop 2, leaf shape 2, veins 1; improvement note: reduce vein clutter.
Four practice exercises
Exercise 1
Draw one heart-shaped leaf at 45 degrees with length 4 cm. Label notch, point, midrib, and two side veins.
Show answer and check
Leaf outline rotated so point faces upper right; notch at lower left stem end; midrib from notch to point; two side veins branching outward; length measured 4 cm.
Why: Rotation preserves the notch-to-point relationship; labeling confirms convention.
Check: Measure notch-to-point distance; confirm notch is at stem end and point opposite; count side veins.
Exercise 2
Draw a trunk 3 cm wide at base and 1.5 cm wide at first branch on a 15 cm by 21 cm sheet. State the taper difference.
Show answer and check
Curved-sided trunk from 3 cm to 1.5 cm; difference is 1.5 cm.
Why: Subtracting upper width from base width gives taper difference.
Check: Measure both widths with a ruler; subtract; compare to stated 1.5 cm.
Exercise 3
Draw two drooping branches: one starts at 16 cm height and ends at 10 cm; another starts at 12 cm and ends at 8 cm. State each drop.
Show answer and check
First drop 6 cm; second drop 4 cm; both end lower than start.
Why: Drop equals start height minus end height.
Check: Measure start and end heights; subtract; confirm positive values.
Exercise 4
Sketch a small bodhi tree with three leaves of length 3 cm, 4 cm, and 5 cm. Record the range and check every leaf has a notch and point.
Show answer and check
Range 3 cm to 5 cm; each leaf has notch at stem and point opposite; midrib present.
Why: Recording range makes size variation checkable without requiring identical leaves.
Check: Measure each leaf; confirm range; trace each outline for notch and point.
Common mistakes
- Drawing leaves as generic ovals without a notch at the stem end. Redraw each leaf with a clear notch at the stem end and a point opposite; check by tracing the outline with your finger.
- Making branches curve upward at the tips, which reads as a generic tree. Ensure at least two branch lines end lower than they start; measure start and end heights in centimeters.
- Using a straight-sided trunk with no taper. Mark base width and upper width, then connect with gently curved sides; record both measurements.
- Adding too many veins so the leaf looks cluttered. Limit side veins to three to five per side and keep the midrib continuous from notch to point.
Self-check rubric
- Trunk taper: 0 no taper, 1 slight taper, 2 clear taper with recorded widths.
- Branch droop: 0 upward tips, 1 one drooping branch, 2 at least two branches end lower than start.
- Leaf shape: 0 no notch, 1 notch unclear, 2 clear notch at stem and point opposite on every leaf.
- Vein pattern: 0 absent, 1 midrib only, 2 midrib plus three to five side veins per side.
- Measurement record: 0 none, 1 partial, 2 paper size, trunk widths, and leaf length range recorded.
Questions and answers
Must every leaf be the same size?
No. Choose a length range, for example 3 cm to 5 cm, and record it. Consistency of shape convention matters more than identical size.
How many drooping branches are enough?
Three to five readable drooping branches are sufficient for a clear silhouette; at least two must end lower than they start.
Can I draw the tree from a different angle?
Yes. The convention applies to leaf shape and branch droop regardless of viewpoint; keep the notch at the stem end and the point opposite.
What if my paper is a different size?
Measure your actual paper and scale the hypothetical values proportionally; write your measurements on the page so checks remain arithmetic.