Free original lessons
Draw a Seated Buddha Statue: Pose, Drapery, and Proportion Guide
Learn to construct a seated Buddha statue with clear pose guides, drapery fold logic, and proportion landmarks using a simple drawing convention.
Free lesson
Four exercises
Worked answers
Object Drawing Lessons
This lesson teaches a repeatable method for drawing a seated Buddha statue as a sculptural form. You will build the figure from simple proportion landmarks, establish the seated pose with a stable base, and add drapery folds that follow gravity and body contact. The approach uses a defined drawing convention: x-height is measured from baseline to midline of each letter in your own handwriting, and letter styles vary, so the convention is a guide rather than a universal standard. All measurements are checkable with simple arithmetic and consistent units. The printable construction plate, feature map, and blank drawing box are planned resources, not yet built; this text describes what they will contain so you can draw from the instructions alone.
Practice materials: Printable downloads are not available for this lesson yet. Use the instructions and four exercises below.
Reference illustration
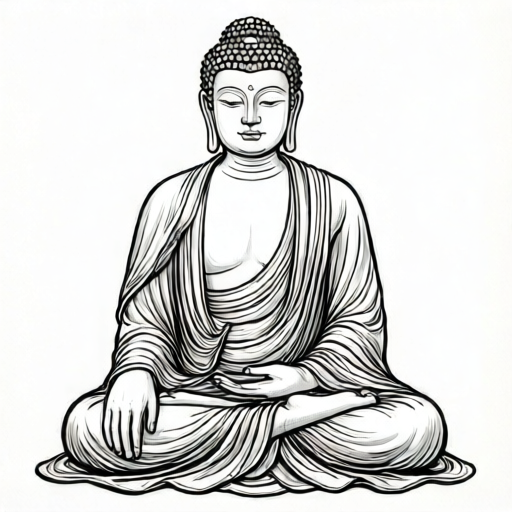
Use the stated measurements and conventions for each exercise.
Establishing Proportion Landmarks
Begin by deciding the total seated height of the statue in your drawing. Use a single unit, such as centimeters on your paper, and label it as a hypothetical example if you choose numbers. A seated Buddha statue is typically wider at the base than at the head, so plan a stable triangular silhouette. Mark four horizontal landmarks: the seat base, the crossed legs, the shoulders, and the crown of the head. Measure the distance from seat base to crown and divide it into equal parts to place the shoulders and the lap line. Keep all measurements in the same unit and write them lightly so you can adjust.
The head is drawn as an oval whose width is about one-third of the shoulder width in this convention. The neck is short and vertical, connecting the head to the shoulders without a long gap. The torso tapers from shoulders to waist, and the waist sits above the crossed legs. Because letter styles vary, treat these ratios as a starting guide: check your own drawing by measuring the actual distances on your paper and comparing them with simple arithmetic, not by matching a universal template.
- Draw a light vertical center line for the statue.
- Mark the seat base and the crown; measure the total height in your chosen unit.
- Divide the height into four equal bands and mark the lap, waist, and shoulder lines.
- Sketch the head oval, neck, shoulders, and tapered torso within the bands.
- Check each landmark by measuring from the seat base and recording the values.
Building the Seated Pose
The seated pose is built from a broad base. Draw the crossed legs as a flattened oval or a wide trapezoid, with the knees projecting outward and the feet tucked inward. The lap line sits on top of the legs and supports the torso. Keep the hips centered on the vertical center line so the statue looks balanced. The arms rest downward, with the hands near the lap; draw the upper arms close to the torso and the forearms angled slightly forward. Avoid detailed facial rendering in this lesson; the face is a simple oval with a calm horizontal midline.
Check stability by drawing a horizontal line through the widest part of the base and confirming that the center of the head falls within that width. If the head sits outside the base width, widen the legs or shift the torso. Use the same unit for all checks. The pose should read as seated even without facial detail, because the crossed legs, lap line, and centered torso carry the structure.
- Draw the crossed legs as a wide base centered on the vertical line.
- Place the lap line on top of the legs and mark the hip center.
- Draw the torso from lap to shoulders, tapering slightly at the waist.
- Add upper arms close to the torso and forearms angled toward the lap.
- Check that the head center falls within the base width.
Drapery Folds That Follow Gravity
Drapery on a seated statue follows two forces: gravity pulling fabric downward and body contact pushing fabric outward. Draw fold lines as gentle curves that start at contact points such as the shoulders, knees, and lap, then fall toward the base. Folds over the legs should radiate from the knees and gather under the crossed ankles. Folds on the torso should run from the shoulders toward the waist, curving slightly around the chest. Keep fold spacing uneven but rhythmic; avoid parallel lines that look mechanical.
Use a simple convention for fold width: measure the width of one fold at the knee and repeat a similar width nearby, then vary it by a small amount. Because letter styles vary, the exact fold shapes are not universal; the check is whether each fold starts at a plausible contact point and ends at a lower edge. Draw folds lightly first, then darken only the ones that describe the form. Do not add folds that cross the face or obscure the pose landmarks.
- Mark contact points at shoulders, knees, lap, and ankles.
- Draw curved fold lines from each contact point downward.
- Gather folds under the crossed ankles and along the base edge.
- Vary fold spacing by a small measured amount to avoid mechanical repetition.
- Check that every fold starts at a contact point and ends at a lower edge.
Checking the Finished Construction
Before adding any final line weight, check the construction against three simple tests. First, measure the total height and the base width in the same unit; record both values and confirm the base is wider than the head. Second, confirm that the shoulder line, lap line, and seat base are horizontal and evenly spaced according to your planned bands. Third, trace each drapery fold from its contact point to its lower end and remove any fold that does not follow gravity or body contact.
These checks are arithmetic and visual, not dependent on a single correct style. If a measurement is off, adjust the landmark rather than redrawing everything. Keep your recorded values beside the drawing so the check method is repeatable. The planned printable will include a labeled feature map and a blank box for drawing from the guide, but you can complete the construction on plain paper using the steps above.
- Measure total height and base width; record both in the same unit.
- Confirm horizontal alignment of shoulder, lap, and seat lines.
- Trace each fold and remove any that lack a contact point or lower end.
- Adjust landmarks where measurements differ from the plan.
- Record final values beside the drawing for a repeatable check.
Worked example
A drawing plans a seated statue with total height 16 cm and base width 10 cm. The head oval is 3 cm wide. Check whether the base is wider than the head and whether the head center falls within the base width if the head is centered on the vertical line.
Worked answer
Base width 10 cm is greater than head width 3 cm, so the base is wider. If the head is centered on the vertical line, its center is at the midpoint of the base width, so it falls within the base. The construction passes both checks.
Four practice exercises
Exercise 1
A seated statue drawing has total height 20 cm and base width 12 cm. The head oval is 4 cm wide and centered. State whether the base is wider than the head and whether the head center falls within the base width.
Show answer and check
Base width 12 cm is greater than head width 4 cm. The centered head center is at the midpoint of the base width, so it falls within the base. Both checks pass.
Why: Compare the two widths in the same unit, then locate the head center relative to the base width.
Check: Measure the base and head widths on the drawing and confirm the centered head center lies between the base edges.
Exercise 2
A drawing divides a 24 cm total height into four equal bands from seat base to crown. List the heights of the three internal landmark lines measured from the seat base.
Show answer and check
The bands are 6 cm each, so the internal landmark lines are at 6 cm, 12 cm, and 18 cm from the seat base.
Why: Divide 24 by 4 to get 6 cm per band, then add one band at a time from the base.
Check: Measure each landmark from the seat base and confirm the values are 6, 12, and 18 cm.
Exercise 3
A drapery fold is planned from a knee contact point to the base edge. The knee is 8 cm above the base and the fold ends 2 cm to the side of the knee. Describe the fold direction and state one check that confirms it follows gravity.
Show answer and check
The fold runs downward from the knee to the base edge and shifts 2 cm sideways. The check is that the fold ends at a lower edge than its start and begins at a marked contact point.
Why: Gravity requires a downward end, and body contact requires a contact-point start.
Check: Trace the fold and confirm the end is lower than the start and the start is at the knee contact point.
Exercise 4
A statue drawing has shoulder width 9 cm and head width 3 cm. The head is centered. State the ratio of shoulder width to head width and one proportion check using the base width if the base is 11 cm.
Show answer and check
The ratio is 9 to 3, or 3 to 1. The base width 11 cm is greater than the head width 3 cm, so the base is wider than the head.
Why: Divide shoulder width by head width for the ratio, then compare base and head widths in the same unit.
Check: Measure shoulder, head, and base widths on the drawing and confirm the ratio and the base-versus-head comparison.
Common mistakes
- Making the head wider than the base, which makes the statue look unstable. Measure the base width and the head width in the same unit; widen the crossed legs or narrow the head until the base is wider.
- Drawing drapery folds as parallel lines that ignore body contact. Start each fold at a marked contact point such as a knee or shoulder, then curve it downward toward the base.
- Placing the shoulders too high, leaving no neck and compressing the torso. Re-divide the total height into equal bands and move the shoulder line to the planned band.
- Centering the torso off the vertical line, causing the pose to lean. Check that the head center, hip center, and base center all fall on the same vertical line.
Self-check rubric
- The seated pose is readable from crossed legs, lap line, and centered torso.
- Proportion landmarks are marked and measured in one consistent unit.
- The base is wider than the head, and the head center falls within the base width.
- Drapery folds start at contact points and end at lower edges.
- Fold spacing varies by a small measured amount rather than repeating mechanically.
- The drawing convention is stated, and valid alternative letter styles are accepted.
- Checks are recorded beside the drawing for repeatability.
Questions and answers
Do I need the printable construction plate to complete this lesson?
No. The plate is a planned resource, not yet built. The steps in this text describe the landmarks and checks so you can draw on plain paper.
What does x-height mean in this drawing convention?
X-height is the distance from the baseline to the midline of each letter in your own handwriting. Because letter styles vary, it is a personal guide for consistent sizing, not a universal standard.
Can I use different proportions for the statue?
Yes. The ratios here are a starting guide. Measure your actual drawing in one unit and check that the base is wider than the head and the landmarks are evenly spaced.
How many drapery folds should I draw?
There is no fixed number. Draw folds from each contact point and vary spacing by a small measured amount; the check is whether each fold follows gravity and body contact.