Free original lessons
Draw a Bush: Foliage Clumps and Branch Construction
Learn to draw a bush by building a branch skeleton, wrapping overlapping foliage clumps, and shading masses with a clear, checkable method.
Free lesson
Four exercises
Worked answers
Object Drawing Lessons
A bush reads as a living volume when its branch skeleton supports overlapping foliage clumps rather than a single outline. This lesson teaches a repeatable construction: establish the ground line and trunk base, draw the branch skeleton, wrap clumps around branch ends, then shade by mass. You will use a simple convention for judging size and placement, and a rubric that accepts valid stylistic alternatives. All measurements are hypothetical examples; measure your own paper and tools before relying on any number.
Practice materials: Printable downloads are not available for this lesson yet. Use the instructions and four exercises below.
Reference illustration
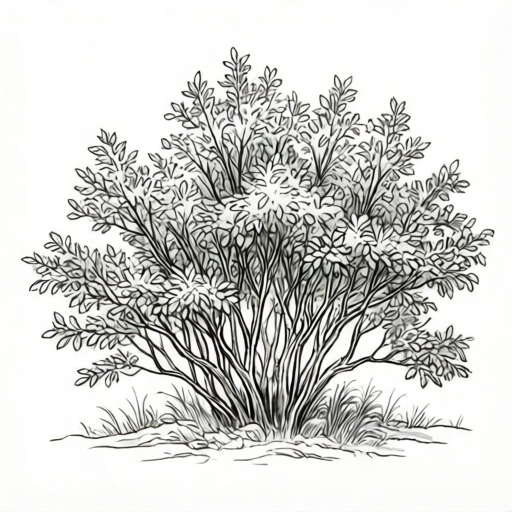
Use the stated measurements and conventions for each exercise.
Build the branch skeleton first
Start with a light ground line and a short trunk base. From the base, draw three to five main branches that fork outward and upward. Keep forks visible: each branch should split into two smaller stems, and those stems should end where a foliage clump will sit. The skeleton is a map, not a final outline, so keep lines light and loose.
Use a simple proportion convention: decide the bush height first, then make the widest branch spread about two-thirds of that height. For example, if the bush is 12 cm tall on your page, the widest spread is about 8 cm. These are hypothetical values; measure your actual page and adjust. Mark the branch tips with small dots so you can place clumps deliberately rather than guessing.
- Draw a light ground line and a 2 cm trunk base (hypothetical example).
- Add three to five main branches that fork into smaller stems.
- Mark each branch tip with a dot where a foliage clump will attach.
- Check that the widest spread is roughly two-thirds of the planned height.
Wrap foliage clumps around branch ends
A foliage clump is an overlapping mass, not a circle. Draw each clump as two or three soft lobes that overlap the branch tip and each other. Overlap is the key: where two clumps meet, let one edge cross in front of the other so the mass reads as depth. Vary clump size—larger clumps near the center, smaller ones at the edges—to avoid a uniform row of circles.
Attach clumps to the skeleton by letting the branch tip disappear into the clump. Do not draw every branch through every clump; instead, show a few branch lines entering the mass and stop them where foliage would hide them. This keeps the structure believable without turning the drawing into a diagram.
- Draw a soft two- or three-lobed mass around each marked branch tip.
- Let overlapping clumps cross in front of one another at the edges.
- Vary clump size: larger near the center, smaller at the silhouette.
- Stop branch lines where foliage would hide them.
Shade by mass, then refine the silhouette
Shade each clump as a single mass before adding leaf detail. Decide a light direction, then darken the side opposite the light and the undersides of overlapping clumps. Keep shading inside the clump boundary so the silhouette stays readable. After the masses are shaded, refine the outer edge with small irregular notches rather than a smooth outline.
Use a checkable value convention: three tones—light, middle, dark. The light tone covers the lit top of each clump, the middle tone covers the side, and the dark tone sits under overlaps and near the trunk. If your darkest tone appears in more than about one-third of the bush area, lighten it; this is a hypothetical guideline, not a universal rule.
- Choose a light direction and mark it lightly beside the drawing.
- Shade each clump as one mass using light, middle, and dark tones.
- Darken undersides of overlaps and areas near the trunk.
- Refine the silhouette with small irregular notches.
Worked example
Draw a medium bush on a 15 cm by 20 cm page using the skeleton-and-clump method. Plan a height of 10 cm and a widest spread of about 7 cm. Use three main branches, five foliage clumps, and three shading tones.
Worked answer
Lightly draw a ground line and a 2 cm trunk base. Add three main branches that fork into six smaller stems, marking six tips. Place five clumps: two large central clumps, two medium side clumps, and one small top clump. Let side clumps overlap the central ones. Stop branch lines inside the clumps. Shade each clump with light on the upper left, middle on the right, and dark under overlaps and near the trunk. Refine the silhouette with small notches. Check that the widest spread is about 7 cm and that dark tone covers less than one-third of the bush area.
Four practice exercises
Exercise 1
On a 12 cm by 18 cm page, plan a bush 9 cm tall with a widest spread of about 6 cm. Draw a branch skeleton with four main branches and mark five branch tips. Do not add foliage yet.
Show answer and check
A light ground line, a short trunk base, four main branches that fork into smaller stems, and five marked tips. The widest spread measures about 6 cm and the height about 9 cm.
Why: The skeleton must support the planned clumps. Four main branches with forks give enough tips for five clumps, and the two-thirds spread convention keeps the bush proportionate.
Check: Measure the height and widest spread with a ruler. Count four main branches and five marked tips. Confirm forks are visible.
Exercise 2
Using the skeleton from the previous exercise, wrap five foliage clumps around the marked tips. Make two clumps large, two medium, and one small. Let at least two clumps overlap.
Show answer and check
Five soft lobed masses attached to the marked tips, with two large central clumps, two medium side clumps, and one small top clump. At least two edges cross in front of another clump.
Why: Overlapping masses create depth, and varied sizes prevent a uniform row of circles. Attaching clumps to marked tips keeps the structure deliberate.
Check: Count five clumps and confirm the size grouping. Trace at least two overlap crossings. Check that each clump touches a marked tip.
Exercise 3
Shade the five-clump bush using three tones. Place light on the upper left, middle on the right, and dark under overlaps and near the trunk. Keep dark tone under one-third of the bush area.
Show answer and check
Each clump shaded as one mass with light upper left, middle right, and dark under overlaps and near the trunk. Dark tone covers less than one-third of the bush area.
Why: Shading by mass keeps the silhouette readable, and limiting dark tone prevents the bush from becoming a dark blob.
Check: Estimate the dark-tone area by dividing the bush into three equal parts; dark should not fill more than one part. Confirm each clump has all three tones.
Exercise 4
Refine the silhouette of the shaded bush with small irregular notches. Then write one sentence explaining how your branch skeleton is still visible in the final drawing.
Show answer and check
The silhouette has small irregular notches rather than a smooth outline. The sentence explains that a few branch lines enter the clumps and stop where foliage would hide them, so the structure remains readable.
Why: Notches suggest foliage edges without turning the drawing into individual leaves. Stopping branch lines inside clumps preserves the skeleton without over-diagramming.
Check: Check that the outer edge is not a smooth circle. Confirm at least two branch lines enter clumps and stop. Read the sentence and verify it matches the drawing.
Common mistakes
- Drawing one smooth outline and filling it with leaf shapes. Build the branch skeleton first, then wrap separate overlapping clumps around branch tips.
- Making every foliage clump the same size and shape. Vary clump size and lobe count; keep larger clumps near the center and smaller ones at the edges.
- Shading individual leaves before the masses read clearly. Shade each clump as a single mass with three tones, then add small leaf notches only at the silhouette.
- Letting branch lines run through every clump. Stop branch lines where foliage would hide them, showing only a few entries into each mass.
Self-check rubric
- Branch skeleton shows at least three main branches with visible forks.
- Foliage clumps are separate overlapping masses, not one outline.
- Clump sizes vary, with larger masses near the center.
- Branch lines stop where foliage would hide them.
- Three tones are used consistently: light, middle, dark.
- Dark tone covers less than about one-third of the bush area (hypothetical guideline).
- Silhouette is irregular rather than a smooth circle.
- Valid alternative leaf styles are accepted if mass and overlap remain clear.
Questions and answers
How many foliage clumps should a bush have?
Use enough clumps to cover the branch tips without crowding. A practical starting range is five to nine clumps for a medium bush; adjust to your branch count and page size.
Do I need to draw every branch?
No. Show the main forks and a few smaller stems, then let clumps hide the rest. The skeleton is a construction guide, not a final diagram.
What if my bush looks flat?
Check overlap and tone placement. Clumps should cross in front of one another, and dark tone should sit under overlaps and near the trunk.
Can I use a different leaf style?
Yes. The rubric judges mass, overlap, and structure, not a single leaf shape. Any consistent leaf or notch style that supports the clumps is valid.