Free original lessons
Draw a Cartoon Elf: Pointed Hat, Ears, and Boots
Learn to construct a cartoon elf with a pointed hat, expressive ears, and detailed boots using simple shapes, clear steps, and a flexible style rubric.
Free lesson
Four exercises
Worked answers
Object Drawing Lessons
This lesson teaches a repeatable way to draw a cartoon elf focused on three signature features: a pointed hat, pointed ears, and detailed boots. You will build the figure from basic shapes, then refine each feature with deliberate choices about proportion and line. The approach works for many cartoon styles because it relies on construction rather than copying one finished drawing. You will also learn how to check your own work with simple measurements and a rubric that allows valid stylistic alternatives. All practice tasks are self-contained and use plain arithmetic with consistent units.
Practice materials: Printable downloads are not available for this lesson yet. Use the instructions and four exercises below.
Reference illustration
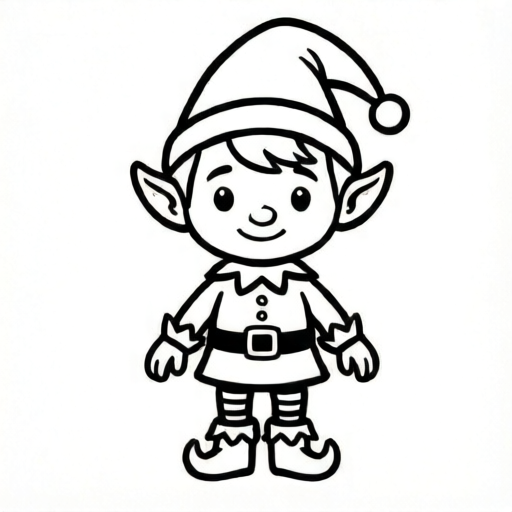
Use the stated measurements and conventions for each exercise.
Build the Body from Simple Shapes
Start with a light construction drawing. Draw a vertical center line for the body. Place a circle for the head near the top, then a rounded rectangle or oval for the torso below it. Add two short lines for the legs and two small ovals for the feet. Keep these shapes loose so you can adjust them.
Use a proportion guide: make the head about one third of the total figure height for a cute cartoon look, or one quarter for a taller look. Mark the total height with two light dots, then divide that distance into equal parts. For example, if the figure is 12 cm tall and you want a one-third head, the head circle is about 4 cm tall. These numbers are hypothetical examples; measure your own paper and choose values that fit.
Add the arms as simple tubes from the shoulders. Keep the elbows slightly bent so the pose feels natural. At this stage, do not draw the hat, ears, or boot details. The goal is a balanced body you can build on.
- Draw a vertical center line and mark the total figure height with two dots.
- Divide the height into equal parts and place the head circle using your chosen proportion.
- Add a torso shape, two leg lines, and two foot ovals.
- Attach two arm tubes with slightly bent elbows.
- Check that the left and right sides are roughly balanced before adding details.
Shape the Pointed Hat
The pointed hat is the elf's strongest silhouette cue. Draw a curved band around the top of the head, then extend a tapering triangle upward from the band. The tip can lean left, right, or straight up. A slight lean often looks more lively.
Control the hat's height with a simple ratio. If the head circle is 4 cm tall, a hat tip about 6 cm above the band gives a tall, dramatic hat. A tip about 3 cm above the band gives a short, playful hat. Label any numbers you choose as your own working examples, not fixed standards.
Add a folded brim or a small bell only if it supports the cartoon style. Keep the hat outline clean and avoid crossing lines that confuse the tip. The hat should read clearly even at a small size.
- Draw a curved band around the top third of the head.
- From the band, draw two lines that taper toward a single tip.
- Choose a tip direction and height ratio, then adjust the taper for smoothness.
- Erase construction lines inside the hat and darken the final outline.
- Check that the hat tip is clearly separated from the background.
Draw Expressive Pointed Ears
Place the ears on the sides of the head, roughly level with the eyes or slightly higher. A cartoon elf ear usually has a rounded base and a pointed tip. The tip can angle upward, outward, or slightly backward. Vary the two ears for personality, but keep their sizes close.
Use a simple ear-variant panel in your practice: draw three ear shapes side by side, each with a different tip angle. This helps you choose a style before committing to the final drawing. The ear should attach smoothly to the head outline, not float separately.
Add one or two interior lines to suggest the ear fold. Keep these lines light so the ear does not look heavy. If the hat covers part of the ear, draw the ear first, then place the hat band over it.
- Mark ear positions on both sides of the head at eye level or slightly higher.
- Draw a rounded base and a tapering point for each ear.
- Choose tip angles that match the character's mood.
- Add one or two light interior fold lines.
- Check that both ears attach to the head and are similar in size.
Add Boot Detail and Finish the Pose
Boots give the elf a grounded, sturdy look. Start with the foot oval, then extend a short cuff above the ankle. Add a sole line, a toe curve, and a simple strap or fold. A small upturn at the toe is a common cartoon choice, but a flat toe also works.
Use a boot-detail guide: draw one boot with a cuff, one with a strap, and one with a folded top. Compare which detail suits your elf. Keep the two boots consistent in style even if the pose differs.
Finish by checking the whole figure. The hat, ears, and boots should be the most visible features. Erase construction lines, darken the final outline, and add simple shading only if it helps readability. A practice strip with two poses, such as standing and walking, helps you test the construction before a final drawing.
- Draw the foot oval and extend a cuff above the ankle.
- Add a sole line, toe curve, and one detail such as a strap or fold.
- Repeat the boot style on the second foot, adjusting for the pose.
- Erase construction lines and darken the final outline.
- Check the silhouette: hat tip, ear points, and boot shapes should read clearly.
Worked example
A cartoon elf stands with feet apart. The total figure height is 12 cm. The head is one third of the height. The hat tip rises 6 cm above the hat band. The ears sit at eye level. Each boot has a cuff and a sole line. Describe the construction order and one check.
Worked answer
Mark 12 cm total height. Divide into three equal parts of 4 cm; the head circle is about 4 cm tall. Draw the torso, legs, and foot ovals. Add arms with slightly bent elbows. Draw the hat band around the top of the head and taper two lines to a tip 6 cm above the band. Place ears at eye level with rounded bases and pointed tips. Add boot cuffs and sole lines. Check that the hat tip, ear points, and boot shapes are visible in the silhouette.
Four practice exercises
Exercise 1
A cartoon elf is 10 cm tall. The head is one quarter of the total height. What is the head height in centimeters?
Show answer and check
2.5 cm
Why: Divide 10 cm into four equal parts: 10 divided by 4 equals 2.5 cm.
Check: Multiply 2.5 cm by 4 to confirm the total is 10 cm.
Exercise 2
The head circle is 3 cm tall. The hat tip is 4.5 cm above the hat band. What is the total height from the bottom of the head to the hat tip?
Show answer and check
7.5 cm
Why: Add the head height and the hat height above the band: 3 cm plus 4.5 cm equals 7.5 cm.
Check: Subtract 3 cm from 7.5 cm to confirm the hat height is 4.5 cm.
Exercise 3
An elf figure is 14 cm tall. The hat band sits 2 cm below the top of the head. The hat tip is 5 cm above the band. How far is the hat tip from the top of the head?
Show answer and check
3 cm
Why: The band is 2 cm below the top, and the tip is 5 cm above the band. Subtract the 2 cm gap: 5 cm minus 2 cm equals 3 cm above the top of the head.
Check: Add 2 cm and 3 cm to confirm the tip is 5 cm above the band.
Exercise 4
Each boot cuff is 1.5 cm tall. The sole line is 0.5 cm above the bottom of the boot. If the boot is 4 cm tall from bottom to cuff top, what is the height from the sole line to the cuff top?
Show answer and check
3.5 cm
Why: The sole line is 0.5 cm above the bottom, so subtract that from the 4 cm boot height: 4 cm minus 0.5 cm equals 3.5 cm.
Check: Add 0.5 cm and 3.5 cm to confirm the total boot height is 4 cm.
Common mistakes
- Making the hat tip too wide or rounded so it no longer reads as pointed. Taper the two hat lines gradually toward a single tip and check the outline at a small size.
- Placing the ears too low or too far from the head. Mark ear positions at eye level or slightly higher and attach the ear base to the head outline.
- Drawing boots as plain ovals with no cuff or sole. Add a short cuff, a sole line, and one simple detail such as a strap or fold.
- Using inconsistent proportions between the head, hat, and body. Measure the total height and divide it into equal parts before drawing the head and hat.
Self-check rubric
- Pointed hat is clearly tapered to a tip and reads at a small size.
- Ears are attached to the head, pointed, and similar in size, with allowed variation in tip angle.
- Boots include at least one detail such as a cuff, sole line, strap, or fold.
- Body proportions are balanced and construction lines are cleaned up.
- Valid stylistic alternatives are accepted if the three signature features remain recognizable.
Questions and answers
Do I need to use exact measurements?
No. The numbers in this lesson are hypothetical examples. Measure your own paper and choose proportions that fit your drawing.
Can the elf have short ears or a short hat?
Yes. The rubric allows valid stylistic alternatives as long as the pointed hat and pointed ears remain recognizable.
How do I check my drawing without an image to compare?
Use the silhouette check: the hat tip, ear points, and boot shapes should be clear when you view the drawing from a short distance.
Should both boots match exactly?
They should share the same style, but the pose may change their angle. Keep the cuff and sole details consistent.