Free original lessons
Cello Drawing: Body Outline, F-Holes, and Bow Geometry
Learn to draw a cello with a symmetric body outline, correctly placed f-holes, and a geometrically constructed bow using checkable proportions and clear conventions.
Free lesson
Four exercises
Worked answers
Object Drawing Lessons
This lesson teaches a reliable method for drawing a cello from the front: first a symmetric body contour built from simple measured arcs, then f-holes placed by proportion rather than guesswork, and finally a bow whose stick, hair, and frog follow a consistent angle and length relationship. All measurements are relative to the body length you choose, so the drawing scales cleanly. Use a light pencil for construction lines and a darker line only when a checkpoint passes. The convention for judging placement is simple: treat the body outline as a closed curve, mark its vertical midline, and measure every horizontal offset from that midline. Letter shapes and handwriting vary, so f-hole style is judged by placement and proportion, not by a single exact curve.
Practice materials: Printable downloads are not available for this lesson yet. Use the instructions and four exercises below.
Reference illustration
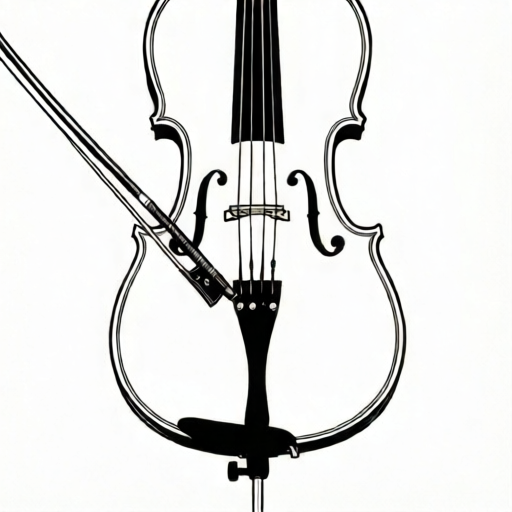
Use the stated measurements and conventions for each exercise.
Building a symmetric body outline
Start with a vertical midline longer than the finished cello. Mark the top of the body and the bottom of the body on this line. Divide that body length into eight equal parts; these divisions are your horizontal reference levels. The upper bout occupies roughly the top two parts, the waist narrows around the middle, and the lower bout occupies the bottom three parts. These are proportions, not fixed centimetres.
Draw the left half first using three arcs: a broad upper bout arc, a concave waist arc, and a broad lower bout arc. Then mirror each arc to the right by measuring equal horizontal distances from the midline at each reference level. Check symmetry by folding the paper along the midline or by comparing offsets with a ruler.
- Mark top and bottom of body on a vertical midline; divide body length into eight equal levels.
- At each level, mark a half-width to the left of the midline using the planned proportions.
- Connect the left marks with three smooth arcs: upper bout, waist, lower bout.
- Mirror each half-width to the right and connect the right arcs.
- Verify symmetry: corresponding left and right offsets must match within your chosen tolerance.
Placing f-holes by proportion
The f-holes sit on the upper face, one each side of the midline, roughly level with the waist and extending toward the lower bout. A workable convention is to place the upper eye of each f-hole at about three-eighths of the body length down from the top, and the lower eye at about five-eighths down. The horizontal distance from the midline to each f-hole's centre is about one-fifth of the maximum lower-bout half-width.
Draw each f-hole as a narrow S-curve with a small circle at each end. The two f-holes should be mirror images. Judge them by eye position, overall length, and mirror symmetry rather than by an exact stroke shape, because lettering and hand curves legitimately vary.
- Mark the upper-eye level and lower-eye level on the midline using the chosen fractions of body length.
- Mark each f-hole centre at the chosen fraction of the lower-bout half-width, left and right.
- Draw a small circle at each eye position.
- Connect upper and lower eyes with a narrow S-curve, then mirror for the other side.
- Check that eye levels match and that left and right f-holes are mirror images.
Constructing the bow
The bow is drawn as a separate object beside the cello. Its total length is about three-quarters of the cello body length, and the stick is slightly curved. The hair runs from the frog near the lower end to the tip at the upper end. A consistent construction uses a straight reference line for the hair and a curved line for the stick, with the gap between them widest near the middle.
Set the bow at a chosen angle to the vertical, for example thirty degrees as a hypothetical working value. Mark the frog end and tip end along that angled line, then offset the stick curve above the hair line. The frog is a small rectangle at the lower end; the tip is a small tapered shape at the upper end.
- Choose a bow length equal to about three-quarters of the body length.
- Draw a straight hair line at the chosen angle to vertical.
- Mark frog end and tip end on the hair line.
- Draw the stick as a gentle curve offset above the hair line, widest gap near the middle.
- Add a small rectangle for the frog and a tapered tip; check length and angle against your chosen values.
Checking the finished drawing
A finished drawing passes three checks: body symmetry, f-hole mirror placement, and bow proportion. Measure offsets from the midline at each of the eight levels and compare left to right. Confirm that f-hole eye levels match the planned fractions. Confirm that bow length and angle match the values you chose before drawing.
Because hand-drawn curves vary, allow a small tolerance you define in advance, such as two millimetres on a body length of twenty centimetres. Record your chosen values so the drawing can be checked consistently.
- Measure left and right half-widths at all eight levels and compare.
- Check f-hole eye levels against the planned fractions.
- Check bow length and angle against the chosen values.
- Mark any checkpoint that fails and redraw only that part.
Worked example
A student draws a cello body 24 cm long on the midline. They plan upper-eye level at three-eighths of body length and lower-eye level at five-eighths. Calculate both levels measured from the top of the body.
Worked answer
Upper-eye level = 3/8 × 24 = 9 cm from the top. Lower-eye level = 5/8 × 24 = 15 cm from the top. The f-hole spans 15 − 9 = 6 cm vertically.
Four practice exercises
Exercise 1
A cello body is 20 cm long. Using the lesson convention, calculate the upper-eye and lower-eye levels from the top, and the vertical span of each f-hole.
Show answer and check
Upper eye = 3/8 × 20 = 7.5 cm. Lower eye = 5/8 × 20 = 12.5 cm. Span = 12.5 − 7.5 = 5 cm.
Why: Multiply body length by the stated fractions and subtract to find the span.
Check: Recompute both fractions and confirm the span equals the difference; units are centimetres.
Exercise 2
A bow is drawn at 30 degrees to vertical with length 18 cm. Calculate its vertical rise and horizontal run, using sine and cosine rounded to one decimal place.
Show answer and check
Vertical rise = 18 × cos 30 ≈ 15.6 cm. Horizontal run = 18 × sin 30 = 9.0 cm.
Why: The bow line forms a right triangle with the vertical; the vertical component uses cosine and the horizontal component uses sine.
Check: Square both components, add, and take the square root; the result should be approximately 18 cm.
Exercise 3
A drawing has body length 16 cm and maximum lower-bout half-width 5 cm. Using the lesson convention, calculate the horizontal distance from the midline to each f-hole centre.
Show answer and check
Distance = 1/5 × 5 = 1 cm from the midline on each side.
Why: The convention places each f-hole centre at one-fifth of the maximum lower-bout half-width.
Check: Multiply the half-width by 0.2 and confirm both sides use the same value.
Exercise 4
A student's body is 28 cm long. They mark left half-widths of 4, 3, 2, 3, 5, 6, 5, and 4 cm at the eight levels. State the right half-widths needed for symmetry and the total width at the widest level.
Show answer and check
Right half-widths must equal the left: 4, 3, 2, 3, 5, 6, 5, 4 cm. Widest level is 6 cm half-width, so total width = 12 cm.
Why: Symmetry requires equal offsets from the midline; total width is twice the half-width.
Check: Compare each left and right pair and double the largest half-width.
Common mistakes
- Drawing the body freehand without a midline, so the two halves differ. Draw the midline first and measure every horizontal offset from it; mirror each mark before connecting arcs.
- Placing f-holes by eye at arbitrary heights. Mark upper-eye and lower-eye levels as fractions of body length on the midline before drawing any curve.
- Making the bow the same length as the cello or drawing it vertically. Set bow length to about three-quarters of body length and choose an angle to vertical before drawing.
- Treating one f-hole curve shape as the only correct answer. Judge f-holes by eye placement, length, and mirror symmetry; accept valid stylistic variation in the S-curve.
Self-check rubric
- Body outline is closed and symmetric about the midline within the chosen tolerance.
- Eight reference levels are marked and used to place half-widths.
- Upper and lower f-hole eyes sit at matching levels left and right.
- F-holes are mirror images and judged by placement and proportion, allowing valid curve variation.
- Bow length is about three-quarters of body length and matches the chosen angle.
- Frog and tip are present and correctly positioned at the ends of the bow.
- Checkpoint measurements are recorded and compared.
Questions and answers
Do I need exact measurements in centimetres?
No. Use proportions of the body length you choose. Any numerical values in this lesson are hypothetical examples; measure your own paper and equipment if you want absolute sizes.
How do I know my f-holes are placed correctly?
Check that both upper eyes sit at the same level, both lower eyes sit at the same level, and the left and right f-holes are mirror images about the midline.
Can the bow angle be different from thirty degrees?
Yes. Choose any angle you can measure consistently, record it, and check the finished bow against that chosen value.
What if my hand-drawn arcs are not perfectly smooth?
Smoothness is judged by the checkpoint tolerances you set, not by a single ideal curve. Focus on symmetry and proportion first.