Free original lessons
Dog Face Drawing: Feature Placement Guide
Learn to place a dog's eyes, nose, ears, and mouth using simple proportion landmarks. Includes a worked example, four practice tasks, and a rubric for self-checking.
Free lesson
Four exercises
Worked answers
Object Drawing Lessons
Drawing a dog face becomes much easier when you use a few reliable landmarks instead of guessing. This guide teaches a repeatable method for placing features on a front-facing dog face. You will start with a basic head shape, locate the midline and eye line, then position the nose, mouth, and ears in relation to those guides. The approach works for many dog types because it focuses on relative placement rather than exact measurements. All numerical values here are hypothetical examples for practice; measure your own paper and tools when you draw. A clear convention is used throughout: x-height means the distance from the baseline to the midline of lowercase letters, and letter styles may vary, so treat x-height as a flexible reference, not a fixed universal standard.
Practice materials: Printable downloads are not available for this lesson yet. Use the instructions and four exercises below.
Reference illustration
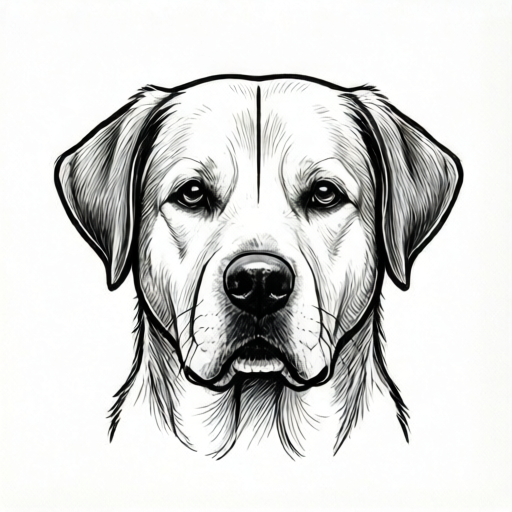
Use the stated measurements and conventions for each exercise.
Set Up the Head Shape and Midline
Begin with a light oval or rounded rectangle for the head. Keep your pencil pressure soft so you can adjust later. Draw a vertical midline through the center of the head; this is your symmetry guide. Next, draw a horizontal line across the middle of the head. This horizontal line is the eye line. On most front-facing dog faces, the eyes sit roughly on or just above this middle line. The space below the eye line is where the nose and mouth will go.
Use the midline to check that left and right features mirror each other. If you are drawing a dog with a slight head turn, the midline can curve, but for this guide keep it straight and front-facing. Mark the top and bottom of the head shape so you can judge proportions. A common practice proportion is that the eye line sits about halfway between the top of the head and the chin. Label any chosen numerical values as hypothetical examples only.
- Draw a light oval for the head, about as wide as it is tall.
- Draw a vertical midline from top to bottom.
- Draw a horizontal eye line across the middle of the head.
- Mark the top of the head and the chin to check that the eye line is near the halfway point.
Place the Eyes and Nose
The eyes are the anchors for the rest of the face. Place them on the eye line, one on each side of the midline. Leave a gap between the eyes that is roughly one eye-width wide; this is a simple checkable proportion. Draw the eyes as small ovals or circles, then add a pupil. The nose sits on the midline, below the eye line. A practical starting point is to place the top of the nose about one-third of the way down from the eye line to the chin. The nose is usually wider than it is tall, so draw a rounded triangle or a soft trapezoid.
Check the spacing: the distance from the eye line to the top of the nose should be shorter than the distance from the nose to the chin. If your nose feels too high, move it down slightly. If it feels too low, move it up. Keep the nose centered on the midline. The mouth will connect to the bottom of the nose, so leave room below the nose for the muzzle.
- Mark two eye positions on the eye line, each about one eye-width from the midline.
- Draw the eyes as small ovals and add pupils.
- Place the top of the nose on the midline, about one-third of the way from the eye line to the chin.
- Draw the nose as a rounded triangle or soft trapezoid, wider than tall.
Add the Mouth, Ears, and Final Checks
From the bottom center of the nose, draw a short vertical line down to the mouth area. Then draw two gentle curves outward and slightly down to suggest the lips. The mouth should sit below the nose and above the chin. For the ears, choose a style: floppy ears start near the top corners of the head and hang down; pointed ears rise from the top sides. Place the ear bases at the same height on both sides of the head. Use the midline to check symmetry.
Final checks: the eyes should be level with each other, the nose should be centered, and the mouth should be centered below the nose. The ears should be balanced. If you are using a handwriting-style label or note on the drawing, remember that x-height is measured from the baseline to the midline of lowercase letters, and letter styles vary, so do not force a single universal letter size. Adjust lightly until the face looks balanced.
- Draw a short vertical line from the bottom of the nose toward the chin.
- Add two gentle outward curves for the lips.
- Place ear bases at matching heights on both sides of the head.
- Check that eyes are level, nose is centered, and mouth is centered below the nose.
Worked example
A front-facing dog face is drawn on a head shape 12 cm tall. The eye line is at the middle. The top of the nose is placed one-third of the way from the eye line to the chin. How far below the eye line is the top of the nose?
Worked answer
The distance from the eye line to the chin is half the head height: 12 cm ÷ 2 = 6 cm. One-third of 6 cm is 2 cm. So the top of the nose is 2 cm below the eye line.
Four practice exercises
Exercise 1
A head shape is 10 cm tall. The eye line is at the middle. You place the top of the nose one-third of the way from the eye line to the chin. Calculate the distance from the eye line to the top of the nose.
Show answer and check
The eye line to chin distance is 10 ÷ 2 = 5 cm. One-third of 5 cm is about 1.67 cm. So the top of the nose is about 1.67 cm below the eye line.
Why: The head is split into upper and lower halves by the eye line. The lower half is 5 cm. The nose top is one-third of that lower half, so 5 ÷ 3 ≈ 1.67 cm.
Check: Measure 5 cm from the eye line to the chin on your drawing, then divide that segment into three equal parts. The first part below the eye line should match your calculated distance.
Exercise 2
On a front-facing dog face, each eye is 2 cm wide. The gap between the eyes is one eye-width. What is the total width from the left edge of the left eye to the right edge of the right eye?
Show answer and check
Total width = left eye width + gap + right eye width = 2 cm + 2 cm + 2 cm = 6 cm.
Why: The gap is one eye-width, which is 2 cm. Add the two eye widths and the gap: 2 + 2 + 2 = 6 cm.
Check: Use a ruler to measure each eye and the gap on your drawing. The three measurements should be approximately equal, and their sum should be about 6 cm.
Exercise 3
A head shape is 14 cm tall. The eye line is at the middle. The top of the nose is 2 cm below the eye line. What fraction of the distance from the eye line to the chin is the nose-top distance?
Show answer and check
The eye line to chin distance is 14 ÷ 2 = 7 cm. The fraction is 2 ÷ 7, or about two-sevenths.
Why: The lower half of the head is 7 cm. The nose top is 2 cm below the eye line, so the fraction is 2/7.
Check: Measure the lower half of the head on your drawing. Divide it into seven equal parts; the nose top should be about two parts below the eye line.
Exercise 4
You draw a dog face with floppy ears. Each ear base is 3 cm from the midline, and the two ear bases are at the same height. The head is 12 cm wide. How far is each ear base from the nearest side of the head?
Show answer and check
Half the head width is 12 ÷ 2 = 6 cm. Each ear base is 3 cm from the midline, so the distance to the nearest side is 6 − 3 = 3 cm.
Why: The midline divides the 12 cm head into two 6 cm halves. An ear base 3 cm from the midline leaves 3 cm to the side of the head.
Check: Measure 6 cm from the midline to the side of the head on your drawing. Mark 3 cm from the midline and check that the remaining distance to the side is also about 3 cm.
Common mistakes
- Placing the eyes too high or too low on the head. Use the horizontal eye line at the middle of the head as a guide, then adjust slightly only after checking the overall balance.
- Making the nose too large or too small relative to the eyes. Compare the nose width to one eye width; a common practice proportion is that the nose is about one to one and a half eye-widths wide.
- Putting the mouth directly under the nose with no gap. Leave a small space between the bottom of the nose and the top of the mouth curves so the muzzle reads clearly.
- Drawing ears at different heights. Mark both ear bases on the same horizontal level before drawing the ear shapes.
Self-check rubric
- Head shape is closed and roughly symmetrical.
- Vertical midline is present and used to center the nose and mouth.
- Eye line is horizontal and eyes are placed at matching heights.
- Gap between the eyes is approximately one eye-width.
- Nose is centered on the midline and sits below the eye line.
- Mouth is centered below the nose with a small gap.
- Ear bases are at matching heights on both sides.
- Proportions are checked with simple units such as eye-widths.
- Light construction lines are used and can be adjusted.
- Final drawing reads clearly as a dog face, allowing valid style variations.
Questions and answers
Do I need to measure exactly?
No. The proportions are guides, not strict rules. Use light lines and adjust until the face looks balanced. Any numerical values in this guide are hypothetical examples for practice.
Can I use this method for different dog breeds?
Yes. The landmark method works for many front-facing dog faces. Breed differences mainly affect ear shape, muzzle length, and eye spacing, so adjust those features while keeping the midline and eye line.
What does x-height mean in this context?
X-height is the distance from the baseline to the midline of lowercase letters. Letter styles vary, so treat x-height as a flexible reference when adding handwritten labels, not as a fixed universal measurement.
How do I check my drawing without an instructor?
Use the rubric and the check methods in the exercises. Look for level eyes, a centered nose, a centered mouth, and balanced ears. Compare spacing using simple eye-width units.