Free original lessons
Dried Flower Drawing: Brittle Stems, Shriveled Petals, and Seed Heads
Learn to draw dried flowers with tapered brittle stems, shriveled petal contours, and structured seed heads using a clear convention and checkable steps.
Free lesson
Four exercises
Worked answers
Object Drawing Lessons
Dried flowers reward close looking: stems lose moisture and become thin, stiff, and slightly angular; petals curl inward and collapse unevenly; seed heads expose geometric packing. This lesson defines a simple drawing convention so you can build believable dried flower forms from observation or from described examples. You will practice stem taper and bend, shriveled petal contours, seed-head structure, and a small arrangement. All measurements are hypothetical examples; measure your own paper and tools. The convention: draw the stem as a centerline with two edges that taper from base to tip; mark bends as short straight segments joined by gentle curves; draw petals as closed contours that fold toward the stem; draw seed heads as a dome or cone with radial or spiral packing lines. Valid alternatives are allowed when the contour reads as dry and brittle.
Practice materials: Printable downloads are not available for this lesson yet. Use the instructions and four exercises below.
Reference illustration
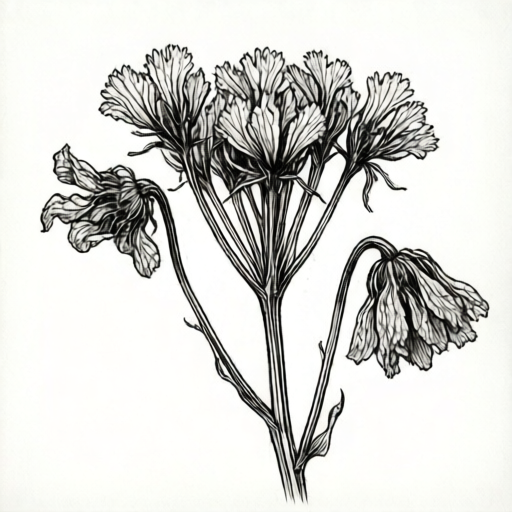
Use the stated measurements and conventions for each exercise.
Stem taper and brittle bend
A dried stem is not a uniform tube. Near the base it is thicker; toward the flower head it narrows. Draw a centerline first, then set two edge lines that converge gradually. For a brittle look, use short straight runs between slight direction changes rather than long sweeping curves. Keep the taper consistent: if the base is 4 mm wide on your paper, the tip might be 1.5 mm; these are hypothetical example values, so choose your own and keep them proportional.
Bends should look like they happened at joints. Mark a bend point, draw a short straight segment, then a small curve, then another straight segment. Avoid smooth rubber-hose curves. Check that the two edges stay parallel in direction even as the width changes.
- Draw a light centerline from base to flower head.
- Mark the base width and tip width as two small ticks; label them with your chosen units.
- Draw the left edge as short straight segments that taper toward the tip.
- Draw the right edge to match the left edge's direction changes.
- At each bend, add a tiny joint mark or a slight thickening to suggest stiffness.
Shriveled petal contours
Shriveled petals collapse inward and twist. Draw each petal as a closed contour with a fold line. The outer edge should have small notches or waves, not smooth arcs. Petals near the center are often smaller and more curled; outer petals may hang or point downward. Use overlapping contours to show depth, but keep each petal's outline readable.
A useful convention is to draw the fold line first, then the two sides of the petal around it. If a petal curls toward the stem, its visible width is narrower than its full length. Check that no petal contour crosses another without an overlap break.
- Lightly mark the flower head's center point.
- Draw three to five fold lines radiating outward at uneven angles.
- Around each fold line, draw a closed petal contour with small notches on the outer edge.
- Shade or hatch the inner side of each fold to show curl.
- Erase construction lines only after the petal shapes read clearly.
Seed-head structure
Seed heads are organized. A dome-shaped head can be drawn with radial lines from the top center to the rim, then small seed shapes packed between the lines. A cone-shaped head uses rings that shrink toward the tip. Keep the packing pattern consistent: if you choose radial, do not switch to spiral halfway. Label your chosen pattern in a corner note.
Draw the outer silhouette first, then the packing lines, then individual seeds. Seeds can be simple ovals or short dashes. Check that the number of seeds per ring decreases toward the tip for a cone, or stays roughly even for a dome.
- Draw the seed-head silhouette as a dome or cone.
- Mark the top center and the rim.
- Add radial or ring packing lines according to your chosen pattern.
- Draw small seed shapes between the lines, keeping size consistent.
- Add a few loose seeds near the base to suggest brittleness.
Arrangement and composition
A small dried arrangement should show stems crossing at different angles and heights. Choose three stems: one tall, one medium, one short. Draw the tallest first, then the medium, then the short, so overlaps are clear. Keep the base cluster narrow and let the heads spread. Use the same taper and bend rules for every stem.
Check that no two flower heads sit at the same height and that the stems do not all bend in the same direction. A simple triangle composition works: place the three heads at three different points, then connect with stems.
- Mark three head positions at different heights and horizontal offsets.
- Draw the tallest stem from base to its head using taper and bend rules.
- Draw the medium stem, breaking its contour where it passes behind the first.
- Draw the short stem in front or behind as needed.
- Add seed heads and shriveled petals to each head using the earlier conventions.
Worked example
Draw a single dried flower with a tapered stem, three shriveled petals, and a dome seed head. Use a base stem width of 4 mm and a tip width of 1.5 mm (hypothetical example values).
Worked answer
Draw a centerline 10 cm long. Mark 4 mm at the base and 1.5 mm at the tip. Draw the left edge as three short straight segments that taper, with a bend at 4 cm and another at 7 cm. Mirror the right edge. At the top, draw a dome 2 cm wide and 1.5 cm tall. Add radial packing lines from the top center to the rim, then small oval seeds between them. Below the dome, draw three petal contours: one curling left, one curling right, one pointing down. Each petal has a fold line and two small notches on its outer edge. Check that the stem edges converge, the bend points are marked, the dome packing is radial throughout, and each petal contour is closed.
Four practice exercises
Exercise 1
Draw a single dried stem with a base width of 5 mm and a tip width of 2 mm (hypothetical example values). Include two bend points and label them.
Show answer and check
A centerline with two marked bend points; left and right edges taper from 5 mm to 2 mm; each bend is a short straight segment joined by a small curve.
Why: The taper ratio is 5:2, so the tip is 40 percent of the base width. Two bends give the brittle look without overcomplicating the stem.
Check: Measure the base and tip widths with a ruler. Confirm both edges converge and that each bend point has a short straight run on either side.
Exercise 2
Draw a shriveled flower head with four petals. Each petal must have a fold line and at least one notch. Describe where the petals curl.
Show answer and check
Four closed petal contours around a center point; each has a fold line; two petals curl inward toward the stem, one curls left, one curls down; each outer edge has a notch.
Why: Four petals allow clear overlaps without clutter. Inward curl reads as dry and collapsed, while the notches break the smooth fresh-flower look.
Check: Trace each petal contour to confirm it is closed. Check that every petal has a fold line and at least one notch. Confirm no contour crosses another without an overlap break.
Exercise 3
Draw a cone-shaped seed head 3 cm tall and 2 cm wide at the base (hypothetical example values). Use ring packing with three rings. How many seeds are in each ring if the top ring has 3, the middle has 5, and the bottom has 7?
Show answer and check
A cone silhouette 3 cm tall and 2 cm wide at the base; three rings; top ring 3 seeds, middle ring 5 seeds, bottom ring 7 seeds; total 15 seeds.
Why: The ring counts increase by 2 from top to bottom, matching the widening cone. The total is 3 + 5 + 7 = 15.
Check: Count the seeds in each ring and add them. Confirm the ring lines shrink toward the tip and that the packing pattern stays ring-based throughout.
Exercise 4
Draw a small arrangement of three dried flowers: one tall with a dome head, one medium with a cone head, and one short with a shriveled petal head. Place the heads at three different heights. Use stem base widths of 4 mm, 3 mm, and 2 mm (hypothetical example values).
Show answer and check
Three stems with different heights and head types; heads offset vertically and horizontally; stems cross at different angles; base widths taper to tips; dome uses radial packing, cone uses ring packing, petal head has fold lines and notches.
Why: Different head types and heights create a readable arrangement. The three base widths give variety while each stem still tapers.
Check: Check that no two heads share the same height. Measure each base width and confirm a narrower tip. Verify each head uses its stated packing or petal convention consistently.
Common mistakes
- Drawing stems as uniform-width tubes. Set a wider base and narrower tip, then taper both edges gradually.
- Using long smooth curves for brittle stems. Use short straight segments joined by small curves at bend points.
- Making petals smooth and rounded like fresh flowers. Add notches, fold lines, and inward curl to each petal contour.
- Switching seed-head packing patterns halfway. Choose radial or ring packing and keep it consistent across the head.
- Placing all flower heads at the same height. Offset heads vertically and horizontally to create a readable arrangement.
Self-check rubric
- Stem shows clear taper from base to tip with two edges that converge.
- Bends are drawn as short straight segments joined by small curves, not long smooth arcs.
- Each petal is a closed contour with a fold line and at least one notch or wave.
- Seed head uses one consistent packing pattern (radial, ring, or spiral) across the whole head.
- Arrangement (if required) has heads at different heights and stems crossing at different angles.
- Valid alternatives: any petal count from three to seven, any consistent seed-head pattern, and any proportional stem widths are accepted if the dry, brittle character reads clearly.
Questions and answers
Do I need a real dried flower to draw from?
No. You can use the described conventions and the worked example. If you have a real flower, measure its stem widths and note bend points.
How wide should the stem be?
Choose a base width and a tip width that are proportional, such as 4 mm and 1.5 mm on your paper. These are hypothetical examples; measure your own paper and keep the ratio consistent.
Can I use spiral packing for seed heads?
Yes, if you keep it consistent. The rubric accepts radial, ring, or spiral packing as long as the pattern is clear and does not switch midway.
How many petals should a shriveled flower have?
Three to seven is a practical range for a small drawing. The exact number is not fixed; what matters is that each petal has a fold line and a notched contour.