Free original lessons
Fist Bump Drawing: Contact Point, Wrist Angles, and Hand Alignment
Learn to draw a two-figure fist bump by fixing the contact point, measuring wrist angles, and aligning both hands with clear steps and checks.
Free lesson
Four exercises
Worked answers
Object Drawing Lessons
A fist bump drawing succeeds when two hands meet at one believable contact point and the wrists read as a deliberate angle, not a random collision. This lesson builds the pair as a single composition: first place the contact point, then set each wrist angle, then align knuckles and forearms so the gesture looks intentional. You will use a simple convention: x-height means the vertical distance from baseline to midline in your own lettering, and all angle values are hypothetical examples you can replace after measuring your actual drawing surface. The method works on paper or a tablet and needs only a pencil, eraser, and straightedge.
Practice materials: Printable downloads are not available for this lesson yet. Use the instructions and four exercises below.
Reference illustration
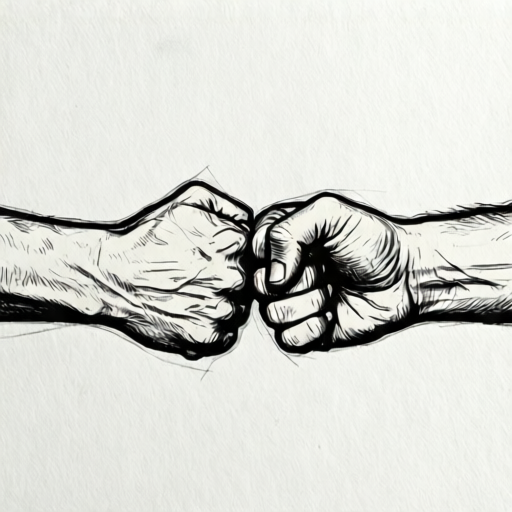
Use the stated measurements and conventions for each exercise.
Place the contact point before drawing either fist
The contact point is the single spot where the two fists touch. Mark it first as a small cross or dot near the center of your page. Everything else is measured from this point, so moving it later forces you to redraw both hands.
Decide which hand comes from the left and which from the right. In a typical fist bump the knuckles face each other, so the left hand's knuckle ridge points right and the right hand's knuckle ridge points left. Keep this facing consistent for the whole drawing.
- Draw a light horizontal baseline and a midline above it at a distance you choose; call that distance one x-height.
- Mark the contact point on the midline, roughly centered left to right.
- Draw a short vertical guide through the contact point to keep both hands vertically balanced.
- Label left hand and right hand on your page so you do not swap them mid-drawing.
Set wrist angles with a measured guide
A wrist angle is the angle between the forearm line and the back-of-hand line. For a natural fist bump, each wrist bends so the knuckles meet while the forearms angle away from the contact point. Hypothetical example values: left wrist 35 degrees, right wrist 40 degrees. These are starting points only; measure your own drawing and adjust.
Draw each forearm as a straight line from the edge of the page toward the contact point, stopping short of it. Then draw the back-of-hand line from the wrist to the knuckle ridge. The angle between those two lines is your wrist angle.
- Draw the left forearm line ending about two x-heights from the contact point.
- From that wrist point, draw the left back-of-hand line toward the contact point at your chosen angle.
- Repeat for the right forearm and right back-of-hand line, using a slightly different angle so the pose is not mirror-perfect.
- Check each angle with a straightedge or by counting grid squares if your paper has a grid.
Align knuckles and build the fist shapes
Alignment means the knuckle ridges of both hands meet along the same short line through the contact point. If one ridge sits higher, the bump looks like a miss. Build each fist as a rounded box with four knuckle bumps along the ridge, then erase the guide lines that cross the contact area.
Keep the thumb on each hand tucked along the side of the fist, not wrapped across the knuckles. The thumbs should sit on opposite sides of the contact point so the hands do not overlap confusingly.
- Draw a short ridge line through the contact point, tilted slightly, and mark four knuckle positions on each side.
- Build the left fist as a rounded box behind its ridge, then the right fist behind its ridge.
- Add each thumb along the outer side of its fist, pointing toward the wrist.
- Erase construction lines inside the contact area and darken the final outline.
Check the pair as one composition
Step back and check three things: one contact point, two distinct wrist angles, and knuckle ridges that meet rather than cross. A quick test is to trace each forearm line backward; the two lines should diverge away from the contact point like a shallow V.
If the drawing looks like two separate fists floating near each other, the contact point is probably too loose. Tighten it by moving both knuckle ridges closer to the marked cross.
- Confirm the contact point is a single spot, not a gap or an overlap.
- Confirm each wrist angle is visible as a bend between forearm and back-of-hand line.
- Confirm the four knuckle bumps on each hand sit along one ridge line.
- Confirm the thumbs are on opposite sides and do not cross the knuckles.
Worked example
A left hand comes from the left and a right hand from the right. The contact point is centered. The left wrist angle is 35 degrees and the right wrist angle is 40 degrees, both hypothetical. Describe how to place the forearm lines and ridge line so the bump reads correctly.
Worked answer
Mark the contact point on the midline. Draw the left forearm line from the left edge toward the contact point, stopping two x-heights short, then bend the left back-of-hand line toward the contact at 35 degrees. Draw the right forearm from the right edge, stopping two x-heights short, then bend the right back-of-hand line at 40 degrees. Draw one short ridge line through the contact point and place four knuckle bumps on each side along it. Tuck the left thumb on the outer left side and the right thumb on the outer right side. Erase construction lines inside the contact area.
Four practice exercises
Exercise 1
On a blank page, mark a contact point and draw one short ridge line through it. Place four knuckle marks on each side of the contact point along that ridge. Do not draw the fists yet. Describe what you should see.
Show answer and check
A single cross or dot with a short tilted line through it, and four evenly spaced marks on each side of the cross along that line.
Why: Fixing the contact and ridge first prevents the two fists from drifting apart later. The marks are the anchor for both hands.
Check: Confirm all eight knuckle marks sit on the same ridge line and the contact point is a single spot.
Exercise 2
Draw a left forearm line ending two x-heights from a contact point, then a left back-of-hand line at a 35-degree bend as a hypothetical example. Draw a right forearm and back-of-hand line at a 40-degree bend. Check that the two forearm lines diverge away from the contact point.
Show answer and check
The forearm lines form a shallow V opening away from the contact point, with each back-of-hand line bending toward the contact at its own angle.
Why: Diverging forearms show the hands coming from opposite sides, which is what makes the bump read as two figures rather than one.
Check: Trace each forearm line backward from its wrist; the lines should separate as they move away from the contact point.
Exercise 3
Build both fists as rounded boxes behind the ridge lines, add four knuckle bumps per hand, and tuck each thumb on the outer side. Then erase construction lines inside the contact area. Describe the final check.
Show answer and check
The final drawing shows one contact point, aligned knuckle ridges, two visible wrist bends, and thumbs on opposite outer sides with no construction lines crossing the contact.
Why: The check confirms the three teaching targets: contact, wrist angle, and alignment.
Check: Look for a single contact spot, a visible bend on each wrist, and knuckle bumps that meet rather than cross.
Exercise 4
A classmate draws a fist bump where the left knuckle ridge sits higher than the right and the thumbs cross over the knuckles. Name the two faults and state one fix for each.
Show answer and check
Fault one: misaligned knuckle ridges; fix by drawing one ridge line through the contact point and moving both sets of knuckles onto it. Fault two: thumbs crossing the knuckles; fix by tucking each thumb along the outer side of its own fist.
Why: Both faults break the single-contact and clear-alignment reading, so the fixes restore those two targets.
Check: After the fix, confirm the knuckle bumps share one ridge line and each thumb sits on an outer side.
Common mistakes
- Drawing two complete fists first and then trying to make them touch. Mark the contact point and ridge line before building either fist, then build outward from the contact.
- Making both wrist angles identical, so the pose looks stiff or mirrored. Use slightly different angles, such as 35 and 40 degrees as hypothetical examples, and check each against its own forearm line.
- Letting one knuckle ridge sit higher than the other. Draw one short ridge line through the contact point and place all knuckle bumps on both hands along that same line.
- Wrapping the thumbs across the knuckles so the hands overlap confusingly. Tuck each thumb along the outer side of its own fist, on opposite sides of the contact point.
Self-check rubric
- One clear contact point where the two fists meet, with no gap or overlap.
- Two distinct wrist angles visible as bends between forearm and back-of-hand lines.
- Knuckle ridges of both hands aligned along one short line through the contact point.
- Thumbs tucked on opposite outer sides, not wrapped across the knuckles.
- Construction lines erased and final outline readable as a paired gesture.
- Valid alternatives accepted: different hand sizes, slightly different angles, and either hand on top at the contact, provided alignment and contact remain clear.
Questions and answers
Do I need to measure angles in degrees?
No. You can estimate the bend by eye or count grid squares. Degree values in this lesson are hypothetical examples; replace them after measuring your own drawing surface.
What is x-height here?
X-height is the vertical distance from your baseline to your midline in your own lettering. Use it as a repeatable unit for spacing the wrists and forearms.
Can the hands be different sizes?
Yes. Slight size differences are valid and often look more natural. Keep the knuckle ridges aligned and the contact point single.
How do I know the drawing is finished?
When one contact point, two visible wrist angles, aligned knuckle ridges, and opposite-side thumbs all read clearly without construction lines.