Free original lessons
Foreshortened Group Pose: Depth Layering in Figure Drawing
Plan a three-figure group with clear front, mid, and back zones, overlap order, and foreshortening cues using a simple, checkable drawing convention.
Free lesson
Four exercises
Worked answers
Object Drawing Lessons
This lesson teaches how to arrange and draw a small group of figures so that depth reads clearly through overlap, scale, and foreshortening. You will use a defined convention: the front zone is drawn first and overlaps the mid zone, which overlaps the back zone. Foreshortening is shown by shortening limbs that point toward or away from the viewer and by placing feet higher or lower on the page according to depth. Letter styles and figure proportions vary, so the rubric rewards consistent depth cues rather than a single correct drawing. All measurements are hypothetical examples; measure your own paper and tools before drawing.
Practice materials: Printable downloads are not available for this lesson yet. Use the instructions and four exercises below.
Reference illustration
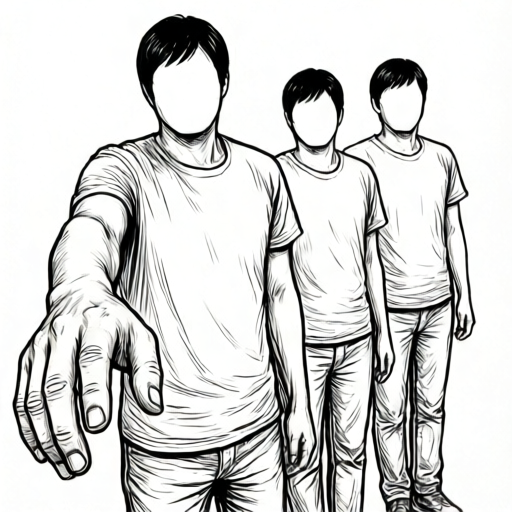
Use the stated measurements and conventions for each exercise.
Set Up Depth Zones and Overlap Order
Divide your page into three horizontal bands: front zone at the bottom, mid zone in the middle, and back zone at the top. These bands are guides, not rigid borders. Figures in the front zone are drawn largest and placed lowest; back-zone figures are smallest and highest. Overlap order follows the same rule: front figures cover mid figures, and mid figures cover back figures. Draw the back zone first, then the mid zone, then the front zone so that nearer figures sit on top.
Use a simple overlap arrow convention: draw a short arrow from the figure that should appear in front to the figure it covers. For example, an arrow from the front figure's shoulder to the mid figure's torso means the front shoulder is drawn over the mid torso. Keep arrows outside the figure outlines so they do not clutter the drawing.
- Draw three light horizontal guide lines to mark the bottom of the front zone, the mid zone, and the back zone.
- Sketch the back-zone figure first, using the smallest scale and placing its feet near the back-zone line.
- Sketch the mid-zone figure next, slightly larger, with feet near the mid-zone line.
- Sketch the front-zone figure last, largest, with feet near the front-zone line.
- Add overlap arrows showing which figure covers which, then erase the guide lines after the outlines are clear.
Apply Foreshortening to Limbs and Torso
Foreshortening makes a limb or torso look shorter when it points toward or away from the viewer. In a group pose, use foreshortening on the figure that reaches toward the viewer, such as an arm extended forward or a leg stepping toward the front zone. A simple convention is to shorten the forward-pointing limb by about one-third of its side-view length and to draw its end larger than its base. These numerical values are hypothetical examples; adjust them to match your observed pose.
Keep the head and shoulders consistent with the figure's scale. A common mistake is to foreshorten the arm but leave the hand the same size as a non-foreshortened hand. Instead, enlarge the hand slightly when it is closer to the viewer and reduce it when it points away. Check that the foreshortened limb connects to the torso at a believable angle and that the overlap order still reads correctly.
- Choose one limb per figure to foreshorten, preferably the limb that points toward or away from the viewer.
- Mark the limb's base at the shoulder or hip and its end at the hand or foot.
- Shorten the limb's length along its pointing direction and enlarge the end that is closer to the viewer.
- Check that the foreshortened limb does not cross another figure in a way that breaks the overlap order.
- Compare the limb's size to the figure's head; if the hand looks too small for a forward reach, enlarge it slightly.
Use Scale and Placement as Depth Cues
Scale and placement reinforce overlap. A figure drawn 20 percent larger than another and placed lower on the page reads as closer. Use a simple ratio: if the back figure's head is 2 units tall, the mid figure's head might be 2.5 units and the front figure's head 3 units. These are hypothetical examples; choose ratios that fit your page and pose. Keep the ratios consistent across all figures so the depth order is unambiguous.
Placement works with scale: the front figure's feet sit lowest, the mid figure's feet sit higher, and the back figure's feet sit highest. Avoid placing a back figure's feet below a front figure's feet, because that contradicts the depth order. If figures sit or kneel, use the lowest visible body part as the placement marker and keep the same order.
- Assign a head-height unit to each figure, increasing from back to front.
- Place each figure's lowest visible body part on the corresponding zone line.
- Check that no back-zone figure's lowest point is below a front-zone figure's lowest point.
- Adjust scale ratios so the front figure is clearly largest but not so large that it crowds the page.
- Confirm that overlap arrows match the scale and placement order.
Review and Refine the Group
After sketching, review the drawing against three checks: overlap order, scale order, and foreshortening consistency. Overlap order is correct if every front figure covers the mid figure it overlaps and every mid figure covers the back figure. Scale order is correct if head heights increase from back to front. Foreshortening is consistent if forward-pointing limbs are shortened and their ends enlarged, while side-view limbs keep their normal length.
Refine by strengthening the outlines of front figures and lightening the outlines of back figures. This line-weight convention adds a second depth cue without changing the pose. Keep the convention explicit: thicker lines mean closer, thinner lines mean farther. Do not rely on shading alone, because shading can obscure the overlap order.
- Trace over the front figure's outline with a thicker line than the mid figure's outline.
- Trace the mid figure's outline thicker than the back figure's outline.
- Erase any guide lines that cross figure outlines.
- Recheck the overlap arrows against the final line weights.
- Label the three zones lightly outside the drawing frame for reference.
Worked example
A three-figure group stands in a line. The back figure's head is 2 units tall, the mid figure's head is 2.5 units, and the front figure's head is 3 units. The front figure reaches forward with one arm. Describe the overlap order, placement, and foreshortening convention for a clear depth read.
Worked answer
Draw the back figure first with feet highest on the page, then the mid figure with feet lower, then the front figure with feet lowest. Overlap order: front covers mid, mid covers back. Foreshorten the front figure's forward arm by shortening its length along the pointing direction and enlarging the hand slightly. Use thicker outlines on the front figure and thinner outlines on the back figure. Check that head heights increase from back to front and that no back figure's lowest point is below a front figure's lowest point.
Four practice exercises
Exercise 1
Three figures stand in a group. The back figure's head is 2 units, the mid figure's head is 2.5 units, and the front figure's head is 3 units. The front figure's feet are at the bottom guide line, the mid figure's feet are 4 units higher, and the back figure's feet are 8 units higher. State the overlap order and the placement order.
Show answer and check
Overlap order: front covers mid, mid covers back. Placement order: front feet lowest, mid feet 4 units higher, back feet 8 units higher.
Why: Overlap follows the depth zones: nearer figures cover farther ones. Placement follows the lowest visible body part, which increases in height from front to back.
Check: Verify that the front figure's feet are lowest and the back figure's feet are highest, and that the overlap arrows point from front to mid to back.
Exercise 2
A mid-zone figure reaches toward the viewer with one arm. The arm's side-view length is 6 units. Using the lesson's hypothetical convention, shorten the forward-pointing arm by one-third and state its drawn length. Then state whether the hand should be enlarged or reduced.
Show answer and check
Drawn length is 4 units. The hand should be enlarged because it is closer to the viewer.
Why: One-third of 6 units is 2 units, so 6 minus 2 equals 4 units. A forward-pointing limb ends closer to the viewer, so its end is enlarged under the convention.
Check: Confirm that 4 units is two-thirds of 6 units and that the hand is described as enlarged, not reduced.
Exercise 3
A student draws the front figure first, then the mid figure, then the back figure. The back figure's outline is thicker than the front figure's outline. Identify two depth-cue mistakes and state a fix for each.
Show answer and check
Mistake 1: drawing front to back can break overlap order; fix by drawing back to front. Mistake 2: thicker outline on the back figure contradicts depth; fix by using thicker outlines on front figures and thinner on back figures.
Why: Overlap order is easiest to keep consistent when farther figures are drawn first. Line weight is a depth cue, so it must match the overlap and scale order.
Check: Check that the revised drawing has back-to-front drawing order and that line weight decreases from front to back.
Exercise 4
A group has a front figure with head height 3 units and a back figure with head height 2 units. The front figure's lowest visible body part is 1 unit above the bottom guide line, and the back figure's lowest visible body part is 9 units above the bottom guide line. State whether the scale and placement orders agree, and explain.
Show answer and check
Yes, they agree. The front figure is larger (3 units versus 2 units) and placed lower (1 unit versus 9 units above the bottom guide line), so both cues read as closer.
Why: Scale order requires larger figures closer; placement order requires lower figures closer. Both conditions are met.
Check: Compare head heights and lowest-point heights: larger and lower for the front figure, smaller and higher for the back figure.
Common mistakes
- Drawing the front figure first and then trying to fit the back figure behind it. Draw back to front so nearer figures naturally cover farther ones and overlap order stays consistent.
- Foreshortening a forward-pointing arm but leaving the hand the same size as a side-view hand. Enlarge the hand slightly when it is closer to the viewer and reduce it when it points away, keeping the limb's end proportional to its shortened length.
- Placing the back figure's feet lower on the page than the front figure's feet. Use the lowest visible body part as the placement marker and keep feet or knees ordered from highest at the back to lowest at the front.
- Using line weight that contradicts the overlap order, such as a thicker line on a back figure. Apply thicker outlines to front figures and thinner outlines to back figures, and check that line weight matches the overlap arrows.
Self-check rubric
- Overlap order is consistent: front figures cover mid figures, and mid figures cover back figures.
- Scale order is consistent: head heights increase from back to front, using a stated ratio.
- Placement order is consistent: the lowest visible body part is lowest for the front figure and highest for the back figure.
- Foreshortening convention is applied to at least one forward- or away-pointing limb per figure, with shortened length and enlarged or reduced end.
- Line-weight convention matches depth: thicker outlines for closer figures, thinner for farther figures.
- Valid alternatives are accepted if the depth cues are internally consistent and the convention is stated.
Questions and answers
Do I need to use exact numerical ratios for scale?
No. The ratios in this lesson are hypothetical examples. Choose consistent ratios that make the depth order clear on your page, and measure your own paper to set zone lines.
Can I foreshorten more than one limb per figure?
Yes, but keep the convention consistent. If two limbs point toward the viewer, shorten both and enlarge both ends. Check that the overlaps still read correctly.
What if my figures are sitting or kneeling?
Use the lowest visible body part as the placement marker. Keep the same order: front figure's lowest point lowest on the page, back figure's highest. Scale and overlap still apply.
How do I know the drawing is finished?
Use the rubric: overlap order, scale order, foreshortening consistency, and line-weight convention all match. If any check fails, adjust the drawing before calling it complete.