Free original lessons
Guitarist Drawing: Torso, Arms, and Instrument Alignment
Learn to draw a guitarist by building torso, arms, and guitar alignment step by step, with a convention-based rubric and four self-contained practice tasks.
Free lesson
Four exercises
Worked answers
Object Drawing Lessons
Drawing a guitarist is mostly a problem of alignment: the torso sets the lean, the arms create the reach, and the instrument must sit convincingly against both. This guide uses a simple construction order and an explicit convention for judging proportions and placement. You will work from a torso block to arm paths to guitar alignment, then check hand placement against the strings. All measurements are hypothetical examples; measure your own paper and tools when adapting them. The approach is designed for pencil and paper, but the same logic works digitally.
Practice materials: Printable downloads are not available for this lesson yet. Use the instructions and four exercises below.
Reference illustration
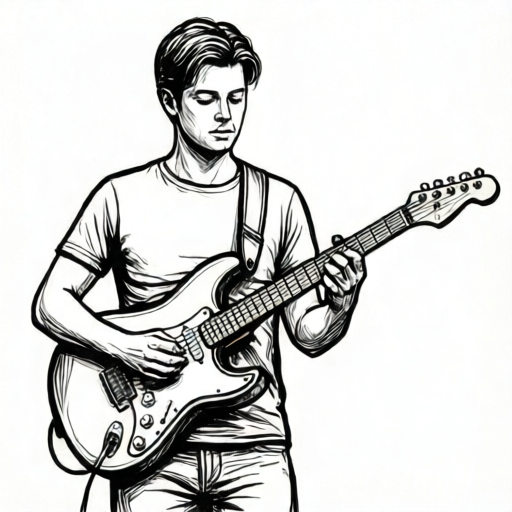
Use the stated measurements and conventions for each exercise.
Build the torso block first
Start with a torso block rather than a stick figure. Draw a rounded rectangle about 6 cm tall and 4 cm wide on a 15 cm by 20 cm practice area. This block represents the ribcage and gives the arms a stable origin. Mark a center line down the block and a shoulder line about 1 cm below the top edge. The guitarist usually leans slightly toward the instrument, so tilt the block 5 to 10 degrees; label this tilt as a hypothetical example and adjust to your pose.
Add a hip block below, about 3 cm tall and 4 cm wide, overlapping the torso by 1 cm. The overlap keeps the figure connected. Mark the waist where the blocks meet. Keep the torso block simple: no clothing folds yet. The goal is a clear volume that the arms and guitar can wrap around.
- Draw a 6 cm by 4 cm rounded rectangle for the torso.
- Add a center line and a shoulder line 1 cm from the top.
- Tilt the torso 5 to 10 degrees toward the strumming side.
- Draw a 3 cm by 4 cm hip block overlapping the torso by 1 cm.
- Mark the waist seam and check that the figure stands or sits without floating.
Route the arms with clear joints
Arms are paths with joints, not tubes. From the shoulder line, draw the upper arm as a line to the elbow, then the forearm as a line to the wrist. Use two different lengths: upper arm about 3 cm, forearm about 2.5 cm, as hypothetical proportions. The strumming arm crosses the guitar body; the fretting arm reaches toward the neck. Keep the elbow below the shoulder line unless the pose clearly raises it.
Mark the wrist and hand as a small oval about 1.5 cm long. The hand oval should touch the guitar before you draw fingers. This order prevents the common error of drawing hands that hover above the instrument. Check that both arms originate from the shoulder line, not from the neck or the guitar.
- Draw the upper arm from shoulder to elbow, about 3 cm.
- Draw the forearm from elbow to wrist, about 2.5 cm.
- Place a 1.5 cm hand oval at each wrist.
- Route the strumming hand over the guitar body.
- Route the fretting hand toward the neck and check both shoulders connect.
Align the guitar to the torso and hands
Draw the guitar as a simple body shape and a neck line. The guitar body sits against the torso, roughly centered on the strumming side. The neck points toward the fretting hand. Use a body about 5 cm wide and 6 cm tall, and a neck about 8 cm long, as hypothetical examples. The guitar should overlap the torso block, not float beside it.
Align the strings as a single line from the bridge to the nut. The strumming hand oval should cross this line near the sound hole; the fretting hand oval should sit behind the nut on the neck. Check that the neck angle matches the fretting arm's reach. If the neck points away from the hand, adjust the neck before adding details.
- Draw the guitar body against the torso, about 5 cm by 6 cm.
- Draw the neck toward the fretting hand, about 8 cm long.
- Mark the bridge and nut, then draw one string line between them.
- Place the strumming hand oval across the string line near the sound hole.
- Place the fretting hand oval behind the nut and check the neck angle.
Check hand placement and finish
Before adding details, run a placement check. The strumming hand should overlap the guitar body and cross the string line. The fretting hand should touch the neck behind the nut. The guitar body should overlap the torso. The shoulders should sit on the shoulder line. If any of these fail, adjust the construction lines rather than erasing details.
Finish with simple clothing and hair shapes that follow the torso block. Keep the guitar edges visible where they overlap the body. Use the convention below to judge your drawing: x-height is measured from baseline to midline, and letter styles vary, so valid alternatives are allowed. For figure drawing, use the same idea: measure from a clear baseline, such as the hip seam, to a midline, such as the shoulder line, and accept different stylizations that keep the alignment checks true.
- Check strumming hand overlaps body and crosses string line.
- Check fretting hand touches neck behind nut.
- Check guitar body overlaps torso.
- Check shoulders sit on shoulder line.
- Add clothing and hair, then re-check alignment.
Worked example
A seated guitarist leans 8 degrees toward the strumming side. The torso block is 6 cm by 4 cm, the upper arm is 3 cm, the forearm is 2.5 cm, and the guitar body is 5 cm by 6 cm. Describe the alignment checks.
Worked answer
The torso tilts 8 degrees. The strumming arm routes from the shoulder line to the elbow, then to the wrist, and the hand oval crosses the string line near the sound hole. The fretting arm reaches to the neck, and its hand oval sits behind the nut. The guitar body overlaps the torso by at least 1 cm. All four alignment checks pass: hands touch the guitar, guitar overlaps torso, shoulders sit on the shoulder line, and the neck points toward the fretting hand.
Four practice exercises
Exercise 1
Draw a standing guitarist with a 6 cm by 4 cm torso block, a 3 cm upper arm, a 2.5 cm forearm, and a 5 cm by 6 cm guitar body. The torso tilts 5 degrees. Check hand placement.
Show answer and check
The strumming hand oval crosses the string line near the sound hole; the fretting hand oval sits behind the nut; the guitar body overlaps the torso; shoulders sit on the shoulder line.
Why: The construction order keeps the torso stable, the arm lengths consistent, and the guitar aligned to the hands. The 5-degree tilt is a hypothetical example.
Check: Measure the torso, arm segments, and guitar body against the stated sizes, then verify the four alignment checks in order.
Exercise 2
A seated guitarist has a torso block 6 cm tall and a hip block 3 cm tall overlapping by 1 cm. The guitar neck is 8 cm long. Describe where the fretting hand oval should sit and why.
Show answer and check
The fretting hand oval should sit behind the nut on the neck, touching the neck line, because the neck points toward that hand and the hand must contact the instrument.
Why: The neck length and direction are set by the fretting arm's reach. Placing the hand behind the nut keeps the alignment check true.
Check: Confirm the hand oval touches the neck and sits behind the nut; confirm the neck points toward the fretting hand.
Exercise 3
Draw a guitarist whose strumming hand hovers 1 cm above the guitar body. Identify the mistake and correct it using the construction order.
Show answer and check
The mistake is a hovering hand. Correct it by moving the hand oval down until it overlaps the guitar body and crosses the string line, then redraw fingers from that contact point.
Why: Hands must touch the instrument before details are added. The construction order places hand ovals before fingers.
Check: Check that the hand oval overlaps the body and crosses the string line; check that no gap remains between hand and guitar.
Exercise 4
A guitarist's guitar body floats 2 cm beside the torso. The torso is 4 cm wide and the guitar body is 5 cm wide. Describe the correction and the alignment check.
Show answer and check
Move the guitar body until it overlaps the torso by at least 1 cm, then re-check that the strumming hand still crosses the string line and the fretting hand still touches the neck.
Why: The guitar must sit against the torso, not beside it. Moving the body changes hand placement, so all checks must be repeated.
Check: Measure the overlap between guitar body and torso, then verify hand contact and neck direction.
Common mistakes
- Drawing the guitar first and forcing the arms to reach it. Build torso and arm paths first, then align the guitar to the hands.
- Letting hands hover above the strings or neck. Place hand ovals so they touch the guitar before drawing fingers.
- Making both arms the same length and angle. Use different upper arm and forearm lengths and route each arm to its task.
- Floating the guitar beside the torso instead of overlapping it. Draw the guitar body over the torso block and keep the overlap visible.
Self-check rubric
- Torso block is clear and tilted consistently with the pose.
- Shoulder line and waist seam are marked and used.
- Both arms originate from the shoulder line and have distinct joints.
- Strumming hand overlaps the guitar body and crosses the string line.
- Fretting hand touches the neck behind the nut.
- Guitar body overlaps the torso rather than floating.
- Neck angle matches the fretting arm's reach.
- Valid stylistic alternatives are accepted if alignment checks remain true.
Questions and answers
Do I need to draw a realistic guitar?
No. A simple body shape and neck line are enough if the alignment checks pass.
How do I know the arms are the right length?
Use consistent hypothetical proportions and check that each hand reaches its target on the guitar.
Can I use a different pose?
Yes. Keep the construction order and alignment checks; the tilt and reach can vary.
What does x-height mean here?
It is a measurement convention from baseline to midline. For figure checks, use a clear baseline and midline and accept valid stylistic alternatives.