Free original lessons
Charcoal Hand Drawing: Proportion and Knuckle Shading
Learn charcoal hand drawing with a measured proportion guide and focused knuckle shading zones. Includes a worked example, four practice tasks, and a clear rubric.
Free lesson
Four exercises
Worked answers
Object Drawing Lessons
This lesson teaches a reliable method for drawing a hand in charcoal, with emphasis on proportion and knuckle shading. You will use a defined convention: x-height is measured from the baseline (the wrist line) to the knuckle line, and letter styles may vary. The approach separates structure from tone so you can check proportions before adding charcoal shading. All measurements are simple and checkable; any numerical values are hypothetical examples you can adjust to your actual paper and charcoal.
Practice materials: Printable downloads are not available for this lesson yet. Use the instructions and four exercises below.
Reference illustration
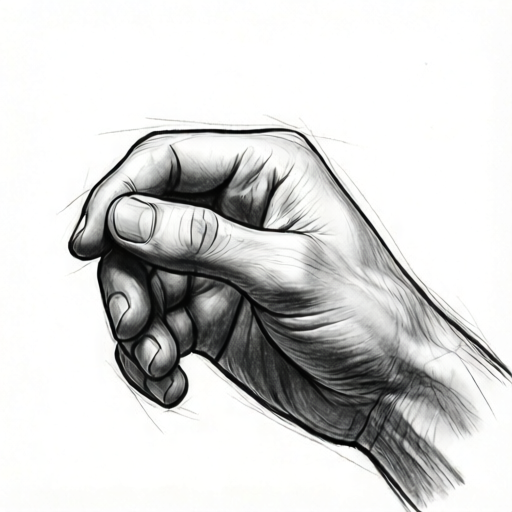
Use the stated measurements and conventions for each exercise.
Establishing Hand Proportion with a Simple Guide
Begin by drawing a light rectangular box on your paper. This box represents the hand's overall span from wrist to fingertip and from thumb side to little-finger side. Use a ruler to measure the box in centimeters; record the width and height. A hypothetical example is a box 12 cm wide and 18 cm tall. These numbers are examples only; measure your own paper and hand reference.
Inside the box, mark the wrist line near the bottom and the knuckle line about two-thirds of the box height from the bottom (one-third down from the top). If the wrist line is at the bottom, the palm occupies the lower two-thirds and the fingers occupy the upper third. If the wrist line is offset above the bottom, subtract the wrist-line height from the knuckle-line height to get palm height, and subtract the knuckle-line height from the box height to get finger height. This is a convention, not a universal rule; adjust if your hand reference differs. Draw a vertical center line to divide the hand into thumb side and finger side. Check the thumb-side width at the palm base against the finger-side width; either may be wider depending on the hand position, so compare rather than assume.
Use the x-height convention: measure from the baseline (the wrist line) to the knuckle line. This distance helps you compare finger lengths. For example, if the x-height is 6 cm, the middle finger may extend about 1.5 times that distance above the knuckle line in a hypothetical example. Keep units consistent in centimeters.
- Draw a light box and label width and height in centimeters.
- Mark the wrist line and knuckle line; measure the x-height from baseline to knuckle line.
- Draw a vertical center line and note thumb-side width versus finger-side width.
- Measure palm height as knuckle-line height minus wrist-line height, and finger height as box height minus knuckle-line height. If the wrist line is at the bottom and the knuckle line is at two-thirds of the box height, the palm height is about twice the finger height; this is a convention, so adjust if your reference differs.
Mapping Knuckle Shading Zones
Knuckle shading in charcoal should describe form, not outline. Identify four knuckle zones: the ridge of each knuckle, the dip between knuckles, the side plane of the finger, and the shadow under the knuckle. Use a tonal strip made with your charcoal: make five patches from light to dark. Label them 1 to 5. You can make your own strip now with scrap paper.
Apply the lightest tone (patch 1 or 2) on the top of the knuckle ridge. Use a mid tone (patch 3) in the dip between knuckles. Use a darker tone (patch 4) on the side plane facing away from the light. Use the darkest tone (patch 5) sparingly under the knuckle where the finger bends. Blend with a fingertip or paper stump only if you want soft transitions; keep some edges crisp for structure.
Check shading by squinting: the knuckle ridges should read as lighter bands, and the dips as darker recesses. If the whole hand looks flat, increase contrast between patch 2 and patch 4. If it looks muddy, reduce the darkest tone and clean your blending tool.
- Make a five-patch charcoal tonal strip and label 1 to 5.
- Place light tone on knuckle ridges and mid tone in dips.
- Add darker side-plane tone and a small darkest accent under each knuckle.
- Squint to check that ridges read lighter than dips; adjust contrast.
Building the Charcoal Drawing in Layers
Work from light to dark. First, draw the proportion guide lightly with a hard charcoal pencil or vine charcoal. Second, block in the palm and finger shapes with a light tone, keeping the guide visible. Third, add knuckle shading zones using the tonal strip as a reference. Fourth, refine edges and add the darkest accents only where needed.
Keep the charcoal from smudging by resting your hand on a clean sheet of paper. Measure the actual equipment you use, such as the width of your charcoal stick, and label any chosen numerical values as hypothetical examples. For instance, a hypothetical charcoal stick 0.7 cm wide can make a line about 0.7 cm thick; measure yours.
At the end, compare your drawing to the proportion guide: the x-height, the palm-to-finger ratio, and the thumb-side width. If proportions are off, correct them before adding more shading. Charcoal is forgiving; lift tone with a kneaded eraser and reapply.
- Draw the proportion guide lightly and keep it visible.
- Block in light tone over palm and fingers.
- Add knuckle shading zones from light to dark.
- Refine edges, add darkest accents, and check proportions against the guide.
Worked example
A hand reference fits a box 10 cm wide and 16 cm tall. The wrist line is 2 cm from the bottom, and the knuckle line is 8 cm from the bottom. Find the x-height from baseline to midline, and state a hypothetical middle-finger length above the knuckle line if it is 1.4 times the x-height.
Worked answer
The x-height is 8 cm minus 2 cm = 6 cm. The hypothetical middle-finger length above the knuckle line is 1.4 times 6 cm = 8.4 cm. Check: 2 cm wrist line + 6 cm x-height = 8 cm knuckle line, and 8 cm + 8.4 cm = 16.4 cm, which exceeds the 16 cm box by 0.4 cm. So the 1.4-times length does not fit; to fit, the maximum finger length is 16 minus 8 = 8 cm, which is about 1.33 times the x-height.
Why: Subtract the wrist-line height from the knuckle-line height to get the x-height. Multiply by the given ratio for the finger length. Add the knuckle-line height and finger length to check against the box height; if the sum exceeds the box, reduce the finger length.
Check: Re-measure the box height and the wrist and knuckle lines in centimeters. Confirm 8 minus 2 equals 6. Confirm 1.4 times 6 equals 8.4. Confirm 8 plus 8.4 equals 16.4, which is greater than 16, so the adjusted 8 cm finger length gives 8 plus 8 equals 16 cm, matching the box.
Four practice exercises
Exercise 1
A hand box is 9 cm wide and 15 cm tall. The wrist line is 3 cm from the bottom, and the knuckle line is 9 cm from the bottom. Find the x-height. If the index finger extends 1.2 times the x-height above the knuckle line, what is its hypothetical length, and does it fit inside the box?
Show answer and check
X-height = 9 minus 3 = 6 cm. Index finger length = 1.2 times 6 = 7.2 cm. Knuckle line plus finger length = 9 plus 7.2 = 16.2 cm, which exceeds the 15 cm box, so the 1.2-times length does not fit. The maximum length that fits is 15 minus 9 = 6 cm, which is 1.0 times the x-height.
Why: Subtract wrist line from knuckle line for x-height. Multiply by 1.2 for finger length. Add knuckle line and finger length and compare to box height.
Check: Re-measure in centimeters: 9 minus 3 equals 6; 1.2 times 6 equals 7.2; 9 plus 7.2 equals 16.2, greater than 15. The adjusted 6 cm finger gives 9 plus 6 equals 15 cm.
Exercise 2
You make a five-patch charcoal tonal strip. Patch 1 is lightest and patch 5 is darkest. You place patch 2 on knuckle ridges, patch 3 in dips, patch 4 on side planes, and patch 5 under knuckles. Describe one change that would increase contrast between ridges and dips, and one change that would reduce muddiness.
Show answer and check
To increase contrast, move ridges to patch 1 and dips to patch 4. To reduce muddiness, remove patch 5 from broad areas and keep it only as a small under-knuckle accent, and clean the blending tool.
Why: Contrast increases when the tone difference between ridges and dips is larger. Muddiness decreases when the darkest tone is limited and blending tools are clean.
Check: Squint at the drawing: ridges should read clearly lighter than dips. Check that patch 5 appears only in small under-knuckle areas.
Exercise 3
A hand box is 11 cm wide and 17 cm tall. The wrist line is 2 cm from the bottom. For this example, choose the knuckle line at two-thirds of the box height from the bottom. Find the knuckle-line height and the x-height. If the middle finger is 1.3 times the x-height above the knuckle line, does it fit?
Show answer and check
Two-thirds of 17 cm is about 11.33 cm, so the knuckle line is about 11.33 cm from the bottom. X-height = 11.33 minus 2 = 9.33 cm. Middle finger = 1.3 times 9.33 = about 12.13 cm. Knuckle line plus finger = 11.33 plus 12.13 = about 23.46 cm, which exceeds 17 cm, so it does not fit. The maximum finger length that fits is 17 minus 11.33 = about 5.67 cm.
Why: Multiply box height by two-thirds for the knuckle line. Subtract wrist line for x-height. Multiply by 1.3 for finger length. Add knuckle line and finger length and compare to box height.
Check: Use consistent centimeters: 17 times two-thirds is about 11.33; 11.33 minus 2 is 9.33; 1.3 times 9.33 is about 12.13; 11.33 plus 12.13 is about 23.46, greater than 17. The maximum fitting finger is 17 minus 11.33, about 5.67 cm.
Exercise 4
You draw a hand with a thumb-side palm width of 4 cm and a finger-side palm width of 5 cm at the palm base. The x-height is 6 cm. State whether the thumb side is narrower or wider, and describe one proportional check you would make before adding knuckle shading.
Show answer and check
The thumb side is narrower by 1 cm. Before shading, check that the palm height from wrist line to knuckle line equals the x-height of 6 cm, and that the finger lengths above the knuckle line are consistent with the x-height.
Why: Compare the two widths directly: 4 cm is less than 5 cm. Proportional checks use the x-height and palm height to catch errors before tone is added.
Check: Re-measure both widths in centimeters and subtract: 5 minus 4 equals 1 cm. Re-measure the palm height and confirm it matches the marked x-height of 6 cm.
Common mistakes
- Shading every knuckle with the same dark tone. Use the tonal strip: light on ridges, mid in dips, dark on side planes, darkest only under the knuckle.
- Ignoring the x-height and making fingers too short or too long. Measure from the baseline (wrist line) to the knuckle line, then compare finger length above the knuckle line to that x-height.
- Blending all edges until the hand looks flat. Keep some crisp edges at knuckle ridges and finger sides; blend only where form turns softly.
- Assuming the thumb side must be wider without checking the reference. Compare the palm base width on the thumb side with the finger side and adjust the guide to match your reference before shading.
Self-check rubric
- Proportion guide is present and measured in consistent units.
- X-height from baseline to knuckle line is marked and used to compare finger lengths.
- Palm-to-finger ratio and thumb-side width are checked against the guide and the reference.
- Knuckle shading uses at least three distinct tones from the tonal strip.
- Knuckle ridges read lighter than dips when squinting.
- Darkest accents are limited to under-knuckle shadows and side planes.
- Some edges remain crisp; blending does not flatten the form.
- Valid alternative hand positions and letter styles are accepted if proportions and tonal logic are consistent.
Questions and answers
Do I need special charcoal paper?
No. Use any paper with some tooth. Measure your paper and charcoal, and label any numerical values as hypothetical examples.
How do I know if my knuckle shading is working?
Squint at the drawing. Knuckle ridges should read lighter than the dips between them. If not, adjust contrast using your tonal strip.
Can I use a different hand position?
Yes. The proportion guide is a convention. Adjust the box, wrist line, and knuckle line to your reference, then keep units consistent.
What if my charcoal is wider than the example?
Measure your actual charcoal width and use that number. The 0.7 cm example is hypothetical; your measurement replaces it.