Free original lessons
Draw a Haunted House: Crooked Roof, Boarded Windows, Porch and Silhouette
Learn to construct a haunted house drawing with a crooked roofline, boarded windows, a porch, and a spooky silhouette using simple measured steps.
Free lesson
Four exercises
Worked answers
Object Drawing Lessons
This lesson teaches a repeatable way to draw a haunted house. You will build the shape in layers: first the main mass, then a deliberately crooked roof, then windows with boards, a porch, and finally a dark silhouette treatment. A construction midline is simply a horizontal guide line across the body of the house; it is not the same as the letter x-height convention (baseline to midline of a letter), which is not used in these steps. Letter styles vary, so your drawing does not need to match a single universal answer. All measurements are hypothetical examples; measure your own paper and tools. Work in pencil first, then darken chosen lines.
Practice materials: Printable downloads are not available for this lesson yet. Use the instructions and four exercises below.
Reference illustration
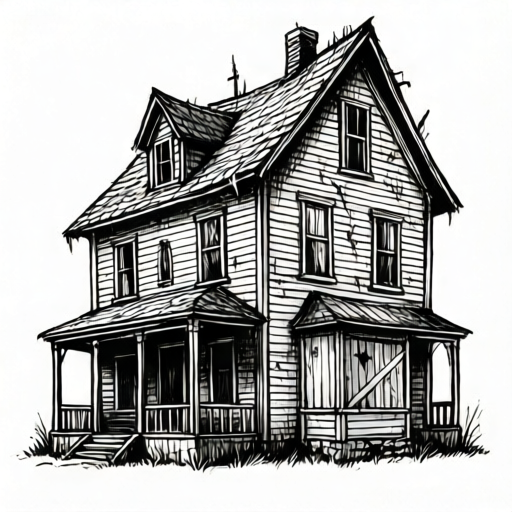
Use the stated measurements and conventions for each exercise.
Massing the House
Start with a rectangle for the main body. On a 20 cm wide sheet, a hypothetical body 10 cm wide and 7 cm tall leaves room for roof and porch. Lightly mark the baseline and the midline of the body; these guide window placement.
Add a smaller side mass if you want an L-shape. Keep walls vertical at this stage so the crooked roof reads as intentional rather than accidental.
- Draw a light rectangle 10 cm by 7 cm for the main body.
- Mark a baseline at the bottom and a midline 3.5 cm up.
- Add a side rectangle 4 cm by 5 cm attached to one side.
- Check that all wall lines are vertical using a straight edge.
Crooked Roofline
A crooked roof is built from two or three sloping segments that change angle. Choose a peak point above the body, then draw each slope as a straight segment with a slight tilt. Vary the tilt by a few degrees between segments; the change is what makes it look haunted.
Extend eaves beyond the walls by about 1 cm. Add a chimney as a narrow rectangle tilted slightly, and check that its top is above the roof peak.
- Mark a peak 3 cm above the body top, offset from center.
- Draw the left slope as a straight line to the eave.
- Draw the right slope with a different tilt, meeting the peak.
- Add a tilted chimney 1.5 cm wide and 3 cm tall.
- Extend eaves 1 cm past each wall.
Boarded Windows and Porch
Place windows between the baseline and midline. A hypothetical window is 2 cm wide and 2.5 cm tall. Draw the frame, then add two boards as narrow rectangles crossing the window at different angles. Boards should overlap the frame slightly.
The porch is a horizontal deck line with two or three posts and a small roof. Keep posts vertical and evenly spaced; the porch roof can echo the crooked angle of the main roof.
- Draw two windows on the front wall, 2 cm by 2.5 cm each.
- Add two boards per window at different angles, overlapping the frame.
- Draw a porch deck line 1 cm below the windows.
- Add three vertical posts and a small sloped porch roof.
- Check that boards do not cover the entire window opening.
Spooky Silhouette
Silhouette means darkening the house shape against a lighter sky. Use a consistent convention: fill the roof and walls with dark pencil, leave window openings lighter, and add a few bare tree branches behind the house. Letter styles vary, so any clear dark shape is acceptable if the outline reads.
Keep the silhouette simple. Avoid detailed texture; the goal is a readable dark shape with a crooked roof and boarded windows.
- Darken the roof and walls with even pencil strokes.
- Leave window openings lighter than the walls.
- Add two or three bare branches behind the house.
- Check that the crooked roof and porch still read as separate shapes.
Worked example
Draw a haunted house on a 20 cm by 15 cm sheet using a body 10 cm wide and 7 cm tall, a peak 3 cm above the body, two windows 2 cm by 2.5 cm, and a porch deck 1 cm below the windows.
Worked answer
The body occupies the lower center. The peak sits 3 cm above the body top, offset 2 cm from center. Two windows are placed between baseline and midline, each with two angled boards. The porch deck is 1 cm below the windows with three vertical posts. The roof and walls are darkened, windows left lighter, and two bare branches added behind.
Four practice exercises
Exercise 1
On a 20 cm wide sheet, draw a body 8 cm wide and 6 cm tall. Mark a midline 3 cm up. Place one window 2 cm wide and 2 cm tall between baseline and midline. Add two boards at different angles. Describe where the window sits.
Show answer and check
The window sits between the baseline and the 3 cm midline, centered on the body width, with two boards crossing at different angles and leaving a small gap.
Why: The midline at 3 cm divides the 6 cm body into two equal rows. A 2 cm window fits within the 8 cm width with 3 cm margins on each side.
Check: Measure the window height: it should be 2 cm and end below the 3 cm midline. Check that boards overlap the frame but do not cover the whole opening.
Exercise 2
Draw a roof with a peak 2 cm above a 6 cm tall body. The left slope drops 4 cm horizontally and the right slope drops 5 cm horizontally. State the total roof width and check the peak height.
Show answer and check
Total roof width is 9 cm. The peak is 2 cm above the body top.
Why: The two horizontal drops add: 4 cm plus 5 cm equals 9 cm. The peak height is given as 2 cm above the body.
Check: Measure the horizontal distance from left eave to right eave; it should be 9 cm. Measure from body top to peak; it should be 2 cm.
Exercise 3
A porch deck is 1 cm below two windows that are 2.5 cm tall and start 1 cm above the baseline. How far above the baseline is the porch deck?
Show answer and check
The porch deck is at the baseline, 0 cm above it.
Why: The window bottom is 1 cm above the baseline. The porch deck is 1 cm below the window bottom, so 1 cm minus 1 cm equals 0 cm above the baseline. The deck therefore sits on the baseline.
Check: Mark the window bottom at 1 cm above baseline. Mark 1 cm below it; the deck line should coincide with the baseline. If it does not, adjust the window start height.
Exercise 4
Draw a silhouette house with a crooked roof and two boarded windows. Add three bare branches behind the house. Describe one check that confirms the silhouette is readable.
Show answer and check
The silhouette is readable if the roof peak, porch, and window gaps remain visible as separate lighter or darker areas when viewed from 2 meters away.
Why: Silhouette readability depends on contrast between the dark house and lighter openings or sky. Branches should not merge with the roof outline.
Check: View the drawing from a distance and confirm you can point to the roof peak, each window gap, and the porch deck without tracing lines.
Common mistakes
- Making the roof crooked by accident with wobbly lines. Use straight segments with deliberate angle changes, and check each slope with a straight edge.
- Boards covering the whole window so it looks like a solid wall. Leave at least one small gap in each window and overlap boards only slightly past the frame.
- Porch posts leaning or unevenly spaced. Mark post positions first, keep posts vertical, and measure spacing with a ruler.
- Silhouette too dark to see the roof and porch shapes. Leave window openings lighter and keep the outline clear before filling.
Self-check rubric
- Crooked roofline is made of straight segments with deliberate angle changes.
- At least two windows have boards that overlap the frame but leave a gap.
- Porch has a deck line, vertical posts, and a small roof.
- Silhouette is dark but the roof, windows, and porch remain readable.
- Measurements are consistent and units are stated.
- Valid alternative styles are accepted if the brief is met.
Questions and answers
Do I need to match a single correct haunted house?
No. The convention allows valid alternatives. Any drawing with a crooked roof, boarded windows, a porch, and a readable silhouette meets the brief.
What does x-height mean here?
X-height is a typography term for the distance from a letter's baseline to its midline. It is not used in this drawing lesson; the midline here is simply a horizontal guide across the house body for placing windows.
Can I use different measurements?
Yes. All numbers are hypothetical examples. Measure your own paper and keep units consistent.
How do I check the drawing is balanced?
Look at the house from a distance. The roof peak should sit above the body, the porch should be level, and the silhouette should read as one shape.