Free original lessons
Hoodie Drawing: Front and Side Views with a Shadow Grid
Learn to draw a hoodie in front and side views using a simple grid, fold cues, and shadow placement for clear, believable clothing sketches.
Free lesson
Four exercises
Worked answers
Object Drawing Lessons
This lesson teaches a reliable method for drawing a hoodie in front and side views on a grid. You will establish proportion with simple shapes, add fold cues at stress points, and place shadows using a consistent light direction. The grid helps you compare widths, heights, and alignment between views. A defined convention keeps the work checkable: x-height means the distance from baseline to midline of a letter, and letter styles vary, so use the convention only as a measuring guide, not a universal style rule. All measurements are hypothetical examples; measure your own paper and tools. The goal is a clear, readable hoodie drawing with fold and shadow cues, not fabric rendering or figure construction.
Practice materials: Printable downloads are not available for this lesson yet. Use the instructions and four exercises below.
Reference illustration
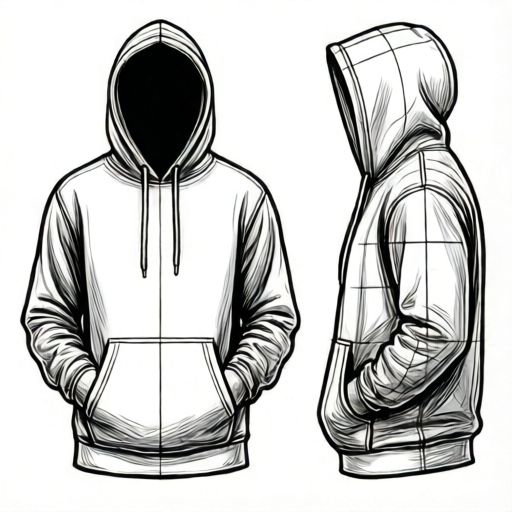
Use the stated measurements and conventions for each exercise.
Set up the grid and establish proportion
Choose a light source direction, for example upper left, and keep it consistent in both views. On your paper, draw a rectangular grid with equal squares. A hypothetical example is 1 cm squares on A4 paper, but measure your actual paper and use consistent units. Label the front view frame and the side view frame with the same grid size so comparisons are fair.
In the front view, block the hoodie as a rounded rectangle for the torso, a smaller rounded shape for the hood behind the neck, and two sleeve tubes angled slightly outward. In the side view, block the torso as a narrower rounded rectangle, the hood as a curved shape at the back of the neck, and one sleeve overlapping the torso. Use grid squares to set key widths: for example, shoulder width might be 6 squares, torso length 8 squares, and sleeve length 7 squares. These numbers are hypothetical; adjust to your design.
- Draw two equal grid frames side by side and label front and side.
- Mark a baseline and a midline in each frame to compare heights.
- Block the torso, hood, and sleeves with simple rounded shapes using grid squares.
- Check that shoulder width, torso length, and sleeve length use the same square count in both views where appropriate.
Add fold cues at stress points
Folds appear where fabric bends or compresses. For a hoodie, common fold cues are at the armpits, elbows, waist hem, and where the hood meets the shoulders. Draw folds as short curved lines that follow the pull direction, not as random scribbles. In the front view, add two or three curved lines from the armpit toward the chest and a few short lines at the hem. In the side view, add elbow crease lines and a curved line where the hood folds behind the neck.
Keep fold lines light and sparse. Use the grid to place them consistently: for example, an elbow crease might sit two squares below the shoulder line. Check that folds do not cross the body outline unless they represent a seam. Valid alternatives include different fold patterns as long as they follow stress points and the chosen light direction.
- Identify stress points: armpits, elbows, hem, and hood-shoulder junction.
- Draw short curved fold lines that follow the pull direction.
- Use grid squares to place folds at consistent heights in both views.
- Keep folds light and avoid crossing outlines except at seams.
Place shadows with a consistent light direction
With light from upper left, shadows fall on the lower right of forms. In the front view, shade under the hood opening, along the right side of the torso, under the sleeves, and at the hem. In the side view, shade the back of the hood, the lower back of the torso, and under the sleeve. Use the grid to keep shadow edges aligned: for example, a shadow edge might run diagonally across two squares.
Use simple hatching or light shading, not fabric rendering. The shadow grid overlay is a planned printable that would show where shadows typically fall; for now, use your own grid and the convention above. Check that shadows are on the side opposite the light source and that they do not cover fold lines completely. Valid alternatives include different hatch directions as long as the shadow placement is consistent.
- Mark the light direction on each frame.
- Shade the lower right of forms in the front view and the back/lower areas in the side view.
- Use the grid to align shadow edges across squares.
- Keep shading simple and leave fold lines visible.
Compare views and refine
Place the front and side views side by side and compare key landmarks: hood height, shoulder line, hem line, and sleeve length. Use the grid to check that the hood in the side view sits at the same height as in the front view. Adjust any mismatches by moving lines one square at a time. Check that the side view shows the hood volume behind the neck and that the front view shows the hood opening clearly.
Refine outlines to be clean and confident. Erase construction lines lightly. The final drawing should read as a hoodie in both views with clear fold and shadow cues. Remember that letter styles vary and x-height is only a measuring convention; do not force a single style. Measure your actual equipment if you use numerical values, and label any chosen numbers as hypothetical examples.
- Compare hood height, shoulder line, hem line, and sleeve length across views.
- Adjust mismatches one grid square at a time.
- Clean up construction lines and refine outlines.
- Confirm fold and shadow cues are consistent with the light direction.
Worked example
On a grid with 1 cm squares (hypothetical), draw a front-view hoodie with shoulder width 6 squares, torso length 8 squares, and sleeve length 7 squares. Add two armpit folds and shade the lower right with light from upper left.
Worked answer
Block a rounded rectangle 6 squares wide and 8 squares tall for the torso. Add a hood shape behind the neck about 3 squares tall. Draw two sleeve tubes 7 squares long angled slightly outward. Add two short curved folds from each armpit toward the chest. Shade the lower right side of the torso and under the sleeves with light hatching, keeping fold lines visible. Check that shoulder width, torso length, and sleeve length match the square counts.
Four practice exercises
Exercise 1
Draw a front-view hoodie on a grid with 1 cm squares (hypothetical). Use shoulder width 5 squares, torso length 7 squares, and sleeve length 6 squares. Add one fold at each armpit and shade the lower right with light from upper left.
Show answer and check
A rounded torso 5 squares wide and 7 squares tall, a hood about 3 squares tall behind the neck, and two sleeves 6 squares long. Two short curved folds at the armpits. Shading on the lower right of the torso and under the sleeves.
Why: The square counts set proportion consistently. Folds at armpits follow stress points. Shading opposite the light source creates readable form.
Check: Count squares for shoulder width, torso length, and sleeve length. Confirm folds are at armpits and shading is on the lower right.
Exercise 2
Draw a side-view hoodie on the same grid size. Use torso length 7 squares, hood height 3 squares, and sleeve length 6 squares. Add an elbow crease two squares below the shoulder line and shade the back of the hood and lower back with light from upper left.
Show answer and check
A narrower rounded torso 7 squares tall, a curved hood shape 3 squares tall behind the neck, and one sleeve overlapping the torso 6 squares long. An elbow crease two squares below the shoulder line. Shading on the back of the hood and lower back.
Why: The side view shows hood volume behind the neck. The elbow crease is placed using the grid. Shading follows the light direction.
Check: Measure hood height and torso length in squares. Confirm the elbow crease is two squares below the shoulder line and shading is on the back/lower areas.
Exercise 3
Compare your front and side views. If the hood height differs by more than one square, adjust the side view to match the front view. Describe the adjustment and redraw the hood.
Show answer and check
Adjust the side-view hood by moving its top line one square at a time until it matches the front-view hood height within one square. Redraw the curved hood shape behind the neck.
Why: Consistent hood height across views improves readability. One-square adjustments are checkable and simple.
Check: Count hood height in squares in both views. Confirm the difference is one square or less after adjustment.
Exercise 4
Add shadow cues to both views with light from upper left. In the front view, shade under the hood opening and along the right side of the torso. In the side view, shade the back of the hood and under the sleeve. Keep fold lines visible.
Show answer and check
Front view: light hatching under the hood opening and on the right side of the torso. Side view: hatching on the back of the hood and under the sleeve. Fold lines remain visible.
Why: Shadows opposite the light source clarify form. Keeping fold lines visible preserves the fold cues.
Check: Confirm shadows are on the lower right in the front view and on the back/lower areas in the side view. Check that fold lines are not fully covered.
Common mistakes
- Using different grid sizes for front and side views. Draw both frames with the same square size and compare square counts for key measurements.
- Placing shadows on the same side as the light source. Mark the light direction first and shade the opposite side of each form.
- Drawing folds as random lines instead of at stress points. Identify armpits, elbows, hem, and hood junction, then draw short folds that follow the pull direction.
- Making the side view hood too small or missing its volume behind the neck. Use the grid to match hood height across views and add a curved shape behind the neck in the side view.
Self-check rubric
- Front and side views use the same grid square size.
- Key landmarks (hood height, shoulder line, hem line, sleeve length) align across views within one square.
- Fold cues appear at stress points and follow the pull direction.
- Shadows are placed opposite the marked light direction and do not obscure fold lines.
- Outlines are clean and construction lines are removed or light.
- Valid alternatives in fold pattern or hatch direction are accepted if consistent with the convention.
Questions and answers
Do I need the planned printable to complete this lesson?
No. You can draw your own grid with equal squares and follow the steps. The printable is planned but not yet built.
What does x-height mean here?
X-height is the distance from baseline to midline of a letter. Letter styles vary, so use it only as a measuring convention, not a universal rule.
Can I use different fold patterns?
Yes, as long as folds follow stress points and the chosen light direction. The rubric allows valid alternatives.
Are the numerical examples fixed standards?
No. All numbers are hypothetical examples. Measure your actual paper and tools and use consistent units.