Free original lessons
Draw a King Figure: Crown, Robe, and Face Proportions
Learn to draw a regal king with a geometric crown, draped robe, and balanced face landmarks using simple construction steps and checkable proportions.
Free lesson
Four exercises
Worked answers
Object Drawing Lessons
This lesson teaches a reliable construction method for a generic king figure. You will build the crown from simple geometry, drape the robe with fold lines that follow gravity, and place facial features using proportion landmarks. The approach is flexible: letter styles and decorative details vary, so the rubric rewards consistent construction and clear choices rather than a single universal look. All measurements are hypothetical examples; measure your own paper and tools before drawing.
Practice materials: Printable downloads are not available for this lesson yet. Use the instructions and four exercises below.
Reference illustration
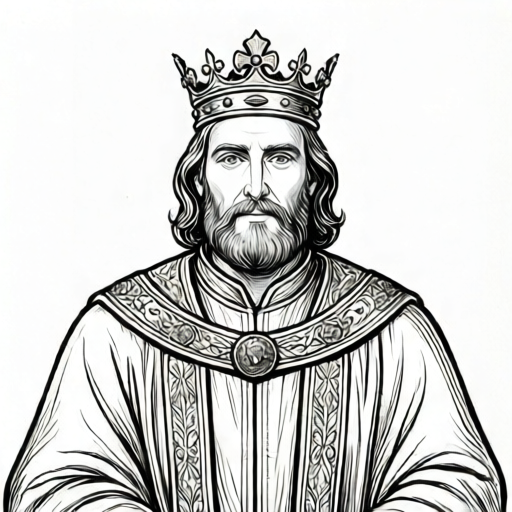
Use the stated measurements and conventions for each exercise.
Crown Geometry and Placement
Begin the crown as a band that sits just above the brow line. A simple approach is to draw a horizontal ellipse for the band, then add triangular points that rise from the band. Keep the points evenly spaced by dividing the band into equal segments. The crown should feel balanced on the head, not tilted unless you intend a dynamic pose.
Use a light construction line to mark the top of the head and the brow line. The crown band typically occupies the space between these two landmarks. For a tall crown, extend the points upward by a consistent height; for a short crown, reduce that height. Label any numerical values you choose as hypothetical examples, such as a band height of one finger-width on your own paper.
- Draw a light oval for the head and mark the brow line and top of the head.
- Sketch a horizontal ellipse for the crown band between the brow and top landmarks.
- Divide the band into equal segments and draw triangular points rising from each segment.
- Add a small circle or gem at the center of the band for visual focus.
- Erase construction lines and refine the crown outline.
Robe Drape and Fold Lines
The robe should hang from the shoulders and follow gravity. Start with a simple trapezoid shape that widens toward the floor. Add fold lines that curve gently outward from the waist and shoulders, suggesting fabric tension. Avoid straight vertical lines unless the fabric is stiff; most robes show soft curves.
Use a consistent convention for fold lines: draw them as thin, slightly curved lines that cluster near the waist and spread near the hem. This convention is not a universal rule but a clear choice you can repeat. Check that folds do not cross the face or crown, and that the hem line is level unless the pose suggests movement.
- Draw a trapezoid from the shoulders to the floor for the robe body.
- Mark the waist line and the hem line.
- Add curved fold lines from the waist outward toward the hem.
- Add a few fold lines near the shoulders to show fabric gathering.
- Refine the hem and erase unnecessary construction lines.
Face Proportion Landmarks
Use the eye line, nose line, and mouth line as landmarks. A common convention places the eyes halfway between the top of the head and the chin. The nose line sits roughly halfway between the eye line and the chin, and the mouth line sits roughly halfway between the nose line and the chin. These landmarks are conventions, not absolute rules; adjust for style.
Use midpoint logic to place the features: the eye line sits halfway between the top of the head and the chin, the nose line halfway between the eye line and the chin, and the mouth line halfway between the nose line and the chin. Keep the features symmetrical around a vertical center line. Check that the eye line, nose line, and mouth line match the midpoint convention you chose. For example, with a hypothetical 12 cm face the eye line is at 6 cm, the nose line at 9 cm, and the mouth line at 10.5 cm, so the eye-to-nose gap is 3 cm and the nose-to-mouth gap is 1.5 cm. In this particular example the eye-to-nose gap happens to be twice the nose-to-mouth gap, but that ratio is not a general consequence of the midpoint rule; it depends on the chosen face height. If you adopt a different convention, state it and verify the gaps against that rule. Label any chosen numerical values as hypothetical examples.
- Draw a vertical center line and mark the top of the head, eye line, nose line, mouth line, and chin.
- Place the eyes on the eye line, equally spaced from the center line.
- Place the nose on the nose line and the mouth on the mouth line.
- Add ears between the eye line and nose line.
- Refine the face outline and erase construction lines.
Assembling the Full Figure
Combine the crown, face, and robe into a single figure. Start with the head and face landmarks, then add the crown, then the robe. Keep the shoulders level and the robe centered under the head. Check that the crown sits on the head without floating and that the robe covers the body naturally.
Use a light construction layer for all landmarks, then darken the final lines. This keeps the drawing clean and makes corrections easy. The rubric rewards consistent use of landmarks and clear fold conventions, not perfect realism.
- Draw the head and face landmarks.
- Add the crown using the band and point method.
- Draw the robe trapezoid and fold lines.
- Add arms and hands if desired, keeping them simple.
- Darken final lines and erase construction marks.
Worked example
Draw a king bust (head and shoulders) with a three-point crown and a simple robe collar. Use the eye, nose, and mouth landmarks. Describe your construction steps and check the proportions.
Worked answer
First, draw a light oval for the head and mark the top, eye line, nose line, mouth line, and chin. Place the eyes on the eye line, the nose on the nose line, and the mouth on the mouth line. Next, draw a horizontal ellipse for the crown band between the brow and top of the head. Divide the band into three equal segments and draw three triangular points rising from the band. Add a small circle at the center of the band. Then draw a trapezoid for the shoulders and a curved collar line. Add two or three curved fold lines on the collar. Check that the crown band is level and the points are evenly spaced. Check that the eye, nose, and mouth lines match the midpoint convention you stated. Erase construction lines and darken final lines. For a hypothetical head height of 12 cm from top to chin, the midpoint convention gives the eye line at 6 cm, the nose line at 9 cm, and the mouth line at 10.5 cm. That means the eye-to-nose gap is 3 cm and the nose-to-mouth gap is 1.5 cm. In this specific example the eye-to-nose gap happens to be twice the nose-to-mouth gap, but that ratio is not a general rule; it follows from the chosen face height. Check consistency against the midpoint convention itself rather than forcing the gaps to match.
Four practice exercises
Exercise 1
Draw a crown with five points on a head oval. Mark the brow line and top of the head. Describe how you ensure the points are evenly spaced.
Show answer and check
Draw a horizontal ellipse for the band between the brow and top landmarks. Divide the band into five equal segments using a ruler or by marking equal steps. Draw a triangular point from each segment. Check that the distance between adjacent points is equal. For example, if the band is 10 cm wide (a hypothetical value), each of the five segments is 2 cm, and each point rises from the center of its segment.
Why: Equal segments on the band produce evenly spaced points. Keeping the band level ensures the crown sits naturally.
Check: Measure the distance between adjacent points; they should be equal within your drawing tolerance. For a hypothetical 10 cm band divided into five segments, each gap should measure about 2 cm. Check that the band is level.
Exercise 2
Draw a robe trapezoid with three curved fold lines from the waist to the hem. Explain why the folds curve outward.
Show answer and check
Draw a trapezoid from shoulders to floor. Mark the waist and hem. Add three gently curved lines from the waist outward toward the hem. The curves suggest fabric tension and gravity, making the robe look soft rather than stiff.
Why: Curved folds follow the way fabric hangs and spreads. Straight lines would suggest rigid material.
Check: Check that folds do not cross the face or crown and that the hem is level. Ensure folds are curved, not straight. As a simple check, the three fold lines should start near the waist and end near the hem without crossing each other.
Exercise 3
Place eyes, nose, and mouth on a face using the midpoint convention. The eye line is halfway between top and chin. The nose line is halfway between eye line and chin. The mouth line is halfway between nose line and chin. Describe your placement.
Show answer and check
Mark top, eye line, nose line, mouth line, and chin. Place eyes on the eye line, equally spaced from the center line. Place the nose on the nose line and the mouth on the mouth line. Check that your placement matches the midpoint convention: for a hypothetical face height of 12 cm from top to chin, the eye line is at 6 cm, the nose line at 9 cm, and the mouth line at 10.5 cm, so the eye-to-nose gap is 3 cm and the nose-to-mouth gap is 1.5 cm. In this specific example the eye-to-nose gap happens to be twice the nose-to-mouth gap, but that ratio is not a general property of the midpoint rule; it depends on the chosen face height. Verify that your placement matches the convention you stated rather than adjusting values to force equal gaps.
Why: Midpoint logic provides a consistent framework for feature placement. Symmetry around the center line keeps the face balanced.
Check: Compare the two distances and confirm they match your stated convention. Under the midpoint convention with a hypothetical 12 cm face, the eye-to-nose gap is 3 cm and the nose-to-mouth gap is 1.5 cm; verify these values against your construction. Note that the 2:1 ratio here is specific to this face height and is not a general rule of the midpoint convention. If you instead adopt an equal-gap convention, compute the mouth line from that rule and verify the two gaps are equal. Check that features are centered on the vertical line.
Exercise 4
Combine a crown, face, and robe into a full figure. List three checks you would perform before darkening final lines.
Show answer and check
Check that the crown band is level and sits on the head. Check that the robe is centered under the head and folds are curved. Check that face landmarks are used and features are symmetrical. Erase construction lines before darkening. As a simple arithmetic check, if the head oval is 6 cm wide (hypothetical), the crown band should span about the same width and the robe shoulders should be at least as wide as the head.
Why: These checks catch common errors in placement and proportion before finalizing the drawing.
Check: Perform each check visually and with simple measurements if needed. Confirm construction lines are removed.
Common mistakes
- Crown points are unevenly spaced or tilted. Divide the crown band into equal segments using a ruler or by marking equal steps, and keep the band level unless the pose is intentionally dynamic.
- Robe folds are straight and stiff. Use gently curved fold lines that cluster near the waist and spread near the hem, following gravity.
- Facial features are placed without landmarks. Mark the eye, nose, and mouth lines first, then place features on those lines using midpoint logic.
- The crown floats above the head. Check that the crown band overlaps the top of the head slightly and sits between the brow and top landmarks.
Self-check rubric
- Crown band is level and points are evenly spaced.
- Crown sits on the head without floating.
- Robe fold lines are curved and follow gravity.
- Face landmarks (eye, nose, mouth lines) are used consistently.
- Features are symmetrical around the center line.
- Construction lines are erased and final lines are clear.
- Valid alternative styles are acceptable if construction is consistent.
- Any numerical values used are labeled as hypothetical examples and measured against the actual paper or tools.
Questions and answers
Do I need to use exact measurements?
No. Use landmarks and relative proportions. Any numerical values you choose are hypothetical examples; measure your own paper and tools.
Can I change the crown style?
Yes. The geometric band-and-point method is a convention, not a rule. You can vary the number of points or add decorations as long as the construction remains clear.
How do I check my face proportions?
Compare the distance from the eye line to the nose line with the distance from the nose line to the mouth line, and check both against the convention you stated. In the hypothetical 12 cm example the gaps are 3 cm and 1.5 cm, but that ratio depends on the chosen face height rather than following generally from the midpoint rule. Also check symmetry around the center line.
What if my robe folds look messy?
Keep fold lines thin and curved, and cluster them near the waist. Erase any folds that cross the face or crown.