Free original lessons
Isometric Kitchen Drawing: Cabinet, Counter, and Appliance Layout
Learn to draw a kitchen in isometric view using a three-axis grid, step-by-step cabinet and counter construction, and clear appliance placement guides.
Free lesson
Four exercises
Worked answers
Object Drawing Lessons
Isometric drawing shows a kitchen from a fixed angle so that vertical edges stay vertical and the two horizontal directions recede at 30 degrees from the horizontal. This makes cabinet runs, countertops, and appliance blocks easy to compare without perspective convergence. The method below uses a simple three-axis grid and a consistent unit so that every box, counter, and appliance can be checked with arithmetic. Work on plain paper or a printed isometric grid; all measurements are hypothetical examples chosen for clarity, not manufacturing standards.
Practice materials: Printable downloads are not available for this lesson yet. Use the instructions and four exercises below.
Reference illustration
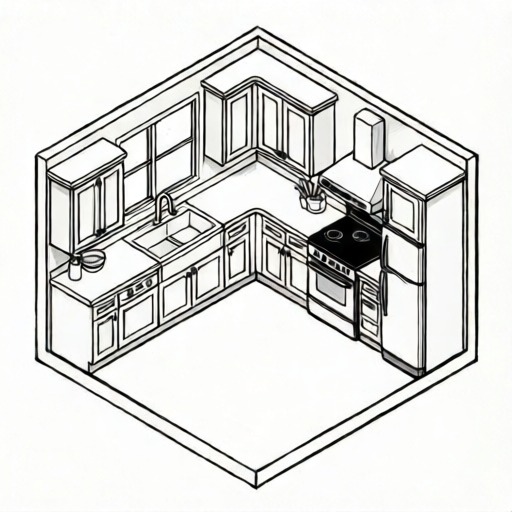
Use the stated measurements and conventions for each exercise.
Set up the three-axis grid and choose a unit
Draw one vertical axis and two axes at 30 degrees above the horizontal, one to the left and one to the right. These represent height, depth, and width. Mark equal intervals along each axis using a single unit, for example 1 cm on paper representing 10 cm in the kitchen. Label the axes height, depth, and width so you do not mix directions.
Choose a simple unit that divides evenly into your cabinet and appliance sizes. If a base cabinet is 60 cm wide and your unit is 10 cm, it spans six grid intervals along the width axis. Keep the same unit for all three axes; do not stretch one direction to make the drawing fit.
- Draw a vertical line for height and two lines at 30 degrees for depth and width.
- Mark equal intervals along each axis and label them with the chosen unit.
- Write the unit conversion at the top of the page, for example 1 grid interval = 10 cm.
- Check that the three axes meet at one origin point and that the 30-degree angles are equal.
Construct the cabinet run as stacked isometric boxes
Treat each cabinet as a rectangular box drawn along the three axes. Start with the base cabinet footprint on the floor plane, then raise vertical edges to the counter height. A standard base cabinet in this example is 60 cm wide, 60 cm deep, and 90 cm high, which becomes 6 by 6 by 9 grid intervals. Draw only the visible edges: the front face, the top face, and one side face.
Build the upper cabinets as a separate box above the counter, leaving a gap for the backsplash. In this example the gap is 50 cm, or five intervals. Keep the upper cabinet depth shallower, for example 35 cm, so it reads as a wall cabinet rather than a base unit. Align the vertical edges with the base cabinet edges where they share a wall.
- Draw the base cabinet footprint as a parallelogram on the floor plane using width and depth intervals.
- Raise vertical lines from each footprint corner to the counter height.
- Connect the top corners to form the countertop plane.
- Draw the upper cabinet box above the counter with its own width, depth, and height intervals.
- Erase hidden lines or leave them faint so the visible box edges remain clear.
Place appliances and check the layout with simple arithmetic
Place appliances as smaller isometric boxes on the counter or floor plane. A refrigerator in this example is 70 cm wide, 65 cm deep, and 170 cm high, which becomes 7 by 6.5 by 17 intervals; round to 7 by 7 by 17 if your grid only allows whole intervals. A stove is 60 cm wide, 60 cm deep, and 90 cm high, matching the base cabinet box. Draw each appliance with the same axis directions and unit.
Check the total run by adding widths along the width axis. If the cabinet run is 240 cm and contains a 60 cm cabinet, a 60 cm stove, and a 70 cm refrigerator, the remaining counter space is 240 minus 190, or 50 cm. Confirm that the sum of placed widths does not exceed the run length. Keep depths consistent so the front faces line up unless you intentionally show a deeper appliance.
- Mark the appliance footprint on the floor or counter plane using width and depth intervals.
- Raise vertical edges to the appliance height and connect the top face.
- Add simple front-face details such as a door line or handle using short lines parallel to the axes.
- Add the widths of all items along the run and compare the total with the available run length.
- Adjust one dimension at a time and recheck the arithmetic before adding more detail.
Refine line weight and label the drawing
Use a heavier line for visible outer edges and a lighter line for internal divisions such as cabinet doors and drawer fronts. Keep all lines parallel to the three axes; avoid freehand curves unless you are drawing a sink bowl or rounded handle, and even then keep the curve within the isometric box. Label each appliance and cabinet with a short name and its dimensions in the chosen unit.
A small key at the corner showing the three axes and the unit makes the drawing self-checking. If a line does not follow one of the three axes, decide whether it is a deliberate detail or a mistake, and correct it before adding shading.
- Trace over visible outer edges with a heavier line.
- Add internal door and drawer lines parallel to the width or height axis.
- Label each box with its name and dimensions.
- Add a three-axis key and unit note at the corner.
- Check that every straight construction line is parallel to one of the three axes.
Worked example
Draw a base cabinet 60 cm wide, 60 cm deep, and 90 cm high, then place a stove 60 cm wide, 60 cm deep, and 90 cm high next to it along a 150 cm run. Use 1 grid interval = 10 cm. State the remaining counter length.
Worked answer
The cabinet is 6 by 6 by 9 intervals. The stove is 6 by 6 by 9 intervals. Together they occupy 12 intervals of width, or 120 cm. The run is 150 cm, so the remaining counter length is 30 cm, or 3 intervals. Draw both boxes side by side along the width axis with their front faces aligned and their heights equal.
Four practice exercises
Exercise 1
A base cabinet is 80 cm wide, 60 cm deep, and 90 cm high. Using 1 interval = 10 cm, state the number of intervals along each axis and describe how to draw the box.
Show answer and check
Width 8 intervals, depth 6 intervals, height 9 intervals. Draw a floor parallelogram using 8 width intervals and 6 depth intervals, raise vertical lines 9 intervals, and connect the top corners.
Why: Each dimension is divided by the unit of 10 cm. The box is drawn by combining the width and depth intervals on the floor plane, then raising the height intervals vertically.
Check: Confirm that 80 divided by 10 is 8, 60 divided by 10 is 6, and 90 divided by 10 is 9; then check that every edge is parallel to one of the three axes.
Exercise 2
A kitchen run is 300 cm long. It contains a 60 cm cabinet, a 60 cm stove, and a 70 cm refrigerator. How much counter length remains? Show the arithmetic.
Show answer and check
60 plus 60 plus 70 equals 190 cm. 300 minus 190 equals 110 cm remaining.
Why: Add the widths of the placed items along the run, then subtract the total from the run length.
Check: Reverse the subtraction: 190 plus 110 equals 300, so the remaining length is correct.
Exercise 3
An upper cabinet is 35 cm deep and a base cabinet is 60 cm deep. Using 1 interval = 5 cm, state the depth intervals for each and explain why the upper cabinet is shallower.
Show answer and check
Upper cabinet depth is 7 intervals; base cabinet depth is 12 intervals. The upper cabinet is shallower so it reads as a wall cabinet and leaves space above the counter.
Why: Divide each depth by 5 cm. The difference in depth is a design choice shown in the drawing, not a manufacturing standard.
Check: Confirm that 35 divided by 5 is 7 and 60 divided by 5 is 12; check that both depth lines are parallel to the depth axis.
Exercise 4
A refrigerator is 70 cm wide, 65 cm deep, and 170 cm high. Using 1 interval = 10 cm, round each dimension to the nearest whole interval and state the rounded box dimensions.
Show answer and check
Width 7 intervals, depth 6.5 rounded to 7 intervals, height 17 intervals. The rounded box is 7 by 7 by 17 intervals.
Why: Divide each dimension by 10 cm, then round to the nearest whole interval because the grid uses whole intervals. State the rounding so the drawing remains checkable.
Check: Confirm that 70 divided by 10 is 7, 65 divided by 10 is 6.5 which rounds to 7, and 170 divided by 10 is 17; note the rounding on the drawing.
Common mistakes
- Using perspective convergence so that parallel cabinet edges meet at a vanishing point. Keep all width lines parallel to the 30-degree width axis and all depth lines parallel to the 30-degree depth axis; do not converge them.
- Mixing units so that one axis uses 10 cm per interval and another uses 20 cm per interval. Write the unit at the top of the page and use the same interval on all three axes.
- Drawing the upper cabinet at the same depth as the base cabinet. Use a shallower depth for wall cabinets, for example 35 cm instead of 60 cm, and align their back edges with the wall.
- Adding appliance widths that exceed the cabinet run length. Add the widths along the run and compare the total with the available length before drawing; adjust one width if the total is too large.
Self-check rubric
- All straight construction lines are parallel to one of the three axes: vertical, 30-degree left, or 30-degree right.
- A single unit is stated and used consistently on all three axes.
- Base cabinet, countertop, and upper cabinet are drawn as separate isometric boxes with visible edges only.
- Appliance boxes use the same axes and unit as the cabinets.
- The sum of widths along the run is shown and does not exceed the run length.
- Labels and a three-axis key make the drawing self-checking.
- Valid alternative: a different unit or rounded interval is acceptable if it is stated and used consistently.
Questions and answers
Do I need a printed isometric grid?
No. You can draw three axes at 30 degrees on plain paper and mark equal intervals. A printed grid is planned as a free resource but is not yet built.
What if my cabinet sizes do not divide evenly by the unit?
Choose a smaller unit that divides evenly, or round to the nearest whole interval and note the rounding. Keep the same unit on all axes.
Can I show a sink or curved handle?
Yes, but keep the curve inside the isometric box and make sure the surrounding straight edges still follow the three axes.
How do I know the drawing is correct?
Check that every straight construction line is parallel to one of the three axes, that the unit is consistent, and that the sum of widths along the run does not exceed the run length.