Free original lessons
Lizard Tail Drawing: Taper, Curl, and Regrowth Variants
Learn to draw a lizard tail with smooth taper, controlled curl, and a regrowth fork variant using simple guides, checkable steps, and a practice strip plan.
Free lesson
Four exercises
Worked answers
Object Drawing Lessons
This lesson focuses only on the lizard tail: how to build a tapered shape from base to tip, how to plan a curl with clear direction and spacing, and how to draw a regrowth variant that forks where the original tail was lost. You will use a simple convention: the tail's centerline is a smooth curve, and its width decreases steadily from base to tip. X-height is baseline to midline for any lettering on the practice strip, but letter styles may vary. All measurements are hypothetical examples unless you measure your own paper and tools. The printable guide, worksheet, and answer sheet are planned resources, not yet built.
Practice materials: Printable downloads are not available for this lesson yet. Use the instructions and four exercises below.
Reference illustration
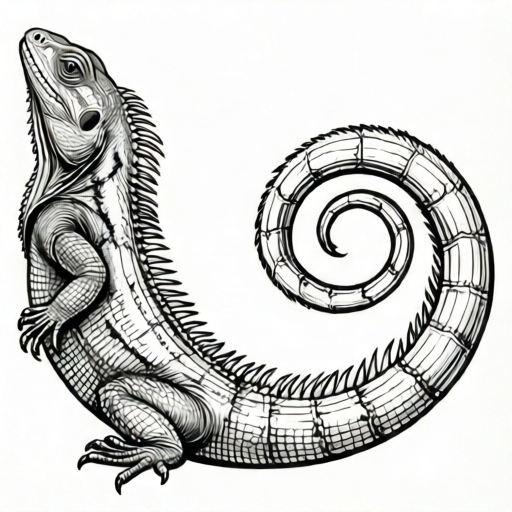
Use the stated measurements and conventions for each exercise.
Building a Tapered Tail from a Centerline
Start with a centerline, not an outline. Draw a smooth curve from the tail base to the tip. Mark the base width and the tip width. For a hypothetical example, a base width of 12 mm tapering to 2 mm over a 90 mm centerline gives a clear, readable taper. Divide the centerline into four equal segments and mark a width at each division: 12 mm, 9 mm, 6 mm, 3 mm, then 2 mm at the tip. These values are examples only; measure your own paper and choose values that fit.
Draw the two side edges by placing points half the width above and below the centerline at each division. Connect the points with smooth curves. The taper should look gradual, not stepped. Check that no segment narrows faster than the next by more than about one-third of the previous width. This keeps the tail readable and avoids a pinched look.
- Draw a smooth centerline from base to tip.
- Mark four equal divisions along the centerline.
- Write a hypothetical width at each division, for example 12, 9, 6, 3, and 2 mm.
- Place edge points half the width above and below the centerline.
- Connect edge points with smooth curves and erase construction marks.
Planning a Curl with Direction and Spacing
A curl is easier to control when you plan its direction before drawing the outline. Draw a centerline that curves in one clear direction, such as clockwise when viewed from above. Add small arrows along the centerline to show the curl direction. Keep the spacing between successive curve sections roughly even; uneven spacing makes the tail look lumpy.
For a hypothetical example, a curl with three turns and a 10 mm gap between turns is easy to check. Measure the gap at the closest points between turns. If the gap changes by more than 3 mm between turns, redraw the centerline. The taper continues through the curl: the width at the start of the curl should be larger than at the end. Do not let the curl cross itself unless you intend a loop; a simple curl stays open.
- Draw a centerline that curves in one direction.
- Add arrows along the centerline to mark curl direction.
- Mark three turn points and measure the gap between turns.
- Keep the gap within 3 mm of your chosen example value.
- Continue the taper through the curl so the tip is narrower than the start.
Drawing the Regrowth Fork Variant
A regrowth variant shows where the original tail was lost and a new section grew. Draw the main tail with taper and curl as above, then choose a fork point. At the fork, draw two short branches: one continuing the original direction and one angled away. The fork should look like a split, not a second tail glued on. Keep both branches tapered and shorter than the main tail.
For a hypothetical example, place the fork at 60 percent of the tail length. Make the two branches 20 mm and 15 mm long, each tapering to 2 mm. Check that the fork point is wider than either branch and that the branches do not overlap. The regrowth fork is a variant, not a universal rule; valid alternatives include a single blunt regrowth tip or a smaller side branch.
- Draw the main tail with taper and curl.
- Mark a fork point at about 60 percent of the length.
- Draw two short branches with separate taper.
- Check that the fork point is wider than each branch.
- Keep branches shorter than the main tail and avoid overlap.
Using the Practice Strip and Checking Your Work
The planned practice strip is a row of four boxes, each about 40 mm wide and 20 mm tall. In box one, draw a straight tapered tail. In box two, draw a curled tail with arrows. In box three, draw a regrowth fork. In box four, draw your own variant. Label each box with a short note using x-height from baseline to midline; letter styles may vary.
Check each drawing against three simple rules: the taper narrows steadily, the curl has one clear direction, and the fork branches are shorter than the main tail. Measure widths and gaps with a ruler. If a measurement is off by more than 3 mm from your planned example, redraw that part. These checks are arithmetic and visual, not dependent on a single correct style.
- Divide the practice strip into four boxes.
- Draw one tail type per box.
- Label each box with a short note.
- Measure taper widths and curl gaps.
- Redraw any part that differs from your plan by more than 3 mm.
Worked example
Draw a straight tapered tail with a centerline of 80 mm, a base width of 10 mm, and a tip width of 2 mm. Use four equal divisions and check the taper.
Worked answer
Divide the centerline into four 20 mm segments. Use hypothetical widths of 10, 8, 6, 4, and 2 mm at the divisions. Place edge points half these widths above and below the centerline: 5, 4, 3, 2, and 1 mm. Connect the points smoothly. Check that each width is smaller than the previous one and that no step is larger than 3 mm. The finished tail tapers steadily from 10 mm to 2 mm.
Four practice exercises
Exercise 1
Draw a straight tapered tail with a 60 mm centerline, base width 8 mm, tip width 2 mm, and four equal divisions. State your planned widths.
Show answer and check
A valid answer uses four 15 mm segments and hypothetical widths such as 8, 6, 4, 3, and 2 mm. Edge points are placed at half these widths above and below the centerline.
Why: Equal divisions make the taper checkable. Each width is smaller than the previous one, and the tip is 2 mm as required.
Check: Measure each division width with a ruler. Confirm the sequence decreases and the tip is 2 mm. Redraw any step that differs by more than 3 mm from the plan.
Exercise 2
Draw a curled tail with three turns and a planned gap of 8 mm between turns. Mark the curl direction with arrows. State how you checked the gap.
Show answer and check
A valid answer shows one clear curl direction, three turns, and measured gaps close to 8 mm. The check is done at the closest points between turns.
Why: Direction arrows prevent a mid-curl reversal. Measuring the closest points gives a simple, repeatable check.
Check: Measure the gap at each pair of turns. If any gap differs from 8 mm by more than 3 mm, redraw that section.
Exercise 3
Draw a regrowth fork variant on a 90 mm tail. Place the fork at 60 percent of the length and make two branches of 20 mm and 15 mm, each tapering to 2 mm. Check that the fork point is wider than each branch.
Show answer and check
A valid answer places the fork at 54 mm from the base, draws two shorter branches, and keeps the fork point wider than either branch. The branches do not overlap.
Why: Sixty percent of 90 mm is 54 mm. Shorter branches and a wider fork point make the regrowth readable.
Check: Measure the fork position and branch lengths. Confirm the fork point width is greater than each branch width and that the branches do not cross.
Exercise 4
Create a four-box practice strip. In each box, draw one tail type: straight taper, curl, regrowth fork, and your own variant. Label each box and list one measurement you checked.
Show answer and check
A valid answer has four labeled boxes, one tail type per box, and a listed measurement such as taper width, curl gap, or branch length. The own variant follows the same convention.
Why: The strip organizes practice and makes each check specific. Labels use x-height from baseline to midline, but letter styles may vary.
Check: Confirm four boxes and four labels. Check that each listed measurement matches the drawing within 3 mm of the planned example.
Common mistakes
- Drawing the outline first and guessing the taper. Draw a centerline, mark divisions, and set widths before drawing edges.
- Making the curl change direction halfway through. Add direction arrows along the centerline and keep one clear curl direction.
- Letting the regrowth branches overlap or become wider than the fork point. Keep branches shorter and narrower than the fork point, and space them apart.
- Using uneven gaps between curl turns. Measure the gap at the closest points and keep it within 3 mm of your example value.
Self-check rubric
- Centerline is smooth and clearly drawn before the outline.
- Taper narrows steadily from base to tip with no pinched or stepped sections.
- Curl has one clear direction marked by arrows and even spacing within 3 mm of the planned example.
- Regrowth fork has two shorter, narrower branches that do not overlap.
- Practice strip has four labeled boxes and measurements are checked with a ruler.
- Valid alternatives are accepted if they follow the stated convention and pass the measurement checks.
Questions and answers
Do I need to use the hypothetical measurements?
No. The numbers are examples only. Measure your own paper and tools, then choose values that fit your drawing.
Can the tail curl in either direction?
Yes. Choose one direction and mark it with arrows. The convention is clear direction, not a fixed clockwise or counterclockwise rule.
Is the regrowth fork the only valid variant?
No. A single blunt regrowth tip or a smaller side branch can also be valid. The fork is one planned variant.
How do I check my taper without a printed guide?
Mark four divisions on the centerline, write your planned widths, and measure the drawn edges with a ruler. Redraw if a width differs by more than 3 mm from your plan.