Free original lessons
Male Anime Base: Head-Unit Ratio and Limb Block-In
Learn to construct a male anime base using a head-unit ratio guide and simple limb block-in boxes, with clear checks and practice tasks.
Free lesson
Four exercises
Worked answers
Object Drawing Lessons
This lesson teaches a repeatable method for drawing a male anime base figure. You will set a head-unit ratio, place the torso and pelvis, then block in arms and legs with simple boxes before refining contours. The convention is explicit: head height is measured from the baseline of the chin to the midline of the skull, not to the top of the hair. Letter styles and facial features vary, so the base is judged by proportion and alignment, not by a single universal face. All measurements are hypothetical examples; measure your own paper and tools. The goal is a clean, poseable base, not a finished character design.
Practice materials: Printable downloads are not available for this lesson yet. Use the instructions and four exercises below.
Reference illustration
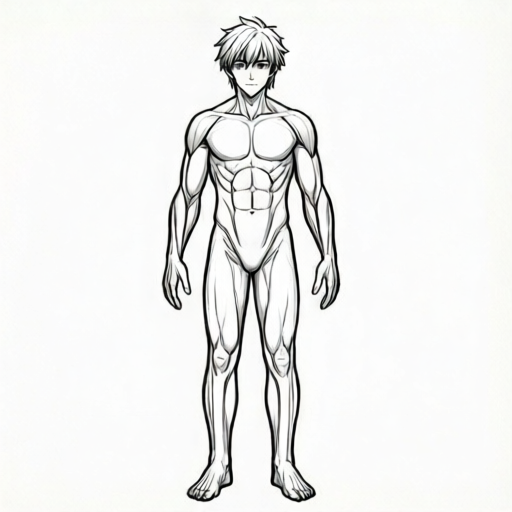
Use the stated measurements and conventions for each exercise.
Set the head-unit ratio
Choose a head-unit count for a male anime base. A common stylized range is six to eight head units tall; for this lesson use seven head units as a hypothetical example. Draw a vertical line for the figure's center. Mark the chin baseline and the skull midline; the distance between them is one head unit. Repeat that distance downward seven times to set the total height. Label each unit lightly so you can check placement later.
The head unit is a measuring tool, not a facial template. Keep the skull midline as the top reference and the chin baseline as the bottom reference. Hair volume sits outside the unit and does not change the count. If your paper is short, reduce the unit count rather than squeezing the units unevenly.
- Draw a vertical center line and mark the chin baseline.
- Mark the skull midline one head unit above the chin baseline.
- Step down seven equal head units and mark the total height.
- Lightly label each unit boundary on the center line.
Place torso and pelvis with block-in boxes
Use boxes to suggest volume before curves. Place a chest box between the second and third unit boundaries, wider at the shoulders and narrower at the waist. Place a pelvis box between the third and fourth unit boundaries, slightly narrower than the chest. Keep both boxes centered on the vertical line and tilt them only if the pose requires it.
Boxes are provisional. Their job is to show width, depth, and overlap. Draw them lightly so you can adjust before adding limb blocks. Check that the chest box does not extend above the chin baseline and that the pelvis box sits below the chest box without a gap larger than half a unit.
- Mark the second and third unit boundaries for the chest box.
- Draw a chest box wider at the top than at the bottom.
- Mark the third and fourth unit boundaries for the pelvis box.
- Center both boxes on the vertical line and check their overlap.
Block in arms and legs
Block each arm as two boxes: an upper-arm box from the shoulder to the elbow, and a forearm box from the elbow to the wrist. Block each leg as two boxes: a thigh box from the hip to the knee, and a shin box from the knee to the ankle. Use the head-unit boundaries as landmarks. For a relaxed standing pose, the elbow often falls near the third unit boundary and the wrist near the fourth; the knee often falls near the fifth and the ankle near the seventh. These are hypothetical examples, not fixed rules.
Keep the limb boxes simple and slightly tapered. Check that left and right limb boxes are similar in length unless the pose is asymmetric. Overlap boxes at joints to show connection. Do not add fingers, toes, or clothing yet; the block-in stage is about proportion and alignment.
- Draw upper-arm boxes from shoulder to elbow on both sides.
- Draw forearm boxes from elbow to wrist on both sides.
- Draw thigh boxes from hip to knee on both sides.
- Draw shin boxes from knee to ankle on both sides.
- Check joint landmarks against the head-unit boundaries.
Refine and verify the base
Once the boxes are placed, refine contours by rounding corners and connecting joints with simple curves. Keep the center line visible until the final check. Verify the head-unit count, the box widths, and the limb lengths. A valid base may have different shoulder widths or slightly different limb angles, provided the head-unit ratio and joint landmarks remain consistent.
Use a simple arithmetic check: if one head unit is 3 cm on your paper, seven units equal 21 cm. Measure your total height and compare. If the total is 20 cm, your units are uneven; adjust before refining. Record your own unit length and chosen count so the check is repeatable.
- Round the box corners into simple contours.
- Connect joints with short curves and keep overlaps visible.
- Measure total height and compare with unit count times unit length.
- Erase construction lines only after the check passes.
Worked example
A student draws a male anime base seven head units tall. One head unit measures 3 cm. The chest box spans from the second to the third unit boundary, and the pelvis box spans from the third to the fourth. The student measures the total height as 20 cm. Identify the error and state the correct total height.
Worked answer
The correct total height is 21 cm because seven units times 3 cm equals 21 cm. The measured 20 cm means the units are uneven or the count is wrong. The student should re-step the head units along the center line and adjust the chest and pelvis boxes to the corrected boundaries.
Four practice exercises
Exercise 1
A male anime base is six head units tall. One head unit is 4 cm. Calculate the total height and state where the chest box should sit if it spans the second to third unit boundaries.
Show answer and check
Total height is 24 cm. The chest box sits between the second and third unit boundaries, measured downward from the skull midline.
Why: Six units times 4 cm equals 24 cm. Unit boundaries are counted downward from the skull midline, so the second boundary is 8 cm below the midline and the third is 12 cm below.
Check: Measure the total height and compare with 24 cm; step one 4 cm unit down twice to confirm the chest box top and bottom.
Exercise 2
A student draws a chest box wider at the waist than at the shoulders and places the pelvis box above the chest box. Describe two corrections using block-in logic.
Show answer and check
Taper the chest box so the top is wider than the bottom, and move the pelvis box below the chest box between the third and fourth unit boundaries.
Why: The chest box should suggest a wider upper torso, and the pelvis sits lower in the body sequence. Correcting width and vertical order restores the block-in structure.
Check: Compare the chest box top and bottom widths, then check that the pelvis box top is below the chest box bottom without a large gap.
Exercise 3
For a relaxed standing pose, the elbow is near the third unit boundary and the wrist near the fourth. If one head unit is 3.5 cm, how far below the skull midline is the wrist boundary?
Show answer and check
The wrist boundary is 14 cm below the skull midline.
Why: The fourth unit boundary is four head units below the skull midline. Four times 3.5 cm equals 14 cm.
Check: Step four 3.5 cm units down the center line and confirm the fourth mark aligns with the wrist boundary.
Exercise 4
A base is drawn with seven head units, but the left thigh box is one unit long and the right thigh box is half a unit long in a symmetric pose. State the likely error and one correction.
Show answer and check
The right thigh box is too short for a symmetric pose. Lengthen it to match the left thigh box and recheck the knee landmark against the fifth unit boundary.
Why: Symmetric poses should have similar limb box lengths. A half-unit difference suggests a misplaced knee or an uneven unit step.
Check: Compare both thigh box lengths against the same head-unit boundaries and measure each from hip to knee.
Common mistakes
- Measuring the head unit to the top of the hair instead of the skull midline. Mark the skull midline and chin baseline first, then measure the unit between them.
- Making the chest box wider at the waist than at the shoulders. Taper the chest box so the top is wider; check against the shoulder landmarks.
- Drawing limb boxes at different lengths on left and right in a symmetric pose. Compare box lengths against the same head-unit boundaries and adjust.
- Refining contours before the block-in boxes are aligned. Keep boxes light and complete the proportion check before rounding corners.
Self-check rubric
- Head-unit count is stated and consistently stepped along the center line.
- Skull midline and chin baseline are used as the unit references, not hair volume.
- Chest and pelvis boxes are centered and tapered appropriately.
- Arm and leg boxes connect at joints and are similar in length for symmetric poses.
- Total height check uses unit count times unit length with consistent units.
- Valid alternatives in shoulder width, limb angle, and facial style are accepted if proportion and alignment checks pass.
Questions and answers
How many head units should a male anime base be?
Use six to eight head units as a stylized range. This lesson uses seven as a hypothetical example; choose a count that fits your paper and pose.
Do I need to draw a face before the base?
No. The base is about proportion and limb block-in. Facial features can be added later and may vary without changing the head-unit count.
What if my pose is not standing straight?
Tilt the chest and pelvis boxes together and keep limb boxes connected at joints. The head-unit count still applies to total height along the main axis.
How do I check my work without a ruler?
Use a strip of paper to mark one head unit, then step it down the center line. Compare each step for equality.