Free original lessons
Mermaid Drawing Base: Torso and Tail Guides
Build a mermaid base with torso proportion guides and a smooth tail curve. Practice the torso-to-tail transition using a simple convention and checkable steps.
Free lesson
Four exercises
Worked answers
Object Drawing Lessons
This lesson teaches a repeatable way to construct a mermaid base: a torso with proportion guides and a tail that curves from the hips to the fin. The goal is a clean structural drawing, not a finished character. You will use a simple convention: x-height is measured from the waist line (the baseline at the bottom of the torso) up to the shoulder line, and letter styles vary, so treat all measurements as guides rather than fixed rules. Work on plain paper with a pencil and ruler. Mark a baseline at the waist and a shoulder line for the torso, then build the tail as a curve that leaves the hips smoothly. Every number below is a hypothetical example; measure your own paper and adjust. Check each stage with simple arithmetic and consistent units before moving on.
Practice materials: Printable downloads are not available for this lesson yet. Use the instructions and four exercises below.
Reference illustration
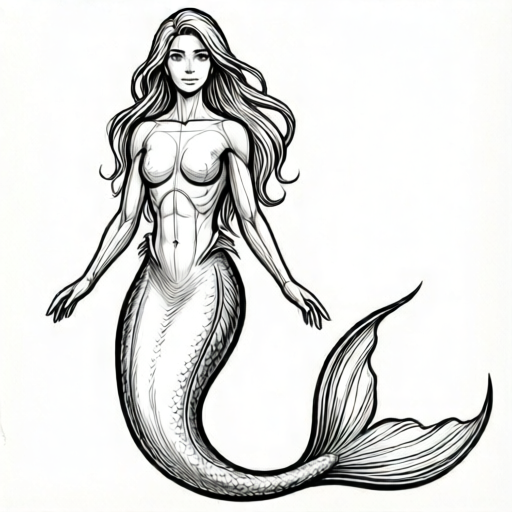
Use the stated measurements and conventions for each exercise.
Set the torso proportion guides
Start with a vertical center line. Mark a shoulder line at the top of the torso and a waist line at the bottom of the torso. The distance from shoulder to waist is the x-height. Choose a convenient x-height, for example 6 cm, and label it. This is a hypothetical value; use whatever fits your paper.
Divide the x-height into three equal parts to place shoulder, chest, and waist guides. If x-height is 6 cm, each part is 2 cm. Mark the shoulder line at the top, the chest line one part down, and the waist line at the bottom of the x-height. These guides keep the torso proportional without forcing a single style. The baseline is the bottom of the torso at the waist line; it is not a separate third guide.
- Draw a vertical center line about 15 cm long.
- Mark a shoulder line and a waist line; measure the x-height between them.
- Divide the x-height into three equal parts and mark shoulder, chest, and waist guides.
- Draw a light oval for the torso between shoulder and waist, centered on the line.
Shape the torso-to-tail transition
The transition is the zone between the waist and the start of the tail curve. Mark a hip line one part below the waist. The tail begins at the hip line and must leave the torso smoothly, not as a sharp corner. Use a light curve that starts tangent to the side of the torso.
Keep the transition narrow. A common mistake is to widen the hips abruptly. Instead, let the torso sides continue into the tail sides with a gentle change of direction. Check that the left and right transition curves are mirror images by measuring their horizontal distance from the center line at the hip line.
- Mark the hip line one part below the waist.
- Draw a short tangent line from each side of the torso at the hip line.
- Extend each tangent into a gentle curve that turns toward the tail direction.
- Measure left and right offsets at the hip line; they should match within your chosen tolerance.
Draw the tail curve and fin guide
The tail curve is a single sweeping line from the hip transition to the fin. Decide the tail length as a multiple of the x-height, for example 2.5 times the x-height. If x-height is 6 cm, tail length is 15 cm. This is a hypothetical example; adjust to your paper.
Draw the tail as a smooth curve with no sharp bends. Use a light guide curve first, then refine. At the end, mark a fin guide as a simple triangle or fan shape. The fin is a placeholder for structure, not a finished design. Check the curve by placing a ruler along short segments; the direction should change gradually.
- Choose a tail length as a multiple of the x-height and mark the fin point.
- Draw a light center curve from the hip transition to the fin point.
- Draw the left and right tail edges parallel to the center curve, keeping width consistent.
- Mark a simple fin guide at the end and check that the curve has no sharp corners.
Check and refine the base
Before adding any detail, check the base with simple arithmetic. Confirm that shoulder-to-waist equals the x-height, that the hip line is one part below the waist, and that the tail length matches your chosen multiple. Use the same unit throughout, such as centimeters.
Refine by erasing construction lines only after the base reads clearly. Keep the torso oval, transition curves, and tail curve visible. A valid alternative is a different tail direction or a wider fin guide, as long as the transition remains smooth and the proportions are consistent.
- Measure shoulder-to-waist and compare to the x-height.
- Measure hip line position and tail length; compare to your chosen values.
- Check left-right symmetry at the hip line and along the tail.
- Erase construction lines and keep the base clean.
Worked example
Construct a mermaid base on paper 20 cm tall. Use an x-height of 6 cm, a hip line one part below the waist, and a tail length of 2.5 times the x-height. Describe the guide lines and the transition.
Worked answer
Mark a shoulder line and a waist line 6 cm apart. Divide the x-height into three 2 cm parts: shoulder at the top, chest 2 cm down, waist at the bottom. Mark the hip line 2 cm below the waist. Draw a torso oval between shoulder and waist. At the hip line, draw short tangent lines from each side of the torso and extend them into gentle curves that turn toward the tail. Mark the fin point 15 cm from the hip line along the tail direction. Draw a light center curve and parallel tail edges. Check: shoulder-to-waist is 6 cm, hip line is 2 cm below waist, tail length is 15 cm, and left-right offsets at the hip line match.
Four practice exercises
Exercise 1
On paper, mark a shoulder line and a waist line 8 cm apart. Divide the x-height into three equal parts. State the chest and waist positions in centimeters measured downward from the shoulder line.
Show answer and check
Chest at about 2.67 cm below the shoulder; waist at 8 cm below the shoulder (the bottom of the x-height).
Why: Eight centimeters divided by three gives 2.67 cm per part. The chest guide is one part down from the shoulder, and the waist is three parts down.
Check: Add the three parts: 2.67 + 2.67 + 2.67 = 8.01 cm, which rounds to 8 cm within 0.01 cm.
Exercise 2
A base has an x-height of 5 cm and a tail length of 3 times the x-height. The hip line is one part below the waist. Calculate the tail length and the hip line distance below the waist.
Show answer and check
Tail length is 15 cm. Hip line is about 1.67 cm below the waist.
Why: Tail length equals 3 times 5 cm, which is 15 cm. One part of the x-height is 5 cm divided by 3, about 1.67 cm.
Check: Multiply 1.67 cm by 3 to get 5.01 cm, which rounds to 5 cm within 0.01 cm.
Exercise 3
Describe how to check that the left and right transition curves are mirror images at the hip line. Use a hypothetical tolerance of 0.2 cm.
Show answer and check
Measure the horizontal distance from the center line to each transition curve at the hip line. If the two distances differ by 0.2 cm or less, treat them as matching.
Why: Symmetry at the transition keeps the tail centered and avoids a lopsided base. A small tolerance allows for hand-drawing variation.
Check: Subtract the smaller distance from the larger; the result should be 0.2 cm or less.
Exercise 4
A learner draws a tail with a sharp bend halfway along its length. Suggest a fix and a check method using short ruler segments.
Show answer and check
Redraw the tail as a light center curve with gradual direction changes, then draw parallel edges. Check by placing a ruler along short segments; the angle should change gradually, not jump.
Why: A sharp bend breaks the smooth transition from torso to tail. A center curve guides consistent width and direction.
Check: Compare the direction of adjacent short segments; if the change is abrupt, smooth the curve and recheck.
Common mistakes
- Making a sharp corner where the torso meets the tail. Start the tail curve tangent to the torso side at the hip line, then turn gradually.
- Widening the hips abruptly instead of continuing the torso sides. Keep the transition narrow and measure left and right offsets at the hip line.
- Using inconsistent units for x-height and tail length. Choose one unit, such as centimeters, and label every measurement.
- Drawing the tail with sudden direction changes. Draw a light center curve first and check short segments with a ruler.
Self-check rubric
- Torso guides include a shoulder line, a waist line, and three equal parts with consistent units.
- Torso-to-tail transition is smooth and tangent to the torso sides at the hip line.
- Tail curve has gradual direction changes and a consistent width.
- Fin guide is simple and placed at the chosen tail length.
- Left and right offsets at the hip line match within the chosen tolerance.
- Valid alternatives, such as a different tail direction, are accepted if proportions and smoothness are maintained.
Questions and answers
What is x-height in this lesson?
X-height is the distance from the shoulder line to the waist line of the torso. It is a proportion guide, not a fixed rule.
Do I have to use 6 cm for x-height?
No. Six centimeters is a hypothetical example. Measure your paper and choose a value that fits.
Can the tail curve in a different direction?
Yes. Any direction is valid if the transition is smooth and the proportions are consistent.
How do I know the base is correct?
Check that shoulder-to-waist equals the x-height, the hip line is one part below the waist, and the tail length matches your chosen multiple.