Free original lessons
Draw a Layered Mountain Range: Overlapping Ridges for Depth
Learn to draw a mountain range with three overlapping ridge layers, using simple depth cues and a clear convention for shading and line weight.
Free lesson
Four exercises
Worked answers
Object Drawing Lessons
This lesson teaches a reliable method for drawing a mountain range that reads as deep space rather than a flat row of peaks. You will build three overlapping ridge layers, from farthest to nearest, and use a simple shading convention to separate them. The approach works with pencil and paper and does not require special tools. All measurements are hypothetical examples; measure your own paper and tools before drawing. The focus is on overlapping ridges only, not single mountains or full landscape scenes with other elements.
Practice materials: Printable downloads are not available for this lesson yet. Use the instructions and four exercises below.
Reference illustration
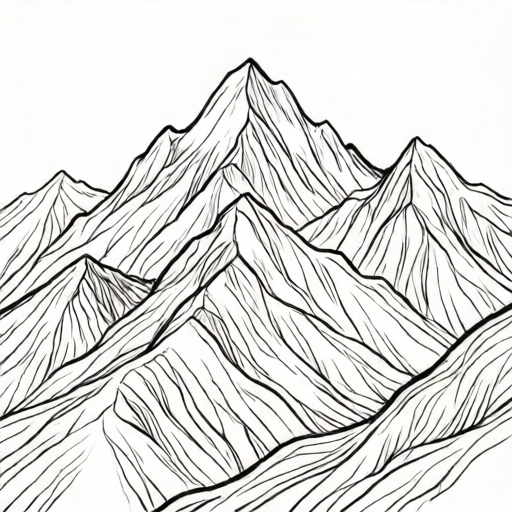
Use the stated measurements and conventions for each exercise.
Set up the frame and define your depth convention
Choose a rectangular drawing area. For this lesson, a hypothetical frame of 18 cm wide by 12 cm tall is used for arithmetic examples; adjust to your actual paper. Lightly mark the frame edges. Decide a simple convention: farther ridges are drawn with thinner lines and lighter shading; nearer ridges use thicker lines and darker shading. This convention is not a universal rule, but it makes depth readable and checkable.
Divide the frame into three horizontal bands for planning: far band (top third), middle band (middle third), near band (bottom third). These bands are guides only; ridges may cross band boundaries slightly. Keep the horizon line near the top of the far band so the nearest ridge has room to overlap.
- Mark a frame on your paper and label top, middle, and bottom bands lightly.
- Write your depth convention at the edge of the paper: far = thin line + light shade; middle = medium line + medium shade; near = thick line + dark shade.
- Check that your frame is at least 15 cm wide and 10 cm tall, or scale the band heights proportionally.
Draw the far ridge first
The far ridge is the highest and smallest in apparent height. Draw a continuous zigzag line across the far band with 4 to 6 peaks. Keep peaks rounded or slightly angular, but avoid sharp spikes that look like single mountains. The far ridge should not touch the frame edges; leave a small margin so later layers can overlap it.
Use a thin line and light shading. Shade only the lower slopes with short parallel strokes angled downward. Do not shade the sky area. The far ridge sets the top of the range and should look distant because of its small size and light value.
- Draw 4 to 6 peaks across the far band, keeping the line thin.
- Add light shading on lower slopes only, using short downward strokes.
- Leave a 1 cm margin from the frame edges so middle and near ridges can overlap.
Add the middle ridge with overlap
The middle ridge sits lower than the far ridge and overlaps it in at least two places. Draw a second zigzag line across the middle band with 3 to 5 peaks. Where the middle ridge crosses in front of the far ridge, stop the far ridge line at the overlap and continue the middle ridge line unbroken. This unbroken line is the main depth cue.
Use a medium line and medium shading. Shade the middle ridge slopes with slightly denser strokes than the far ridge. Keep the shading direction consistent: strokes run from ridge top toward the valley. Check that at least two overlap points are visible and that the middle ridge does not completely hide the far ridge.
- Draw 3 to 5 peaks in the middle band, lower than the far peaks.
- At each overlap, erase or stop the far ridge line and draw the middle ridge line continuously.
- Shade middle slopes with medium-density strokes, keeping direction consistent.
- Verify at least two clear overlap points where the middle ridge is in front.
Draw the near ridge and finish depth shading
The near ridge is the lowest and largest in apparent height. Draw 2 to 4 broad peaks across the near band, overlapping the middle ridge in at least two places. Use a thick line and dark shading. The near ridge should occupy more vertical space than the far ridge, making it look closer.
Finish by checking the three depth cues: line weight increases from far to near; shading darkens from far to near; overlaps are unbroken on the nearer ridge. If any cue is inconsistent, adjust the line or shading. Do not add trees, buildings, or water; this task is only overlapping ridges.
- Draw 2 to 4 broad peaks in the near band, overlapping the middle ridge at least twice.
- Use a thick line and dark shading on near slopes.
- Check line weight, shading value, and overlap continuity across all three ridges.
- Erase planning bands lightly if desired, keeping the frame and ridges intact.
Worked example
On an 18 cm by 12 cm frame, plan three ridges with far peaks at 4, middle peaks at 3, and near peaks at 2. The far ridge occupies the top 4 cm band, middle the next 4 cm, near the bottom 4 cm. If the far ridge has 4 peaks and the middle ridge overlaps it twice, how many unbroken overlap points must the near ridge create to match the middle ridge's overlap count?
Worked answer
The near ridge must create 2 unbroken overlap points to match the middle ridge's count. Total overlap points across the range would then be 2 (middle over far) + 2 (near over middle) = 4.
Why: The middle ridge overlaps the far ridge twice, so the near ridge should overlap the middle ridge twice to keep the depth pattern consistent. Each overlap is counted where the nearer ridge line is unbroken and the farther line stops. The arithmetic is 2 + 2 = 4 total overlaps.
Check: Count the unbroken nearer-ridge lines at each crossing. There should be exactly 2 near-over-middle overlaps and 2 middle-over-far overlaps. If the count differs, adjust the ridge lines until the counts match.
Four practice exercises
Exercise 1
A drawing has three ridges. The far ridge has 5 peaks, the middle ridge has 4 peaks, and the near ridge has 3 peaks. The middle ridge overlaps the far ridge 3 times, and the near ridge overlaps the middle ridge 2 times. What is the total number of overlap points?
Show answer and check
5 overlap points.
Why: Add the middle-over-far overlaps (3) and the near-over-middle overlaps (2): 3 + 2 = 5. Peak counts do not affect the overlap total.
Check: Count each place where a nearer ridge line is unbroken across a farther ridge. Confirm 3 middle-over-far and 2 near-over-middle crossings.
Exercise 2
On a 20 cm by 15 cm frame, you divide the height into three equal bands. What is the height of each band in centimeters?
Show answer and check
5 cm per band.
Why: Divide the total height by 3: 15 cm ÷ 3 = 5 cm. The width does not affect band height.
Check: Measure each band with a ruler; each should be 5 cm. Add the three band heights to confirm 15 cm total.
Exercise 3
A student draws the far ridge with a thick line and dark shading, and the near ridge with a thin line and light shading. According to the lesson convention, what is wrong and how should it be fixed?
Show answer and check
The depth convention is reversed. The far ridge should use a thin line and light shading; the near ridge should use a thick line and dark shading.
Why: The lesson assigns thin/light to far and thick/dark to near so that nearer ridges appear stronger. Reversing these cues makes the far ridge look closer than the near ridge.
Check: Compare line weight and shading value across the three ridges. The far ridge should be the thinnest and lightest; the near ridge should be the thickest and darkest.
Exercise 4
You plan a mountain range with 4 far peaks, 3 middle peaks, and 2 near peaks. The middle ridge must overlap the far ridge at least twice, and the near ridge must overlap the middle ridge at least twice. If you draw exactly the minimum overlaps, how many total overlap points will the drawing have?
Show answer and check
4 total overlap points.
Why: Minimum middle-over-far overlaps = 2; minimum near-over-middle overlaps = 2. Total = 2 + 2 = 4.
Check: Count unbroken nearer-ridge lines at crossings. There should be 2 middle-over-far and 2 near-over-middle, totaling 4.
Common mistakes
- Drawing all ridges with the same line weight and shading value. Assign thin/light to far, medium/medium to middle, and thick/dark to near, then redraw the lines and shading to match.
- Letting the far ridge line continue through a nearer ridge, so overlaps look transparent. At each overlap, stop the farther line and draw the nearer ridge line unbroken across the front.
- Making the near ridge smaller than the far ridge. Increase the near ridge peak height and width so it occupies more vertical space than the far ridge.
- Shading the sky or upper slopes heavily, which flattens depth. Keep sky unshaded and shade only lower slopes, with density increasing from far to near.
Self-check rubric
- Three distinct ridge layers are present: far, middle, near.
- Far ridge uses thinner lines and lighter shading than middle and near ridges.
- Middle ridge overlaps the far ridge in at least two places with unbroken nearer lines.
- Near ridge overlaps the middle ridge in at least two places with unbroken nearer lines.
- Near ridge occupies more vertical space than the far ridge.
- Shading strokes run consistently from ridge top toward valley.
- No extra landscape elements (trees, buildings, water) are included.
- Valid alternative conventions are acceptable if line weight and shading value still increase from far to near and overlaps remain unbroken on the nearer ridge.
Questions and answers
How many peaks should each ridge have?
Use 4 to 6 far peaks, 3 to 5 middle peaks, and 2 to 4 near peaks. These ranges keep the far ridge detailed and the near ridge broad, which supports depth.
Do I have to use the same shading direction on every ridge?
Yes, keep stroke direction consistent from ridge top toward valley. Consistent direction makes the shading read as slope, while mixed directions can look like texture noise.
What if my paper is a different size?
Scale the band heights proportionally. The hypothetical 18 cm by 12 cm frame is only an example; measure your actual paper and divide the height into three equal bands.
Can I use a pen instead of pencil?
Yes, but line weight and shading density become your main depth cues. Use a thinner pen for far ridges and a thicker pen for near ridges, and vary stroke spacing for shading.