Free original lessons
Draw a Classical Museum Facade: Portico, Columns, and Steps
Learn to draw a museum front elevation with a portico, evenly spaced columns, and tiered steps using a simple grid and proportion checks.
Free lesson
Four exercises
Worked answers
Object Drawing Lessons
This lesson teaches a classical museum front elevation: a central entrance under a portico, a row of columns, and broad steps. You will set up a baseline and midline, space columns evenly, and align step tiers. The convention for all measurements is that x-height is the distance from baseline to midline; letter styles vary, so treat these as guides, not fixed rules. Use a pencil, eraser, and ruler. Measure your own paper and label any numerical values you choose as hypothetical examples. The goal is a clear, balanced facade that reads as a museum entrance, not a precise architectural blueprint.
Practice materials: Printable downloads are not available for this lesson yet. Use the instructions and four exercises below.
Reference illustration
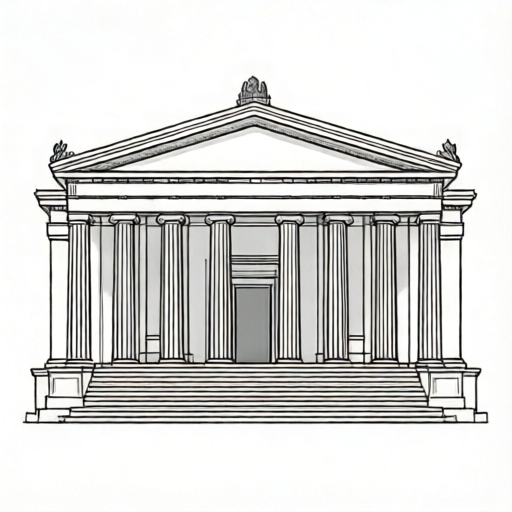
Use the stated measurements and conventions for each exercise.
Set the baseline, midline, and overall width
Start with a horizontal baseline near the lower third of your paper. Draw a faint midline vertically through the center. Decide the total facade width and mark it symmetrically about the midline. These two lines control every later alignment.
Choose a column spacing that fits your width. For example, if your facade width is 18 cm and you want six columns, the five gaps between column centers could be 3 cm each, leaving 1.5 cm margins at each end. These numbers are hypothetical; measure your actual paper and adjust.
- Draw the baseline and midline lightly.
- Mark the left and right facade edges equal distances from the midline.
- Divide the span between the outer column centers into equal gaps.
- Label each column center with a small tick on the baseline.
Draw the portico and columns
The portico is the roofed structure over the entrance. Draw its roof as a wide horizontal band above the columns, with a triangular pediment centered on the midline. Keep the pediment width slightly narrower than the full facade so the columns remain visible.
Columns rise from the baseline to the portico roof. Use the same height for every column. Draw each column as two vertical lines with a simple capital and base. Check that the gaps between column centers are equal and that the outer columns sit inside the facade edges.
- Mark the portico roof height above the baseline.
- Draw the pediment triangle centered on the midline.
- Draw each column from baseline to roof using the tick marks.
- Add simple capitals and bases at consistent heights.
Add the entrance and tiered steps
Center the entrance between the middle columns. Draw a rectangle for the doorway with its top below the portico roof. The entrance should be wide enough to read clearly but narrower than the gap between the two central columns.
Steps sit in front of the entrance and span the portico width. Draw three or four horizontal tiers, each slightly wider than the one above. Keep each tier height equal. Check that the lowest step is centered on the midline and that the step edges align with the outer columns.
- Draw the doorway rectangle centered on the midline.
- Mark equal step heights below the baseline.
- Draw each step tier wider than the one above.
- Check that the lowest step is centered and level.
Refine proportions and line quality
Compare column height to facade width. A common classical proportion is column height roughly equal to half the facade width, but this is a guide, not a rule. Adjust lightly before committing to darker lines.
Erase construction marks and redraw final lines with steady pressure. Keep verticals vertical and horizontals level. The facade should look symmetrical about the midline, with the entrance, pediment, and steps all centered.
- Check symmetry by folding or measuring from the midline.
- Compare column heights and step heights for consistency.
- Erase faint construction lines.
- Redraw final outlines with confident strokes.
Worked example
A student draws a facade 20 cm wide with six columns. The five gaps between column centers are each 3.2 cm, leaving 2 cm margins at each end. The portico roof is 9 cm above the baseline, and three step tiers are each 1 cm high. Check the total width and step height.
Worked answer
Column span: 5 gaps × 3.2 cm = 16 cm. Add two margins: 16 + 2 + 2 = 20 cm, matching the facade width. Step height total: 3 tiers × 1 cm = 3 cm. The layout is consistent and centered if the midline passes through the middle column gap.
Four practice exercises
Exercise 1
Draw a museum facade 16 cm wide with four columns. Use equal gaps between column centers and 2 cm margins at each end. State the gap width.
Show answer and check
Three gaps share 16 − 2 − 2 = 12 cm, so each gap is 4 cm.
Why: Subtract both margins from the total width, then divide by the number of gaps between four columns.
Check: Add the margins and gaps: 2 + 4 + 4 + 4 + 2 = 16 cm, matching the facade width.
Exercise 2
A facade has a portico roof 10 cm above the baseline and four step tiers each 1.2 cm high. What is the total step height, and how far below the baseline does the lowest step sit?
Show answer and check
Total step height is 4 × 1.2 = 4.8 cm. The lowest step sits 4.8 cm below the baseline.
Why: Multiply tier height by tier count, then measure downward from the baseline.
Check: Reverse the arithmetic: 4.8 ÷ 4 = 1.2 cm per tier.
Exercise 3
You want six columns across an 18 cm facade with 1.5 cm margins. What gap width keeps the columns evenly spaced?
Show answer and check
Five gaps share 18 − 1.5 − 1.5 = 15 cm, so each gap is 3 cm.
Why: Six columns create five gaps. Subtract both margins, then divide by five.
Check: Check total: 1.5 + 5 × 3 + 1.5 = 18 cm.
Exercise 4
A student draws a pediment 8 cm wide centered on a 20 cm facade. How far is each pediment edge from the nearest facade edge?
Show answer and check
Each side has (20 − 8) ÷ 2 = 6 cm from the pediment edge to the facade edge.
Why: Subtract the pediment width from the facade width, then halve the remainder for symmetry.
Check: Add back: 6 + 8 + 6 = 20 cm.
Common mistakes
- Columns spaced unevenly because ticks were guessed. Measure the total span and divide by the number of gaps, then mark each center from the midline outward.
- Steps drawn wider on one side of the midline. Mark step widths symmetrically from the midline before drawing horizontal tiers.
- Pediment not centered over the entrance. Draw the pediment triangle from the midline outward and check its apex sits on the midline.
- Column heights vary because the roof line was drawn after the columns. Set the portico roof height first, then draw all columns to that same height.
Self-check rubric
- Baseline and midline are present and the facade is symmetric about the midline.
- Column centers are evenly spaced and all columns reach the same portico roof height.
- Pediment is centered on the midline and sits above the columns.
- Entrance is centered between the middle columns and reads clearly.
- Step tiers have equal heights and are centered, each wider than the one above.
- Construction lines are erased or faint, and final lines are clear.
- Valid alternatives are accepted: column count, step count, and exact proportions may vary if symmetry and equal spacing are maintained.
Questions and answers
How many columns should the museum facade have?
Any even number that fits your width, such as four, six, or eight. The key is equal spacing and symmetry about the midline.
Do the steps have to be three tiers?
No. Three or four tiers are common for readability. Keep each tier height equal and each tier wider than the one above.
Can I use a ruler for every line?
Use a ruler for construction and alignment, then draw final lines freehand if you prefer. The rubric checks alignment and proportion, not perfect straightness.
What does x-height mean here?
X-height is the distance from baseline to midline. It is a convention for consistent vertical measurement, not a fixed letter size.