Free original lessons
Pea Pod and Single Pea Drawing: Easy Construction Guide
Learn to draw a pea pod and single pea using centerline construction, consistent pea spacing, and a defined upper-left light source for shading.
Free lesson
Four exercises
Worked answers
Object Drawing Lessons
Drawing a pea pod and a single pea is a manageable exercise in curved shapes and soft shading. This guide uses a defined convention: the pea is a sphere shaded with a light source from the upper left, and the pod is a curved capsule with a visible seam. You will construct the pod from a centerline and two offset curves, place peas inside, and add a pod-opening variant. All measurements are hypothetical examples; measure your own paper and tools. The practice tasks are self-contained and solvable from the text.
Practice materials: Printable downloads are not available for this lesson yet. Use the instructions and four exercises below.
Reference illustration
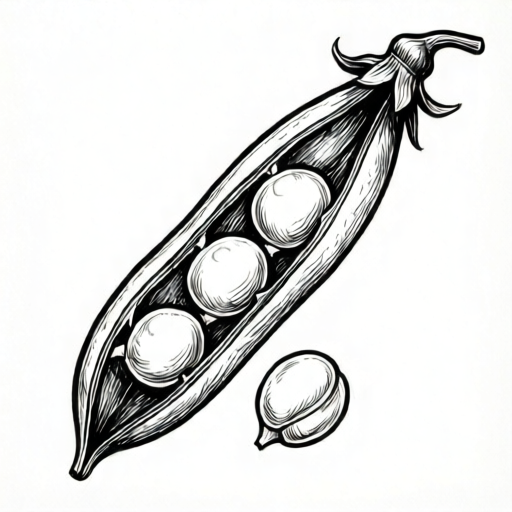
Use the stated measurements and conventions for each exercise.
Constructing the Pod Curve
Begin by drawing a gentle centerline curve for the pod. This line represents the pod's long axis and can bow slightly to suggest natural growth. Mark two endpoints and a midpoint. Using a ruler or freehand, draw two parallel curves offset from the centerline by equal distances. The offset distance is the pod's half-width; for example, a hypothetical half-width of 1.5 cm on a 15 cm pod gives a slender shape. Keep the curves smooth and tapering slightly at the ends.
Next, close the pod shape with rounded tips. The seam line runs along one side, slightly inside the outer edge. Draw it as a thin curve following the pod's contour. This seam helps distinguish the pod from a simple leaf shape. Check that both offset curves remain equidistant from the centerline at several points; adjust if needed.
- Draw a centerline curve about 12 cm long with a slight bow.
- Mark endpoints and midpoint on the centerline.
- Offset two curves 1.5 cm from the centerline on each side.
- Close the ends with rounded tips.
- Add a seam line 0.3 cm inside one outer edge.
Placing Peas Inside the Pod
For a pod-opening variant, show the seam as a gap and let the pod halves curve away from the centerline. The opening has a length along the pod and a width across it. Draw a pea as a full circle only if the opening reveals its full diameter in both directions at that position; if a pod half covers part of it, draw only the visible arc. Keep pea size and center spacing consistent with the closed-pod view.
For a pod-opening variant, widen the seam into a gap that follows the seam line. The opening has two relevant dimensions: its length along the pod and its width across the pod. Show peas according to the visible overlap: draw a complete circle only when the opening leaves the pea's full diameter visible in both directions; if a pod half covers part of it, draw only the visible portion. A stated cross-pod width by itself does not determine how many peas are exposed unless the opening's length and width along the pea positions are also given.
- Mark pea centers along the centerline at intervals slightly larger than the pea diameter, e.g., 2.5 cm for 2 cm peas.
- Draw circles of 2 cm diameter at each mark.
- Erase the portions of circles that fall outside the pod.
- For the opening variant, widen the seam into a gap that follows the seam line.
- Draw peas fully inside the gap as complete circles; allow pod halves to partly hide peas at the gap edges.
Shading the Single Pea
The single pea is a sphere. Use the upper-left light source convention: the highlight sits at about 10 o'clock, the core shadow at 4 o'clock, and a soft reflected light near the lower-right edge. Begin with a light outline circle. Shade the core shadow with smooth, curved strokes that follow the sphere's form. Blend outward toward the highlight, leaving the highlight area white or lightly toned.
Add a cast shadow on the surface below the pea. The cast shadow is an ellipse offset to the lower right. Keep the shadow edge soft. Check that the highlight and core shadow are on opposite sides and that the cast shadow direction matches the light source.
- Draw a circle 3 cm in diameter.
- Mark the highlight at upper left and core shadow at lower right.
- Shade the core shadow with curved strokes.
- Blend toward the highlight, keeping it light.
- Add an elliptical cast shadow to the lower right.
Pod Shading and Final Checks
Shade the pod with a light tone overall, then darken the seam and the lower edge. The pod's curvature suggests a soft gradient from the upper edge to the lower edge. Use the same light source as the pea. Keep the shading consistent: the upper-left side of the pod is lighter, the lower-right side darker. Add a subtle highlight along the upper edge.
Final checks include: pod curves equidistant from the centerline, peas consistent in size, seam line continuous, and shading direction consistent. Measure your actual paper and tools if you use numerical values; the numbers here are hypothetical examples.
- Apply a light tone over the pod.
- Darken the seam line and lower edge.
- Add a highlight along the upper edge.
- Check pea sizes and spacing.
- Verify light source consistency across pea and pod.
Worked example
Draw a pea pod 10 cm long with three peas of 1.8 cm diameter, light source upper left. Describe the construction and shading steps.
Worked answer
Draw a centerline 10 cm long with a slight bow. Offset two curves 1.2 cm from the centerline. Close the ends with rounded tips. Mark pea centers at 2.5, 5, and 7.5 cm from the left end, leaving equal 1.6 cm margins with 1.8 cm peas. The center spacing is 2.5 cm. Draw circles of 1.8 cm diameter at each mark and erase portions outside the pod. Add a seam line 0.3 cm inside the upper edge. Shade the pod lightly, darken the seam and lower edge, and add a highlight on the upper edge. For the single pea, draw a 1.8 cm circle, mark highlight at upper left and core shadow at lower right, shade with curved strokes, and add a cast shadow to the lower right.
Four practice exercises
Exercise 1
Construct a pea pod 8 cm long with a half-width of 1 cm. Mark two pea centers at 2 cm and 6 cm from the left end. Draw peas of 1.5 cm diameter. Describe the steps and check the spacing.
Show answer and check
Centerline 8 cm, offset curves 1 cm each side, rounded tips. Pea centers at 2 cm and 6 cm. Circles 1.5 cm diameter. Spacing between centers is 4 cm, which is greater than pea diameter, so peas do not overlap.
Why: The centerline defines the pod axis. Offsets create equal width. Pea centers are placed at measured distances. The 4 cm spacing exceeds the 1.5 cm diameter, leaving a gap.
Check: Measure the distance between pea centers (should be 4 cm) and the pea diameter (1.5 cm). Confirm the gap is 2.5 cm.
Exercise 2
Draw a single pea 2.5 cm diameter with light source upper left. Describe the highlight, core shadow, and cast shadow placement. Use a hypothetical cast shadow length of 1 cm.
Show answer and check
Circle 2.5 cm diameter. Highlight at upper left (about 10 o'clock). Core shadow at lower right (about 4 o'clock). Cast shadow ellipse offset to lower right, length 1 cm.
Why: The light source determines highlight and shadow positions. The cast shadow falls opposite the light source. The 1 cm length is a hypothetical example.
Check: Verify highlight and core shadow are on opposite sides. Check cast shadow is lower right and about 1 cm long.
Exercise 3
Draw a pod-opening variant for a 12 cm pod with three 2 cm peas centered at 3, 6, and 9 cm from the left end. The seam gap is 2.5 cm wide at the center, measured across the pod perpendicular to its centerline. Explain the visibility rule and whether the exact number of exposed peas can be determined from the given measurements; identify any missing opening dimension.
Show answer and check
Draw a 12 cm bowed centerline and three 2 cm circles centered at 3, 6, and 9 cm. Show the seam opening as 2.5 cm wide across the pod at its center. That transverse width is larger than a pea's 2 cm diameter at that point, but the prompt gives no opening length along the pod and no widths at the other pea positions. Therefore an exact exposed-pea count cannot be determined. A pea is fully visible only where the opening spans its full 2 cm diameter both along and across the pod; otherwise draw only the visible arc or leave it hidden.
Why: The given 2.5 cm value measures only across the pod. It does not say how far the gap extends along the centerline or whether its width remains large enough at centers 3, 6, and 9 cm, so visibility count is underdetermined.
Check: Confirm pea centers are 3, 6, and 9 cm with 2 cm diameters. Compare the stated 2.5 cm transverse width with 2 cm, then verify that no exact visibility count is claimed without the opening's longitudinal extent and local width at each pea.
Exercise 4
A student draws a pod with offset curves 1 cm and 2 cm from the centerline. Identify the mistake and describe a fix using a hypothetical half-width of 1.5 cm.
Show answer and check
The offset curves are unequal, making the pod lopsided. Fix by redrawing both curves at 1.5 cm from the centerline and checking equidistance at three points.
Why: Equal offsets create a symmetrical pod. Unequal offsets distort the shape. Measuring at multiple points ensures consistency.
Check: Measure the distance from centerline to each curve at the midpoint and near the ends; both should be 1.5 cm.
Common mistakes
- Drawing the pod as a perfect rectangle with rounded corners. Use a centerline and offset curves that taper at the ends to create a natural capsule shape.
- Making peas different sizes inside the pod. Choose one pea diameter and mark centers at equal intervals before drawing circles.
- Shading the pea with straight strokes that flatten the sphere. Use curved strokes that follow the sphere's form and keep the highlight and core shadow on opposite sides.
- Placing the cast shadow on the same side as the highlight. Offset the cast shadow to the lower right when the light source is upper left.
Self-check rubric
- Pod shape uses a centerline with two offset curves that taper at the ends.
- Peas are consistent in size and spaced along the centerline.
- Seam line is continuous and follows the pod contour.
- Shading direction is consistent: highlight upper left, core shadow lower right, cast shadow lower right.
- Pod-opening variant, if drawn, keeps peas the same size and pod halves mirror the seam.
- Valid alternatives are accepted if the convention is clearly defined and internally consistent.
Questions and answers
Do I need a ruler to draw the pod?
A ruler helps with offset curves, but freehand is acceptable if the curves remain roughly equidistant. Check by measuring a few points.
How many peas should I draw in the pod?
Four 2 cm peas at 2.5 cm center spacing fit a 12 cm pod: place centers at 1.25, 3.75, 6.25, and 8.75 cm. The first pea spans 0.25 to 2.25 cm and the last spans 7.75 to 9.75 cm, leaving a 0.25 cm margin at the left end and a 2.25 cm margin at the right end. For equal margins, shift the centers right by 1 cm to 2.25, 4.75, 7.25, and 9.75 cm, which gives a 1.25 cm margin at each end. Adjust the number to your pod length and pea size.
Can I use a different light source?
Yes. The convention here is upper left, but any consistent direction works if highlight, core shadow, and cast shadow agree.
What if my pod-opening variant looks uneven?
Keep the gap centered on the seam and draw the pod halves as mirrored curves. To count fully exposed peas, check the gap's length along the pod and width across it at each pea; a pea needs its full diameter visible in both directions.