Free original lessons
Pencil Peacock Drawing: Feather Layering and Tail-Fan Shading
Learn to draw a peacock in pencil using three-step feather layering, tail-fan tonal shading, and clear body contour. Includes worked example, rubric, and four practice tasks.
Free lesson
Four exercises
Worked answers
Object Drawing Lessons
This lesson teaches a reliable pencil method for drawing a peacock: build the body contour first, then layer feathers in three overlap steps, then shade the tail fan with a controlled tonal strip. The convention is simple: construction lines stay light, feather overlap direction stays consistent, and valid alternatives in feather shape and fan width are accepted if the rubric is met. All measurements are hypothetical examples; measure your own paper and pencil. Work on plain paper with a graphite pencil, a soft eraser, and a blending tool if you have one. Keep the bird centered and leave space for the fan to open to one side. The sequence matters: contour, layering, shading. Rushing the layering makes the fan look flat; shading too early smudges the overlap lines. Use light pressure for construction and firmer pressure only for final darks. The four practice tasks are self-contained; where a diagram is needed, the text describes it precisely so you can draw it yourself.
Practice materials: Printable downloads are not available for this lesson yet. Use the instructions and four exercises below.
Reference illustration
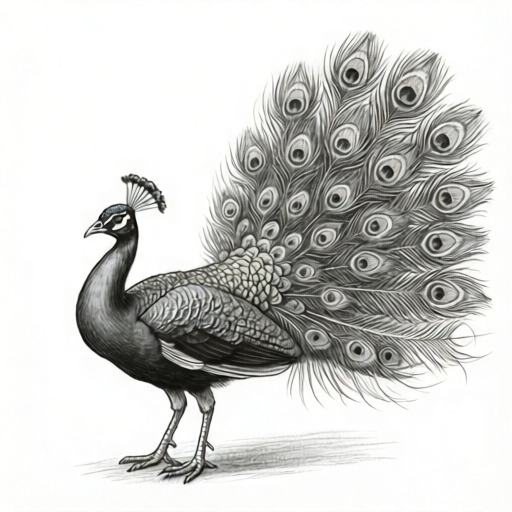
Use the stated measurements and conventions for each exercise.
Body Contour and Proportions
Begin with a light oval for the body, tilted slightly forward. Add a smaller circle for the head above and forward of the oval, then connect them with a curved neck. The beak is a short triangle pointing down-forward. The eye sits about one-third of the head width from the beak side. Keep all construction lines light enough to erase.
Define the body contour with a single confident line: chest curve, belly curve, and back curve. The tail fan attaches at the back, opening to one side. Mark the fan center with a light dot and draw two guide lines for the fan's outer edges, about 90 degrees apart as a hypothetical example. Measure your own paper to choose a fan width that fits.
- Draw a light tilted oval for the body, about 6 cm long as a hypothetical example.
- Add a head circle about 2 cm wide, positioned above and forward.
- Connect head and body with a curved neck; add a short triangular beak.
- Mark the eye one-third of the head width from the beak side.
- Draw the chest, belly, and back contour with one clean line each.
- Mark the fan center at the back and draw two outer guide lines.
Three-Step Feather Layering
Layer feathers in three overlap steps. Step one: draw large outer feathers along the fan edge, each shaped like a long teardrop. Step two: draw medium feathers inside the outer ring, overlapping the first layer by about one-third of their length. Step three: draw small inner feathers near the fan center, overlapping the medium layer. Overlap direction should be consistent: each new feather starts under the previous one.
On the body, layer small contour feathers in rows from the neck down to the belly. Keep rows curved to follow the body contour. Use light pencil strokes and vary feather length slightly so the surface looks natural. The eye feather pattern on the fan can be suggested with a small oval and a dark center, but keep it simple.
- Draw large outer fan feathers as long teardrops along the fan edge.
- Draw medium feathers inside the outer ring, overlapping by one-third.
- Draw small inner feathers near the fan center, overlapping the medium layer.
- Layer body contour feathers in curved rows from neck to belly.
- Vary feather length slightly and keep overlap direction consistent.
- Suggest eye patterns with a small oval and dark center on selected feathers.
Tail-Fan Tonal Shading
Create a tonal strip on scrap paper with five values: lightest, light, medium, dark, darkest. Test your pencil pressure for each value. On the fan, shade from the outer edge inward: darkest at the rim, medium in the middle ring, lightest near the center. Use the side of the pencil for broad areas and the tip for edges. Blend lightly if desired, but keep overlap lines visible.
Shade the body with medium values on the underside and lighter values on the top. Leave a thin light edge along the contour to separate the bird from the background. Check the fan shading by squinting: the rim should read darker than the center. Adjust with light erasing rather than adding heavy graphite.
- Make a five-value tonal strip on scrap paper and note your pressure for each.
- Shade the fan rim darkest, the middle ring medium, and the center lightest.
- Use the side of the pencil for broad fan areas and the tip for edges.
- Shade the body underside medium and the top lighter.
- Leave a thin light edge along the body contour.
- Squint to check that the fan rim reads darker than the center.
Refining Contour and Overlaps
Refine the body contour by darkening only the final outline where it meets the background. Strengthen overlap lines between feather layers with a sharp pencil tip, but avoid outlining every feather. Erase construction lines carefully. Check that the fan attaches naturally at the back and that the neck curve flows into the chest without a kink.
Compare your drawing to the rubric: contour clarity, three visible overlap steps, fan tonal gradient, and consistent feather direction. Make small corrections with light erasing and re-shading. The goal is a readable pencil peacock, not a perfect copy; valid alternatives in feather shape and fan width are acceptable.
- Darken the final body outline only where it meets the background.
- Strengthen overlap lines between layers with a sharp tip.
- Erase construction lines carefully.
- Check fan attachment and neck-to-chest flow.
- Compare to the rubric and correct with light erasing.
- Re-shade corrected areas to match the tonal strip.
Worked example
Draw a peacock with a body oval 6 cm long, a head circle 2 cm wide, and a fan opening 90 degrees to the right. Layer three feather steps and shade the fan darkest at the rim.
Worked answer
Construction: tilted oval 6 cm, head circle 2 cm above and forward, curved neck, triangular beak, eye one-third from beak side. Fan center at back with two guides 90 degrees apart. Layer one: large teardrops along rim. Layer two: medium feathers inside, overlapping one-third. Layer three: small inner feathers near center. Body feathers in curved rows. Shading: five-value strip; fan rim darkest, middle medium, center lightest; body underside medium, top light; thin light edge along contour. Final outline darkened only at background edge; overlap lines strengthened; construction erased.
Four practice exercises
Exercise 1
Draw a peacock body contour only: tilted oval 5 cm long, head circle 1.5 cm wide above and forward, curved neck, triangular beak, eye one-third from beak side. Add fan center and two guides 80 degrees apart. Do not layer feathers.
Show answer and check
A light construction drawing with oval, head circle, neck, beak, eye mark, fan center, and two guides 80 degrees apart; no feather layers or shading.
Why: This isolates contour and proportion before layering. The 5 cm and 1.5 cm values are hypothetical examples; measure your own paper. The eye position and guide angle are checkable.
Check: Measure oval length and head width against your chosen values; confirm eye is about one-third from beak side; confirm guides are about 80 degrees apart.
Exercise 2
On a fan shape with center marked, draw three feather layers: large outer teardrops, medium inner feathers overlapping by one-third, small inner feathers near center. Keep overlap direction consistent. No shading.
Show answer and check
Three visible layers with consistent overlap direction; medium feathers overlap large ones by about one-third of their length; small feathers near center overlap medium layer.
Why: Layering is the core skill; this task removes shading so overlap clarity can be checked. One-third overlap is a hypothetical example but easy to estimate.
Check: Count three layers; check that each medium feather starts under a large one and overlaps about one-third; confirm small feathers are nearest the center.
Exercise 3
Make a five-value tonal strip on scrap paper. Then shade a fan shape darkest at the rim, medium in the middle ring, lightest at the center. Keep overlap lines visible.
Show answer and check
A five-value strip with distinct values; fan rim darkest, middle medium, center lightest; overlap lines still readable.
Why: This practices controlled pressure and the rim-to-center gradient. The five values are a convention, not a standard; adjust to your pencil.
Check: Squint at the fan: rim should read darker than center; compare each area to the tonal strip; confirm overlap lines are not smudged away.
Exercise 4
Draw a complete pencil peacock using the full sequence: contour, three feather layers, fan shading, body shading, and final outline refinement. Use a fan width that fits your paper and note your chosen measurements.
Show answer and check
A complete drawing with clear contour, three overlap steps, rim-to-center fan gradient, body underside/top shading, thin light contour edge, erased construction, and darkened final outline at background edge.
Why: This integrates all skills. Chosen measurements are hypothetical examples; the rubric accepts valid alternatives in feather shape and fan width.
Check: Use the rubric: contour clarity, three layers, consistent direction, three-value fan gradient, body shading, erased construction, final outline. Note your measurements and compare to your own paper.
Common mistakes
- Shading the fan before layering feathers, which smudges overlap lines. Complete all three feather layers first, then shade from rim to center.
- Making all feathers the same length and direction, so the fan looks flat. Vary feather length slightly and keep overlap direction consistent but not identical.
- Using heavy pressure for construction lines that cannot be erased. Keep construction light; use firm pressure only for final darks and overlap lines.
- Shading the fan evenly with one value, losing the rim-to-center gradient. Use the five-value tonal strip and shade darkest at the rim, lightest at the center.
Self-check rubric
- Body contour is clear and continuous, with neck flowing into chest without a kink.
- Three distinct feather overlap steps are visible on the fan.
- Feather direction is consistent, with acceptable variation in shape and length.
- Fan shading shows a rim-to-center gradient using at least three values.
- Body shading distinguishes underside from top with a thin light contour edge.
- Construction lines are erased and final outline is darkened only at the background edge.
- Valid alternatives in feather shape and fan width are accepted if the above are met.
Questions and answers
Do I need special pencils?
No. A standard graphite pencil and a soft eraser are enough. A blending tool is optional.
How wide should the tail fan be?
Choose a width that fits your paper; 90 degrees between outer guides is a hypothetical example. Measure your own paper.
Can my feather shapes differ from the example?
Yes. The rubric allows valid alternatives in feather shape and fan width as long as the three overlap steps and tonal gradient are clear.
How do I check the shading?
Squint at the fan: the rim should read darker than the center. Compare to your five-value tonal strip.