Free original lessons
Draw a Seated Cyclist: Pedaling Legs and Balance
Learn to draw a person riding a bike with a stable seated pose, clear pedaling leg positions, and a believable balance line using simple guides.
Free lesson
Four exercises
Worked answers
Object Drawing Lessons
This lesson focuses on the rider, not the bicycle frame. You will use a defined convention for body proportions, place the seated pose on a balance line, and draw pedaling legs at two key moments. All measurements are hypothetical examples; measure your own paper and tools. The goal is a clear, checkable figure that reads as a person riding a bike.
Practice materials: Printable downloads are not available for this lesson yet. Use the instructions and four exercises below.
Reference illustration
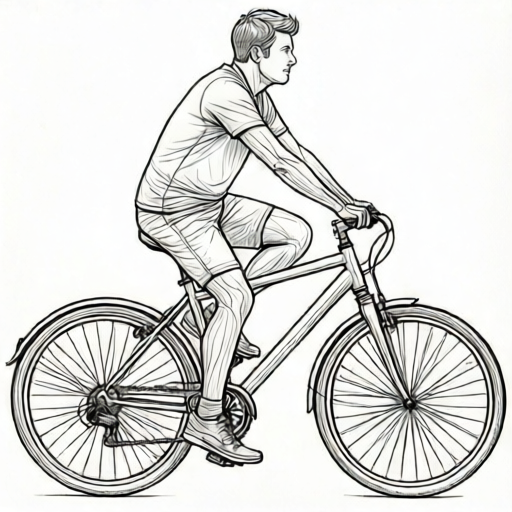
Use the stated measurements and conventions for each exercise.
Set a Simple Proportion Convention
Use a head-unit convention: one head unit equals the vertical distance from the top of the head to the chin. For a seated rider, the torso from hip to shoulder is about two head units, and the thigh from hip to knee is about one and a half head units. These are hypothetical proportions for practice, not universal rules.
Draw a light reference line through the hip point and a horizontal pelvis guide. In this worksheet the pelvis guide is a placement cue, not a calculation of real bicycle balance. Mark the hip point first; place the shoulder forward and above it to show the chosen lean, then center the head over the shoulder.
- Draw a horizontal balance line and mark a hip point at its center.
- Measure one head unit; place the shoulder two head units above and half a head unit forward of the hip point.
- Place the chin one head unit above the shoulder point and the top of the head one head unit above the chin, centered over the shoulder point.
- Lightly sketch an oval torso between hip and shoulder, then a circle for the head centered on the top unit.
Place the Seated Pose and Arms
The seated pose has a slight forward lean: the shoulder point sits a small distance forward of the hip point, about half a head unit. This lean keeps the rider balanced and makes the arms reach naturally toward the handlebars.
Draw the upper arms from shoulder to elbow, then forearms to the hands. Keep elbows slightly bent. The hands rest at handlebar height, which you can mark as a horizontal line about one head unit above the hip point. This is a hypothetical height for practice.
- Shift the shoulder point forward by half a head unit from the hip point.
- Draw a gentle curve from shoulder to elbow, then to the hand position.
- Mark handlebar height as a horizontal line one head unit above the hip point.
- Check that both hands sit on the same horizontal line and elbows are not locked straight.
Draw Pedaling Legs at Two Moments
Pedaling legs alternate between a forward-up position and a back-down position. Use the hip point as the pivot. The thigh length is one and a half head units; the lower leg from knee to ankle is about one and a quarter head units. These are hypothetical lengths for consistent practice.
For a repeatable side-view cue, sketch a pedal-path oval below the hip. Choose its width and height to fit the drawing, then place the two feet at separate points along that oval. These marks are a pose guide; they do not define real bicycle dimensions.
- Sketch a pedal-path oval below the hip and mark its front and rear positions.
- Draw the forward-up leg: knee forward and slightly up, foot on the front of the pedal oval.
- Draw the back-down leg: knee back and down, foot on the rear of the pedal oval.
- Check that both knees bend and neither leg is perfectly straight.
Balance Line and Final Check
Use the vertical drop from hip to ground as a visual alignment cue against the drawn seat mark. In this worksheet it is not a calculation of a real rider’s balance. A small forward lean and bent arms help the figure read as a seated rider.
Use a simple rubric: seated pose clear, pedaling legs alternate, balance line plausible, proportions consistent with your chosen head unit. Valid alternatives include different lean angles or leg lengths, as long as the relationships stay consistent and the figure reads as riding.
- Draw a vertical reference from the hip toward the ground; check that it falls near the seat mark in the drawing.
- Confirm one leg is forward-up and the other back-down.
- Confirm hands are at handlebar height and elbows are bent.
- Erase construction lines lightly and keep the final figure clear.
Worked example
Using a head unit of 2 cm, draw a seated rider with hip at the origin of a 12 cm horizontal balance guide. Mark a seat reference 1 cm forward of the hip. Put the shoulder 4 cm above and 1 cm forward of the hip; put both hands on a handlebar line 2 cm above the hip. Draw an 8.3 cm wide by 3 cm tall pedal-path oval centered 3 cm below the hip. Show one forward-up and one back-down leg.
Worked answer
Use a 2 cm head unit and draw the torso from hip to shoulder with a 4 cm vertical rise and 1 cm forward shift. Place both hands on the handlebar line 2 cm above the hip. For the forward-up leg, place the knee about 2.96 cm forward and 0.5 cm above the hip, then the foot at (2.96,−2.0) cm. For the back-down leg, place the knee at about (−2.47,−1.7) cm and the foot at (−2.47,−4.2) cm. These give about 3 cm hip-to-knee and 2.5 cm knee-to-foot for each leg; the feet sit on opposite arcs of the 8.3-by-3 cm oval. Drop a vertical visual guide from the hip to compare with the seat mark; its 1 cm horizontal offset is a drawing cue, not a stability calculation.
Four practice exercises
Exercise 1
Use a 2 cm head unit, a 3 cm thigh, and a 2.5 cm lower leg. The pedal-path oval is centered at (0,−3 cm) relative to the hip and is 8 cm wide by 3 cm tall. For the forward-up leg, place the knee 3 cm from hip and 0.5 cm above it. Give a foot point near (2.96,−2.00) cm on the front upper arc and verify the lower-leg distance.
Show answer and check
Place the knee at (2.96,0.5) cm relative to the hip and the foot at about (2.96,−2.0) cm. Their horizontal difference is 0 and vertical difference is 2.5 cm, so the lower-leg length is 2.5 cm. The hip-to-knee distance is √(2.96²+0.5²)≈3.00 cm. The foot lies near the front upper arc of the stated oval.
Why: The chosen coordinates satisfy both segment lengths: the vertical knee-to-foot difference is 2.5 cm, and √(2.96²+0.5²) is approximately 3 cm. The pedal oval provides a visible guide for the foot position.
Check: Compute √(2.96²+0.5²)≈3.00 cm for hip-to-knee, then verify the vertical knee-to-foot difference is 2.5 cm. The foot at about (2.96,−2.00) lies near the front upper arc of an 8-by-3 cm ellipse centered at (0,−3): (2.96/4)²+(1/1.5)²≈0.992.
Exercise 2
Using a 2 cm head unit, a 3 cm thigh and a 2.5 cm lower leg, draw the back-down leg. Use an 8.3 cm by 3 cm pedal-path oval centered at (0,−3 cm) relative to the hip. Place the knee about 2.47 cm backward and 1.7 cm below hip, and the foot at the same horizontal position on the lower-left arc. Verify the segment lengths.
Show answer and check
Place the knee at (−2.47,−1.7) cm and the foot at about (−2.47,−4.2) cm. The lower-leg distance is 2.5 cm vertically. The thigh distance is √(2.47²+1.7²)=√(6.1009+2.89)=√8.9909≈3.00 cm. For the ellipse with semiaxes 4.15 and 1.5 cm, the foot’s normalized squared position is (2.47/4.15)²+(1.2/1.5)²≈0.995, so it lies near its lower-left arc.
Why: The coordinates give a thigh of about 3 cm and a lower leg of 2.5 cm. The pedal oval locates the foot on the back-down part of its path, distinct from the forward-up exercise.
Check: Calculate √(2.47²+1.7²)≈3.00 cm and check the 2.5 cm vertical knee-to-foot gap. Confirm the foot is near the ellipse boundary using (2.47/4.15)²+(1.2/1.5)²≈0.995.
Exercise 3
A drawing shows both knees at the same height and both feet on the same side of the pedal oval. What is the main pose error and how do you fix it?
Show answer and check
The legs are not alternating. Move one knee forward-up and the other back-down, placing feet on opposite sides of the pedal oval.
Why: The drawing cue requires different knee heights and feet on different parts of the pedal-path oval. It is a visual alternation check, not a biomechanical claim.
Check: Check that one knee is above the hip line and the other below it.
Exercise 4
The vertical line from the hip point falls 3 cm behind the seat center on a 12 cm balance line. For this exercise only, count a hip drop within 1 cm horizontally of the seat center as aligned; this is a worksheet drawing convention, not a real balance standard. Is the drawing within that convention? How could you adjust?
Show answer and check
No. The 3 cm gap exceeds this exercise’s 1 cm alignment limit. Move the hip or seat mark so their horizontal separation is 1 cm or less, then redraw the vertical guide.
Why: The exercise defines 1 cm as its visual alignment tolerance. This is a drawing convention only and does not measure real rider stability.
Check: Measure the horizontal distance from the hip drop to the drawn seat center; confirm it is no more than 1 cm after adjustment.
Common mistakes
- Drawing both legs in the same pedaling position. Offset the knees: one forward-up, one back-down, and place feet on opposite sides of the pedal oval.
- Making the torso perfectly vertical with straight arms. Add a slight forward lean of about half a head unit and bend the elbows.
- Using inconsistent head units for torso and legs. Measure one head unit first, then derive torso and leg lengths from it.
- Placing the hip point far from the balance line. Center the hip point on the balance line and check the vertical drop to the ground.
Self-check rubric
- Seated pose is clear: hip, shoulder, and head align with a slight forward lean.
- Pedaling legs alternate: one forward-up, one back-down, both knees bent.
- Feet stay on the pedal oval and hands sit at handlebar height.
- The hip-to-ground reference falls near the drawn seat mark as a visual alignment cue.
- Proportions use a consistent head unit; valid alternatives are accepted if relationships stay consistent.
Questions and answers
Do I need to draw the whole bicycle first?
No. This lesson focuses on the rider. Sketch only the seat, handlebar height line, and pedal oval as guides.
Can I use different body proportions?
Yes. The head-unit values are hypothetical examples. Keep your chosen relationships consistent and check the pose reads clearly.
How do I know the balance is believable?
Use the hip-to-ground line as a visual guide and compare it with the seat mark. It is not a calculation of real bicycle balance.
What if my pedaling legs look stiff?
Bend both knees and keep feet on the pedal oval. Avoid straight lines from hip to foot.