Free original lessons
Draw a Seated Figure at a Desk: Contact Points and Arm Reach
Learn to draw a person sitting at a desk by mapping seat contact, torso angle, and arm reach with clear, checkable steps and practice tasks.
Free lesson
Four exercises
Worked answers
Object Drawing Lessons
Drawing someone seated at a desk is mostly a problem of contact and reach. The body meets the chair at the seat and often the backrest, and the arms must span the distance from shoulder to the desk surface. This lesson defines a simple convention for those relationships so you can draw a believable seated pose without guessing. You will establish the seat contact first, set a torso angle, then build arm reach to the desk. All measurements are relative to your own drawing, and any numbers given are hypothetical examples for practice.
Practice materials: Printable downloads are not available for this lesson yet. Use the instructions and four exercises below.
Reference illustration
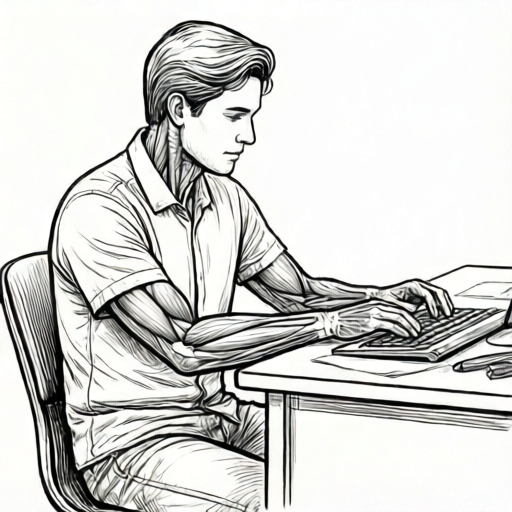
Use the stated measurements and conventions for each exercise.
Establish seat contact and torso angle
Begin with the seat as a horizontal line or shallow curve. The pelvis rests on this line, so the lowest point of the torso touches the seat. Mark a contact patch rather than a single point: the buttocks and upper thighs meet the seat along a short span. This patch anchors the figure and prevents floating.
Next choose a torso angle. A common desk posture leans slightly forward from the hips, but upright and slightly back are also valid. Pick one angle and keep it consistent. Draw a line from the seat contact up to the shoulder area. The angle between this torso line and the seat line is your torso angle. Label it if it helps, but do not treat any angle as the only correct one.
- Draw the seat line and mark a contact patch about one-third of the seat width.
- Place the pelvis so its lowest edge sits on the contact patch.
- Draw the torso line from the pelvis to the shoulder area at your chosen angle.
- Check that the torso line starts at the contact patch, not above it.
Build arm reach from shoulder to desk
Arm reach connects the shoulder to the hand at the desk. First mark the desk edge as a line in front of the figure. Then decide where the hand rests: on the desk surface, at the edge, or holding a tool. Draw the upper arm from shoulder to elbow, then the forearm from elbow to hand. The elbow should sit between shoulder and hand, not beyond either.
Use a simple reach check: the straight-line distance from shoulder to hand should be less than the combined upper-arm and forearm lengths you drew. If the hand cannot touch the desk without stretching the arm beyond its drawn length, move the desk closer or adjust the torso lean. Keep units consistent; if you measure in pencil-widths, use pencil-widths for every part.
- Mark the desk edge in front of the torso.
- Choose a hand contact point on the desk or at its edge.
- Draw upper arm and forearm as two segments meeting at the elbow.
- Verify the elbow lies between shoulder and hand and the hand reaches the desk.
Add legs, feet, and chair back contact
Legs complete the seated pose. From the pelvis, draw the thigh forward to the knee, then the lower leg down to the foot. The foot should meet the floor or a footrest. If the chair has a backrest, show contact where the upper back or lower back meets it, depending on your torso angle. A forward lean may reduce backrest contact; an upright posture may increase it.
Check that the thigh does not pass through the seat and that the lower leg does not intersect the desk. The knee should be forward of the seat edge. Keep the foot contact simple: a short line or small shape where the foot meets the floor. These contacts make the seated pose read as supported rather than hovering.
- Draw the thigh from pelvis to knee, forward of the seat edge.
- Draw the lower leg from knee to foot, meeting the floor.
- Mark backrest contact if your chosen posture includes it.
- Check for overlaps between thigh, seat, lower leg, and desk.
Use a convention and a rubric for consistency
This lesson uses an explicit convention: the seat line is the baseline, and a horizontal midline through the torso is the reference for relative heights. Measure relative distances from these references rather than assuming a universal proportion. Different body types, chair shapes, and torso angles are valid alternatives as long as the contact and reach logic holds.
A rubric helps you check your own drawing without demanding one universal answer. Score each item as met, partly met, or not met: seat contact patch present; torso angle consistent from pelvis to shoulder; elbow between shoulder and hand; hand reaches desk without overstretch; foot meets floor; no unintended overlaps. Valid alternatives include different torso angles, hand positions, and chair back contact, as long as the contact and reach logic holds.
- Define your baseline and midline before drawing.
- Measure relative distances from those references.
- Score the six rubric items after drawing.
- Revise only the items marked not met or partly met.
Worked example
A figure sits on a seat line 12 units wide. The contact patch is 4 units wide. The torso line rises 9 units from the contact patch to the shoulder area at a slight forward lean. The desk edge is 7 units in front of the torso. The upper arm is drawn 5 units and the forearm 5 units. The hand contact point is 8 units from the shoulder in a straight line. Does the arm reach the desk without overstretch?
Worked answer
Yes. The combined arm length is 5 + 5 = 10 units, and the straight-line shoulder-to-hand distance is 8 units. Since 8 is less than 10, the hand can reach the desk without overstretch. The elbow should be placed between shoulder and hand so the two segments meet correctly.
Four practice exercises
Exercise 1
A seat line is 10 units wide with a contact patch 3 units wide. The torso rises 8 units to the shoulder. The desk edge is 6 units in front of the torso. The upper arm is 4 units and the forearm is 4 units. The straight-line shoulder-to-hand distance is 7 units. State whether the hand reaches the desk and give the combined arm length.
Show answer and check
The hand reaches the desk. Combined arm length is 4 + 4 = 8 units, and 7 is less than 8.
Why: Reach is valid when the straight-line shoulder-to-hand distance is less than or equal to the sum of upper-arm and forearm lengths. Here 7 ≤ 8, so the arm can reach without overstretch.
Check: Add the two arm segments, compare with the shoulder-to-hand distance, and confirm the elbow can sit between shoulder and hand.
Exercise 2
A figure has a torso line that starts 2 units above the seat contact patch. The seat contact patch is 4 units wide. Identify the contact error and describe the correction in one sentence.
Show answer and check
The torso starts above the seat, so the figure floats. Move the pelvis down until its lowest edge rests on the contact patch, then redraw the torso from there.
Why: Seat contact requires the lowest part of the torso to meet the seat. Starting 2 units above breaks that contact and makes the pose unsupported.
Check: Trace the torso line downward and confirm it meets the contact patch rather than stopping above it.
Exercise 3
A seated figure has an upper arm of 6 units and a forearm of 3 units. The hand is drawn 10 units from the shoulder in a straight line. Is the reach valid? Explain using the combined length.
Show answer and check
No. Combined arm length is 6 + 3 = 9 units, and 10 is greater than 9, so the hand is beyond the arm's reach.
Why: The straight-line distance from shoulder to hand must not exceed the sum of the two arm segments. Here 10 > 9, so the drawn hand is too far for the drawn arm.
Check: Add upper arm and forearm, compare with the shoulder-to-hand distance, and if the distance is larger, move the desk closer or adjust the lean.
Exercise 4
A chair has no backrest. The seat contact patch is 5 units wide, the foot meets the floor, and the hand reaches the desk with a combined arm length of 9 units and a shoulder-to-hand distance of 8 units. Which rubric item is not applicable, and is the pose otherwise supported?
Show answer and check
Backrest contact is not applicable. The pose is otherwise supported by seat contact, foot contact, and valid arm reach.
Why: Without a backrest there is no backrest contact to check. Seat contact, foot contact, and reach within combined arm length provide the support.
Check: Confirm the chair has no backrest, then verify seat contact, foot contact, and that shoulder-to-hand distance is less than or equal to combined arm length.
Common mistakes
- Drawing the torso starting above the seat, so the figure floats. Place the lowest edge of the pelvis on the seat contact patch before drawing the torso line.
- Making the arm too short to reach the desk, then stretching the hand unnaturally. Compare shoulder-to-hand distance with the drawn upper-arm plus forearm lengths; move the desk or adjust the lean instead of stretching.
- Putting the elbow beyond the hand or behind the shoulder. Redraw the elbow between shoulder and hand, then check the two arm segments meet there.
- Letting the thigh pass through the seat or the lower leg intersect the desk. Draw the knee forward of the seat edge and keep the lower leg clear of the desk line.
Self-check rubric
- Seat contact patch is present and the pelvis rests on it.
- Torso angle is consistent from pelvis to shoulder area.
- Elbow lies between shoulder and hand.
- Hand reaches the desk without exceeding combined arm length.
- Foot meets the floor or footrest.
- No unintended overlaps between thigh, seat, lower leg, and desk.
Questions and answers
Do I need to use a specific torso angle?
No. Slightly forward, upright, and slightly back are all valid if the seat contact and arm reach remain consistent. Choose one angle and keep it from pelvis to shoulder.
How do I know the arm is long enough?
Measure the straight-line distance from shoulder to hand and compare it with the sum of your drawn upper-arm and forearm lengths. The hand should reach the desk without exceeding that sum.
What if the chair has no backrest?
Omit backrest contact and rely on seat contact, foot contact, and arm reach to support the pose. The rubric item for backrest contact becomes not applicable.
Can I use different units for different parts?
No. Use one unit consistently, such as pencil-widths or grid squares, for all relative measurements in the drawing.