Free original lessons
Pianist Drawing: Seated Posture and Keyboard Hand Placement
Learn to draw a seated pianist at a keyboard with clear hand placement, using a simple convention for posture, key layout, and finger marks.
Free lesson
Four exercises
Worked answers
Object Drawing Lessons
This lesson teaches a repeatable method for drawing a pianist seated at a keyboard. You will establish a stable seated posture, lay out a keyboard with consistent key spacing, and place hands so the fingers rest naturally over the keys. The approach uses a simple convention: x-height is measured from the baseline to the midline of lowercase letters, and letter styles vary, so treat all letter-based proportions as guides rather than fixed rules. All numerical values below are hypothetical examples for practice; measure your own paper and tools before committing to a scale. The goal is a clear, readable drawing that shows a seated figure and believable hand placement, not a single universal answer.
Practice materials: Printable downloads are not available for this lesson yet. Use the instructions and four exercises below.
Reference illustration
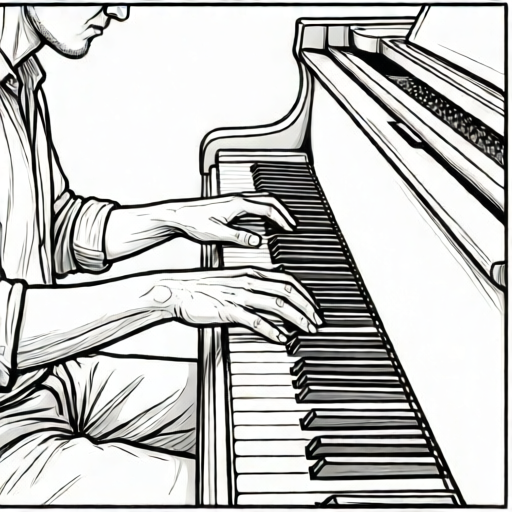
Use the stated measurements and conventions for each exercise.
Seated posture and figure block-in
Begin with a light vertical centerline for the torso and a horizontal line for the seat. Mark the seat height first, then place the hips slightly back from the keyboard edge so the forearms can angle gently downward. Keep the spine upright but relaxed, with shoulders low and elbows slightly away from the body.
Block the head as an oval, the torso as a tapered box, and the upper legs as two long rectangles that meet the seat. Use the x-height convention to check relative sizes: if your lowercase x-height is 5 mm, the head height might be about four x-heights, and the seated torso about six. These are hypothetical examples; adjust to your own figure.
- Draw a light seat line and a vertical centerline for the torso.
- Place the hip block slightly behind the keyboard edge.
- Add the torso taper, shoulders, and head oval.
- Check that forearms can angle down to the keys without locking the elbows.
Keyboard layout and key spacing
Draw the keyboard as a long rectangle with a front edge and a back edge. Mark white keys as evenly spaced vertical divisions. For a practice example, use a 12 mm key width and a 60 mm total visible keyboard width; these are hypothetical values, so measure your actual paper and choose a consistent unit.
Add black keys in repeating groups of two and three, sitting between white keys and extending partway back. Keep the group pattern consistent: two black keys, gap, three black keys, gap. This pattern is the main check that the keyboard reads correctly.
- Draw the keyboard rectangle and mark the front edge.
- Divide the white key area into equal widths using one unit.
- Place black keys in 2-3 groups, aligned to the white key divisions.
- Check that the total width equals the number of white keys times the chosen key width.
Hand placement and finger marks
Place the hands so the wrists are slightly above the keys and the fingers curve down. Use small oval marks for fingertips and short lines for finger segments. A useful convention is to mark each fingertip with a dot and each knuckle with a small circle, then connect them with gentle curves.
For hand placement, align the thumb of each hand near the front edge and let the other fingers rest over adjacent keys. Valid alternatives include slightly different finger spreads and wrist angles; the rubric rewards clear contact points and believable curvature, not a single exact pose.
- Mark wrist points above the keyboard.
- Draw the palm shape and thumb line.
- Add four finger curves per hand with fingertip dots.
- Check that fingertips meet keys and wrists are not collapsed.
Refining the drawing and checking readability
Darken the final lines for the figure, keyboard, and hands. Keep construction lines light or erase them. Check that the seated figure and keyboard share a consistent scale and that the hand placement is visible at a glance.
Use simple arithmetic to verify proportions: if the keyboard width is 60 mm and each white key is 12 mm, then five white keys fit exactly. If your figure head is 20 mm and the seated torso is 30 mm, the torso is 1.5 head heights. These checks catch obvious scale errors without claiming any standard.
- Erase or lighten construction lines.
- Darken the keyboard edges and key divisions.
- Darken the figure outline and hand marks.
- Run one scale check and one key-count check.
Worked example
A practice plate shows a seated pianist with a keyboard 60 mm wide and white keys 12 mm wide. The figure head is 20 mm tall and the seated torso is 30 mm tall. Check the key count and torso proportion.
Worked answer
Five white keys fit because 60 divided by 12 equals 5. The torso is 1.5 head heights because 30 divided by 20 equals 1.5. Both checks are consistent with the stated hypothetical values.
Four practice exercises
Exercise 1
Draw a keyboard 48 mm wide with white keys 8 mm wide. How many white keys fit, and what is the key count check?
Show answer and check
Six white keys fit because 48 divided by 8 equals 6.
Why: Divide the total keyboard width by the chosen key width to get the number of white keys.
Check: Multiply the key width by the key count: 8 times 6 equals 48 mm, matching the total width.
Exercise 2
A seated figure has a head height of 18 mm and a seated torso of 27 mm. What is the torso-to-head ratio, and is it consistent with a 1.5 ratio?
Show answer and check
The ratio is 1.5 because 27 divided by 18 equals 1.5, so it is consistent.
Why: Divide the torso height by the head height to compare the two measurements.
Check: Multiply the head height by 1.5: 18 times 1.5 equals 27 mm.
Exercise 3
A keyboard drawing has 20 white keys and uses repeating 2-3 black key groups. If the pattern starts with a two-key group, how many black keys are shown after four complete groups?
Show answer and check
Twenty black keys are shown because each complete 2-3 pair has five black keys, and four pairs have 20.
Why: Count one two-key group and one three-key group as a pair of five black keys, then multiply by four.
Check: Add the groups: 2 plus 3 plus 2 plus 3 plus 2 plus 3 plus 2 plus 3 equals 20. Also confirm the white-key count is sufficient: four complete groups span 8 white-key gaps, which fits within 20 white keys.
Exercise 4
A hand drawing shows three fingertip dots on keys and a wrist point 6 mm above the key surface. If the finger curves down 6 mm to the key, what vertical distance is covered, and what check confirms contact?
Show answer and check
The vertical distance is 6 mm, and the check is that the fingertip dot meets the key surface at the end of the curve.
Why: The wrist height above the keys and the downward finger curve should meet at the fingertip contact point.
Check: Measure from the wrist point to the key surface and confirm it equals the drawn finger curve length.
Common mistakes
- Drawing the keyboard with uneven white key widths. Choose one key width unit and divide the total width by that unit before drawing any keys.
- Placing the hands too flat or too far above the keys. Mark wrist points slightly above the keys and curve the fingers down so fingertips touch key surfaces.
- Making the seated figure lean too far forward or backward. Keep the hip block slightly behind the keyboard edge and check that the forearms angle gently downward.
- Using inconsistent black key groups. Repeat the two-key and three-key groups in order and align each black key to a white key division.
Self-check rubric
- Seated figure is clearly seated and oriented toward the keyboard.
- Keyboard shows consistent white key spacing and repeating 2-3 black key groups.
- Hand placement shows visible fingertip contact points and curved fingers.
- Wrists are supported and forearms angle naturally toward the keys.
- Construction lines are light or removed, and final lines are readable.
- Valid alternatives in hand spread, wrist angle, or key count are accepted if the drawing remains clear and internally consistent.
Questions and answers
Do I need to draw every key exactly?
No. Draw enough keys to make the keyboard readable, and keep the spacing consistent. A partial keyboard is acceptable if the group pattern is clear.
How many fingers should touch the keys?
Show at least three fingertip contact points per hand for clarity. You may show all five, but the important check is that the contact points are visible and believable.
Can I use a different hand pose?
Yes. The rubric allows valid alternatives as long as wrists are supported, fingers curve toward the keys, and contact points are clear.
What does x-height mean here?
X-height is the distance from the baseline to the midline of lowercase letters in your own handwriting. Use it as a personal measuring unit; letter styles vary, so the unit is a guide, not a standard.