Free original lessons
Draw a Pointing Finger: Knuckle and Proportion Construction
Learn to draw a pointing finger using palm blocks, finger segments, and knuckle arcs. Includes proportion checks, common fixes, and four practice tasks.
Free lesson
Four exercises
Worked answers
Object Drawing Lessons
A pointing finger is a compact gesture with clear landmarks: the palm block, the extended index finger, the folded fingers, and the knuckle arcs that connect them. This guide builds the gesture from simple shapes, then refines proportions using measurable checks. The convention is that x-height means the distance from baseline to midline in your own drawing; letter styles vary, so treat all numerical values as hypothetical examples you can adjust to your equipment and paper. Work at three scales to test consistency.
Practice materials: Printable downloads are not available for this lesson yet. Use the instructions and four exercises below.
Reference illustration
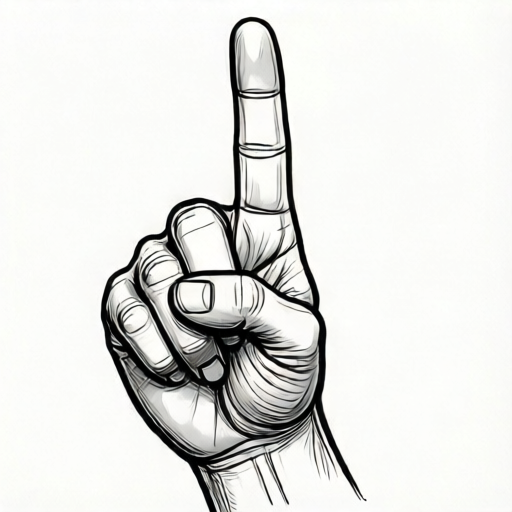
Use the stated measurements and conventions for each exercise.
Build the palm block and knuckle arcs
Start with a rounded rectangle for the palm. Its width is roughly the distance across the four knuckles, and its height is about two-thirds of that width. Mark a baseline at the bottom of the palm and a midline at the top of the palm block. The x-height is baseline to midline; use it as your reference unit for the finger length.
Place four knuckle points along the top edge of the palm block. The index knuckle sits at the corner nearest the pointing direction. Draw a shallow arc through the knuckles to suggest the hand's curve. From the index knuckle, extend a tapered rectangle for the index finger. Its length is about one and a half x-heights, and its width is about one-quarter of the palm width.
- Draw a rounded rectangle for the palm; label width W and height about 0.66W.
- Mark baseline and midline; measure x-height as baseline to midline.
- Place four knuckle points along the top edge; draw a shallow arc through them.
- Extend a tapered rectangle from the index knuckle; length about 1.5 x-heights.
- Add two segment lines across the index finger to mark joints.
Add finger segments and folded fingers
The index finger has three segments: proximal, middle, and distal. Divide the finger length into three parts, with the distal segment slightly shorter. Draw joint lines perpendicular to the finger's long axis. The fingertip is rounded, not pointed. For the folded fingers, draw three short curved blocks below the index finger, each about half an x-height tall, overlapping slightly to show depth.
Check that the folded fingers do not extend past the palm's bottom edge. The thumb sits on the side opposite the pointing direction, angled about 45 degrees from the palm. Keep the thumb's length about one x-height. Use light construction lines first, then darken only the final contours.
- Divide the index finger into three segments; mark joint lines.
- Round the fingertip; avoid a sharp point.
- Draw three folded finger blocks below the index finger, each about half an x-height.
- Add the thumb on the opposite side, angled about 45 degrees.
- Darken final contours and erase construction lines.
Check proportions at three scales
Repeat the gesture at small, medium, and large scales. At each scale, measure the palm width and the index finger length with a ruler. The ratio of finger length to palm width should stay close to 1.5 to 1. If the ratio drifts, adjust the finger length rather than the palm. Also check that the knuckle arc remains shallow; a deep arc makes the hand look clenched.
Use the x-height convention consistently: baseline to midline in your own drawing. Letter styles vary, so your x-height may differ from a neighbor's. Record your measurements in a simple table. Any numerical values here are hypothetical examples; measure your actual paper and tools.
- Draw the gesture at three scales on the same page.
- Measure palm width and finger length at each scale.
- Compare the ratio to 1.5 to 1; adjust finger length if needed.
- Check the knuckle arc depth; keep it shallow.
- Record measurements and note any consistent drift.
Worked example
A palm block is 6 cm wide. Using the hypothetical ratio of finger length to palm width of 1.5 to 1, what is the index finger length? If the finger is divided into three segments with the distal segment slightly shorter, propose segment lengths that sum to the total.
Worked answer
Finger length = 6 cm × 1.5 = 9 cm. One valid split: proximal 3.2 cm, middle 3.0 cm, distal 2.8 cm; sum = 9.0 cm. Check: 3.2 + 3.0 + 2.8 = 9.0 cm, and the distal segment is the shortest.
Four practice exercises
Exercise 1
A palm block is 8 cm wide. Using the hypothetical ratio of 1.5 to 1, calculate the index finger length. Then divide the finger into three segments where the distal segment is 0.5 cm shorter than the middle segment and the proximal segment is 0.3 cm longer than the middle segment. Give all three lengths.
Show answer and check
Finger length = 8 × 1.5 = 12 cm. Let middle = m. Then distal = m − 0.5 and proximal = m + 0.3. Sum: (m + 0.3) + m + (m − 0.5) = 3m − 0.2 = 12, so 3m = 12.2 and m = 12.2 ÷ 3 ≈ 4.0667 cm. Exact solution: middle ≈ 4.0667 cm, proximal ≈ 4.3667 cm, distal ≈ 3.5667 cm; sum = 12.0 cm, proximal is 0.3 cm longer than middle, and distal is 0.5 cm shorter than middle. If you round to one decimal place, use proximal 4.4 cm, middle 4.1 cm, distal 3.6 cm; sum = 12.1 cm, and note that rounding changes the differences slightly.
Why: Multiply palm width by the ratio to get total finger length. Set up a sum with the given differences, solve for the middle segment, then round to practical lengths and verify the total.
Check: Add the three segment lengths; the sum should equal 12.0 cm. Confirm the distal segment is 0.5 cm shorter than the middle and the proximal is 0.3 cm longer.
Exercise 2
A drawing has a palm width of 5 cm and an index finger length of 6.5 cm. Is the finger-to-palm ratio close to the hypothetical 1.5 to 1? If not, by how many centimeters should the finger length change to reach 1.5 to 1?
Show answer and check
Current ratio = 6.5 ÷ 5 = 1.3 to 1, which is below 1.5. Target length = 5 × 1.5 = 7.5 cm. Increase the finger by 7.5 − 6.5 = 1.0 cm.
Why: Divide finger length by palm width to find the current ratio. Multiply palm width by the target ratio to find the target length. Subtract to find the change.
Check: Recompute 7.5 ÷ 5 = 1.5. Confirm the change is 1.0 cm and that the palm width was not altered.
Exercise 3
You draw the same pointing gesture at two scales. At the small scale, palm width is 3 cm and finger length is 4.2 cm. At the large scale, palm width is 9 cm and finger length is 13.5 cm. Are the ratios consistent? Show the arithmetic.
Show answer and check
Small ratio = 4.2 ÷ 3 = 1.4 to 1. Large ratio = 13.5 ÷ 9 = 1.5 to 1. The ratios differ by 0.1, so they are not perfectly consistent. To match the large scale, the small finger should be 3 × 1.5 = 4.5 cm, an increase of 0.3 cm.
Why: Compute each ratio separately. Compare the two results. If they differ, calculate the target length at the smaller scale using the larger scale's ratio.
Check: Verify 4.5 ÷ 3 = 1.5 and 13.5 ÷ 9 = 1.5. Confirm the difference at the small scale is 4.5 − 4.2 = 0.3 cm.
Exercise 4
A palm block is 7 cm wide and 4.6 cm tall. Using the hypothetical palm height of about 0.66 times the width, is the height acceptable? If not, what should the height be, and what is the difference?
Show answer and check
Target height = 7 × 0.66 = 4.62 cm. The drawn height of 4.6 cm is within 0.02 cm of the target, so it is acceptable. The difference is 4.62 − 4.6 = 0.02 cm.
Why: Multiply palm width by 0.66 to find the target height. Compare the drawn height to the target. A small difference is acceptable because the ratio is a hypothetical guide, not a strict standard.
Check: Recompute 7 × 0.66 = 4.62. Subtract 4.6 to get 0.02 cm. Confirm the units are centimeters throughout.
Common mistakes
- Making the index finger too short relative to the palm. Measure palm width and set finger length to about 1.5 times that width; recheck at each scale.
- Drawing a deep knuckle arc that curls the hand into a fist. Flatten the arc so it rises only slightly above the knuckle points; keep the palm block open.
- Pointing the fingertip sharply instead of rounding it. Round the distal segment with a small curve; the fingertip should look soft, not needle-like.
- Letting folded fingers extend below the palm's bottom edge. Shorten each folded block to about half an x-height and overlap them slightly.
Self-check rubric
- Palm block is a rounded rectangle with width W and height about 0.66W.
- Four knuckle points are marked along the top edge and connected by a shallow arc.
- Index finger length is about 1.5 times palm width, or a documented alternative ratio.
- Index finger has three segments with joint lines; distal segment is slightly shorter.
- Fingertip is rounded, not pointed.
- Three folded finger blocks sit below the index finger and do not extend past the palm's bottom edge.
- Thumb is on the opposite side, angled about 45 degrees, length about one x-height.
- Gesture is repeated at three scales with consistent proportions.
- Measurements are recorded and any numerical values are labeled as hypothetical examples.
Questions and answers
What does x-height mean in this drawing?
X-height is the distance from your baseline to your midline in the drawing. It is a local reference unit, not a fixed measurement. Letter styles vary, so your x-height may differ from someone else's.
How many knuckle points should I mark?
Mark four knuckle points along the top edge of the palm block, one for each finger base. The index knuckle is the corner nearest the pointing direction.
Can I use different proportions?
Yes. The 1.5-to-1 finger-to-palm ratio is a hypothetical example. Measure your own hand or reference and adjust; the rubric accepts valid alternatives that stay internally consistent.
Why draw at three scales?
Repeating the gesture at small, medium, and large sizes reveals proportion drift. If the ratio changes with scale, your construction needs adjustment.