Free original lessons
Draw an Off-Road Side-by-Side with Roll Cage and Suspension
Learn to sketch a side-by-side off-road vehicle with a roll cage, wheels, and suspension using simple construction lines and a clear drawing convention.
Free lesson
Four exercises
Worked answers
Object Drawing Lessons
This lesson teaches a repeatable method for drawing an off-road side-by-side vehicle, often called a UTV or RZR-style machine. You will build the body from a box, add a roll cage with visible tubes, place four wheels with suspension arms, and finish with simple details. The method uses a defined drawing convention: x-height is measured from the baseline to the midline of lowercase letters, and letter styles vary, so your proportions may differ from the examples while still being valid. All measurements are hypothetical examples; measure your own paper and tools. No downloads or files are required.
Practice materials: Printable downloads are not available for this lesson yet. Use the instructions and four exercises below.
Reference illustration
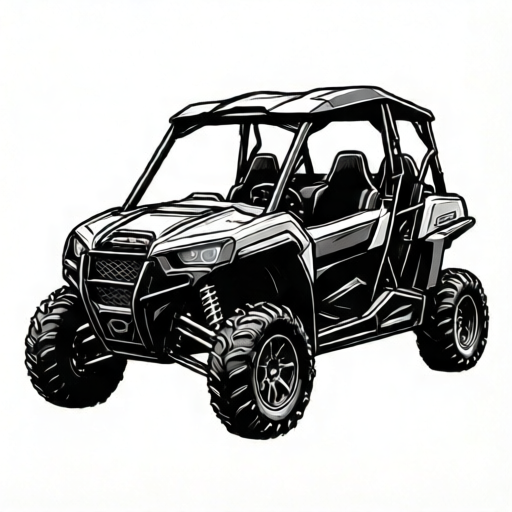
Use the stated measurements and conventions for each exercise.
Set Up the Body Box and Ground Line
Start with a light ground line and a rectangular body box. The box represents the main chassis and cabin volume. Keep the box wider than it is tall for a side-by-side stance. Use a pencil and ruler if you want straight edges, but freehand is acceptable if the box stays readable.
Define a drawing convention before you begin: x-height is the distance from the baseline to the midline of lowercase letters. This helps you compare small details consistently. Letter styles vary, so do not treat any single letter shape as a universal standard. For this lesson, use a simple lowercase x as a height reference for small features such as bolt heads or cage joints.
- Draw a horizontal ground line across the lower third of the page.
- Sketch a rectangular body box above the ground line, leaving space for wheels below.
- Mark a centerline on the box to keep left and right features balanced.
- Lightly label the front and rear of the vehicle so your cage and suspension stay oriented.
Build the Roll Cage from Tubes
The roll cage is a frame of tubes around the cabin. Draw it as a series of connected lines rather than a solid shape. Start with the main hoop behind the seats, then add the front hoop and the connecting roof tubes. Keep tube spacing even so the cage reads as a structure.
Use the x-height convention to size small cage joints consistently. Because letter styles vary, a joint drawn as a small circle or a short overlap is both acceptable. The goal is a clear, readable cage, not a single universal answer.
- Draw the rear main hoop as an inverted U shape above the body box.
- Add the front hoop forward of the rear hoop, matching its height.
- Connect the hoops with two roof tubes and two lower side tubes.
- Add diagonal braces at the rear and label tube intersections lightly.
Place Wheels and Suspension
Place four wheels at the corners of the body box. Front and rear wheels should sit on the ground line. Draw each wheel as a circle with a smaller hub circle. For a side-by-side, the wheels are relatively large and the suspension arms connect the hub to the chassis.
Draw suspension as a pair of arms from the chassis to each wheel hub. Use simple straight lines and a small coil spring shape. Keep the arms symmetrical left and right. If you choose numerical values, label them as hypothetical examples, such as a wheel diameter of 60 units and a suspension arm length of 40 units.
- Draw four wheel circles with hubs, keeping them on the ground line.
- Connect each hub to the chassis with two suspension arms.
- Add a small coil spring between the chassis and each lower arm.
- Check that left and right suspension arms mirror each other.
Add Details and Check Proportions
Add a seat, steering wheel, headlights, and a simple front bumper. Keep details light so the cage and suspension remain the focus. Use the x-height convention for small features and accept variation in letter styles and hand-drawn shapes.
Check proportions by comparing the body box to the wheels. A common hypothetical example is a body box 120 units long and 50 units tall, with wheels 60 units in diameter. These numbers are examples only; measure your own drawing and adjust as needed.
- Draw a seat inside the cage and a steering wheel in front of it.
- Add headlights and a front bumper using short, simple lines.
- Compare wheel size to body height and adjust if the stance looks unstable.
- Erase construction lines lightly and darken the final cage and suspension.
Worked example
Draw a side-by-side with a body box 100 units long and 40 units tall, wheels 50 units in diameter, and a roll cage with two hoops connected by two roof tubes. Use a ground line and show suspension arms from each hub to the chassis.
Worked answer
The finished drawing shows a rectangular body box above a ground line, four wheels touching the ground, a rear hoop and front hoop connected by two roof tubes, and two suspension arms per wheel with a small coil spring. The cage tubes are drawn as separate lines, and the wheels are evenly spaced. Small features use the x-height convention, and the drawing is checked by comparing wheel diameter to body height.
Four practice exercises
Exercise 1
Draw a side-by-side with a body box 80 units long and 30 units tall. Place four wheels 40 units in diameter on a ground line. Add a rear hoop and a front hoop connected by two roof tubes. Show one suspension arm per wheel.
Show answer and check
A drawing with a rectangular body box above the ground line, four wheels touching the ground, two cage hoops joined by two roof tubes, and one suspension arm from each hub to the chassis.
Why: The body box sets the chassis size, the ground line keeps wheels level, and the hoops and roof tubes create a readable roll cage. One arm per wheel is enough to show suspension placement.
Check: Check that all four wheel bottoms touch the ground line, the two hoops are the same height, and each suspension arm connects a hub to the chassis.
Exercise 2
Draw a side-by-side with a body box 120 units long and 50 units tall. Use wheels 60 units in diameter. Add a rear main hoop, a front hoop, two roof tubes, and two diagonal braces at the rear. Show two suspension arms per wheel and a small coil spring.
Show answer and check
A drawing with a larger body box, four large wheels on the ground line, a complete cage with rear and front hoops, roof tubes, rear diagonals, and two suspension arms per wheel with coil springs.
Why: The larger box and wheels create a stable stance. Diagonal braces strengthen the cage visually, and two arms per wheel show a clear suspension linkage.
Check: Compare wheel diameter to body height, confirm the diagonals connect the rear hoop to the chassis, and check that left and right suspension arms mirror each other.
Exercise 3
Draw a side-by-side with a body box 90 units long and 35 units tall. Place wheels 45 units in diameter. Add a seat, steering wheel, headlights, and a front bumper. Use the x-height convention for small bolt heads on the cage joints.
Show answer and check
A drawing with the specified body box and wheels, a seat and steering wheel inside the cage, headlights and a bumper at the front, and small bolt heads sized using the x-height convention.
Why: Details make the vehicle readable, while the x-height convention keeps small features consistent. Letter styles vary, so bolt heads may be circles or short marks.
Check: Check that the seat is inside the cage, the steering wheel is in front of the seat, and small features are similar in size across the drawing.
Exercise 4
Draw a side-by-side with a body box 110 units long and 45 units tall. Use wheels 55 units in diameter. Add a rear hoop, front hoop, roof tubes, and two suspension arms per wheel. Then check your drawing against the rubric and list one improvement.
Show answer and check
A complete drawing matching the given dimensions, with a readable cage, four grounded wheels, mirrored suspension arms, and a written improvement such as darkening the cage tubes or adjusting wheel spacing.
Why: The rubric provides a structured check. Listing an improvement shows reflective practice and helps refine the drawing.
Check: Use the rubric items one by one: body box, cage tubes, wheels on ground, suspension mirroring, x-height details, and clean construction lines.
Common mistakes
- Drawing the roll cage as a solid block instead of separate tubes. Break the cage into connected tube lines and leave gaps between tubes so the frame reads clearly.
- Placing wheels off the ground line or at uneven heights. Draw the ground line first and keep all four wheel bottoms touching it.
- Making suspension arms different lengths on left and right. Mirror the arms across the centerline and check each pair with a ruler or by eye.
- Using tiny details that disappear at the drawing scale. Use the x-height convention to keep small features consistent and large enough to read.
Self-check rubric
- Body box is rectangular and clearly represents the chassis and cabin.
- Roll cage is drawn as separate connected tubes with at least two hoops and roof tubes.
- Four wheels touch the ground line and have visible hubs.
- Suspension arms connect each hub to the chassis and mirror left to right.
- Small details follow the x-height convention, and valid alternative letter styles are accepted.
- Construction lines are light or erased, and the final cage and suspension are readable.
Questions and answers
Do I need a ruler for this drawing?
No. A ruler helps with straight cage tubes, but freehand lines are acceptable if the structure stays readable.
How many wheels should I draw?
Draw four wheels, two front and two rear, because a side-by-side vehicle has four wheels.
What if my letter styles differ from the example?
Letter styles vary, so use the x-height convention as a guide rather than a strict universal standard. Your drawing can still be valid.
Are the numerical values in this lesson real specifications?
No. Any numbers given are hypothetical examples for practice. Measure your own paper and tools instead.