Free original lessons
Drawing a Pregnant Figure: Belly Contour and Shading Lines
Learn to draw a pregnant figure with a clear belly contour and purposeful shading lines, using posture alignment and simple checkable proportions.
Free lesson
Four exercises
Worked answers
Object Drawing Lessons
This lesson focuses on the pregnant figure as a drawing subject, not on clinical anatomy. You will establish a stable posture, shape the belly contour with a few deliberate landmarks, and use shading lines to describe roundness without turning the drawing into a medical diagram. The convention used here is a side or three-quarter view with the figure standing; the belly is the forward-most curve of the torso, and shading lines follow the form from the upper belly toward the lower belly. Letter styles and handwriting vary, so the rubric rewards clear, consistent choices rather than one universal line style. All measurements below are hypothetical examples; measure your own paper and tools before drawing.
Practice materials: Printable downloads are not available for this lesson yet. Use the instructions and four exercises below.
Reference illustration
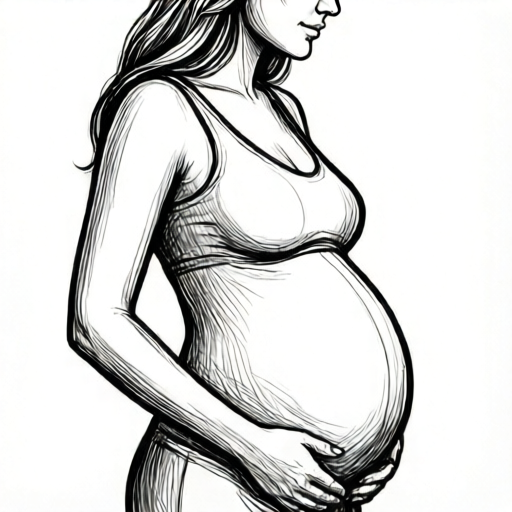
Use the stated measurements and conventions for each exercise.
Set the posture and the frame
Begin with a light vertical line for the body's central axis. Mark a head height at the top, then step down in equal units to place the shoulders, waist, hip, knee and ankle. A common hypothetical example is a figure eight head-heights tall, but any consistent unit works if you keep the same unit throughout.
For a side view, place the shoulder slightly behind the hip so the figure reads as balanced rather than leaning. The belly contour begins below the ribcage and reaches its forward-most point around the lower belly, then curves back toward the pubic area. Keep the back line gentle; the contrast between the back curve and the belly curve is what makes the posture readable.
- Draw a light vertical axis and mark eight equal head units.
- Place shoulder, waist, hip, knee and ankle marks on the axis.
- Offset the shoulder slightly behind the hip for a side view.
- Sketch a light oval for the torso and a smaller oval for the belly mass.
Shape the belly contour with landmarks
The belly contour is not a single circle. Use three landmarks: the upper belly where the curve leaves the ribcage, the forward-most point, and the lower belly where the curve returns toward the body. Connect these with a smooth line that changes direction gradually.
In a three-quarter view, the belly contour shifts toward the viewer's side and the far side of the torso becomes a shorter curve. Keep the forward-most point on the same horizontal level as in the side view so the two views agree. Avoid sharp corners; a contour that changes direction too quickly looks like a costume rather than a body.
- Mark the upper belly landmark just below the ribcage.
- Mark the forward-most point at the lower belly.
- Mark the lower belly return point near the pubic area.
- Connect the three marks with one smooth contour line.
- Repeat on the three-quarter view, shifting the contour toward the viewer.
Place shading lines that describe roundness
Shading lines should follow the form, not the page. On the belly, draw short curved lines that run roughly parallel to the belly contour, spaced more tightly near the forward-most point and more widely near the edges. This creates a sense of roundness without heavy darkening.
Use a consistent line weight. A hypothetical example is a 0.5 mm pencil line for shading and a 0.7 mm line for the contour, but measure your own tools and label any chosen value as an example. Keep shading lines inside the belly mass and stop them before the contour so the edge stays crisp. In the three-quarter view, shading lines on the far side should be shorter and lighter.
- Draw a light contour line around the belly mass.
- Add short curved shading lines parallel to the contour.
- Tighten spacing near the forward-most point.
- Widen spacing near the upper and lower edges.
- Keep all shading lines inside the contour.
Check the drawing against simple arithmetic
Use checkable arithmetic to confirm proportions. If the figure is eight head units tall and the head unit is 3 cm, the total height is 24 cm. If the belly's forward-most point sits at the fourth head unit from the top, that is 12 cm down from the top mark. These are hypothetical examples; substitute your own measured values.
Check that the belly contour's forward-most point is the same distance from the axis in both views. If the side view shows 4 cm forward and the three-quarter view shows 3 cm, the views disagree and one contour needs adjustment. Keep units consistent: use centimetres for paper measurements and head units for proportion.
- Measure total height and divide by the number of head units.
- Measure the forward-most point's distance from the axis.
- Compare that distance across side and three-quarter views.
- Adjust the contour until the two views agree within your chosen tolerance.
Worked example
A side-view figure is eight head units tall. The head unit is 3 cm. The belly's forward-most point is 4 cm from the axis at the fourth head unit from the top. Describe where to place the contour and shading lines.
Worked answer
Total height is 24 cm. The fourth head unit from the top is 12 cm down. Place the upper belly landmark just below the ribcage, the forward-most point at 12 cm down and 4 cm forward of the axis, and the lower belly return point near the pubic area. Connect the three marks with one smooth contour. Add short curved shading lines parallel to the contour, tighter near the forward-most point and wider near the edges, all inside the belly mass.
Four practice exercises
Exercise 1
A side-view figure is six head units tall with a head unit of 4 cm. The belly's forward-most point is at the third head unit from the top and 5 cm from the axis. Calculate the total height and the vertical position of the forward-most point.
Show answer and check
Total height is 24 cm. The forward-most point is 12 cm down from the top.
Why: Six head units times 4 cm equals 24 cm. Three head units times 4 cm equals 12 cm.
Check: Multiply the number of head units by the head unit length and confirm both results use centimetres.
Exercise 2
In a three-quarter view, the belly contour shifts toward the viewer. Describe how to place the three belly landmarks and how the shading lines on the far side should differ from the near side.
Show answer and check
Place the upper belly landmark below the ribcage, the forward-most point at the same horizontal level as the side view but shifted toward the viewer, and the lower belly return point near the pubic area. Shading lines on the far side should be shorter and lighter than on the near side.
Why: The three-quarter view compresses the far side of the torso, so the contour shifts and the far-side shading covers less area.
Check: Compare the forward-most point's horizontal level with the side view and confirm the far-side shading lines are shorter.
Exercise 3
A drawing shows shading lines crossing the belly contour and spaced evenly across the whole belly. Identify two problems and state one fix for each.
Show answer and check
Problem one: shading lines cross the contour, which breaks the edge. Fix: keep shading lines inside the belly mass. Problem two: even spacing does not describe roundness. Fix: tighten spacing near the forward-most point and widen it near the edges.
Why: Shading lines should follow the form and stay inside the contour; spacing should vary to suggest roundness.
Check: Trace each shading line to confirm it stops before the contour, and compare spacing at the centre and edges.
Exercise 4
A side view shows the forward-most point 4 cm from the axis, but the three-quarter view shows it 3 cm from the axis. State whether the views agree and describe one adjustment.
Show answer and check
The views do not agree. Adjust one contour so both views show the same distance from the axis within your chosen tolerance, for example by moving the three-quarter forward-most point to 4 cm.
Why: The forward-most point should sit at the same distance from the axis in both views; a 1 cm difference exceeds agreement.
Check: Measure both distances with the same ruler and confirm they match within the tolerance you chose.
Common mistakes
- Drawing the belly as a perfect circle attached to the torso. Use three landmarks and a contour that changes direction gradually, so the belly reads as part of the body.
- Making shading lines cross the contour or run in random directions. Keep shading lines inside the belly mass and parallel to the contour, tightening spacing near the forward-most point.
- Letting the side and three-quarter views disagree on the forward-most point. Measure the forward-most point's distance from the axis in both views and adjust until they match within your chosen tolerance.
- Leaning the figure forward by placing the shoulder too far ahead of the hip. Offset the shoulder slightly behind the hip for a balanced side view, then recheck the axis.
Self-check rubric
- Posture is balanced: shoulder slightly behind hip in side view, axis stable.
- Belly contour uses three landmarks and changes direction gradually.
- Side and three-quarter views agree on the forward-most point within the chosen tolerance.
- Shading lines follow the form, stay inside the contour, and vary spacing to describe roundness.
- Line weight is consistent and any numerical values are labelled as hypothetical examples.
- Units are consistent and arithmetic checks are shown.
Questions and answers
Do I need to know clinical anatomy to draw this figure?
No. This lesson treats the pregnant figure as a drawing subject with a belly contour and shading lines, not as a medical illustration.
How many shading lines should I use?
There is no fixed number. Use enough short curved lines to describe roundness, with tighter spacing near the forward-most point and wider spacing near the edges.
Can I use a different line style?
Yes. The rubric rewards clear, consistent choices. Letter styles and handwriting vary, so any consistent shading convention that follows the form is acceptable.
What if my paper is a different size?
Measure your own paper and tools, then label any chosen numerical values as hypothetical examples. Keep units consistent throughout.