Free original lessons
Primate Drawing: Body Proportion and Facial Features
Learn to draw a generic primate using body-mass blocks, limb proportion guides, and facial feature placement for sitting and standing poses.
Free lesson
Four exercises
Worked answers
Object Drawing Lessons
This lesson teaches a reliable method for drawing a generic primate with believable body proportions and facial features. You will use simple mass blocks to establish the torso, head, and limbs before refining the face. The approach works for both sitting and standing poses and avoids species-specific details. All measurements are relative to the head height, so you can scale the drawing freely. A convention is defined for facial feature placement: the eye line sits at the vertical midpoint of the head mass, the nose base at two-thirds down from the top, and the mouth line halfway between nose base and chin. Ear placement is at the eye line, just outside the head mass. These are guidelines, not rigid rules; valid alternatives are allowed when the overall proportion remains coherent. You will practice with four self-contained exercises and a worked example. The planned printable plate and practice panel are described in the resource plan but are not yet built.
Practice materials: Printable downloads are not available for this lesson yet. Use the instructions and four exercises below.
Reference illustration
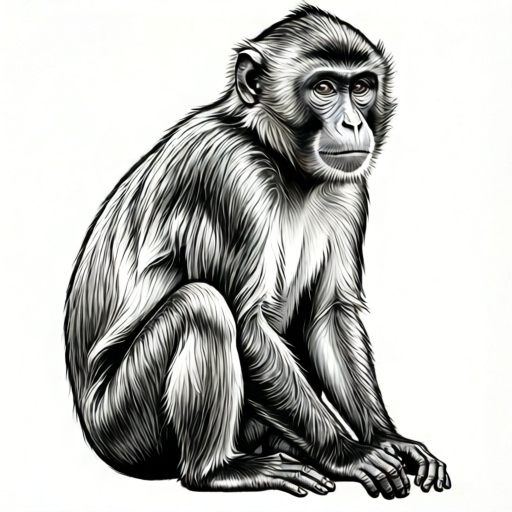
Use the stated measurements and conventions for each exercise.
Establishing Body Mass and Proportion
Begin by drawing a head mass as an oval. Let its height be one unit. For a generic primate, the torso from shoulder to hip is about two head heights. The torso width at the shoulders is about one and a half head widths, tapering slightly to the hips. The arms, from shoulder to wrist, are roughly two and a half head heights, and the legs, from hip to ankle, are about two head heights. These ratios are hypothetical examples for practice; measure your own drawing to check consistency.
Use light construction lines to block the torso as a rounded rectangle or two stacked ovals. Mark the shoulder line and hip line. For a sitting pose, shorten the visible leg length by foreshortening and place the hip line lower relative to the torso. For a standing pose, keep the torso upright and align the hip and shoulder lines horizontally. The key is to compare every new mass to the head unit.
- Draw a head oval and label its height as one unit.
- Block the torso as two stacked ovals, total height two units, shoulder width about one and a half head widths.
- Mark shoulder and hip lines; check that the torso height is twice the head height.
- Add arm masses from shoulder to wrist, each about two and a half units long.
- Add leg masses from hip to ankle, each about two units long for standing; foreshorten for sitting.
Placing Facial Features
Within the head oval, draw a vertical midline and a horizontal eye line at the midpoint of the head height. Place the eyes on this line, separated by about one eye width. The nose base sits at two-thirds of the head height from the top. The mouth line is halfway between the nose base and the chin. Ears attach at the eye line, just outside the head oval. These positions are a convention for this lesson; you may adjust them slightly as long as the face remains balanced.
Draw the eyes as small ovals with a pupil dot. The nose can be a simple rounded triangle or a short curve. The mouth is a gentle curve. Keep features symmetrical around the midline. Check that the distance from the top of the head to the eye line equals the distance from the eye line to the chin.
- Draw a vertical midline and a horizontal eye line at the head's midpoint.
- Place two eye ovals on the eye line, separated by one eye width.
- Mark the nose base at two-thirds of the head height from the top.
- Draw the mouth line halfway between nose base and chin.
- Attach ears at the eye line, just outside the head oval.
Drawing Sitting and Standing Poses
For a sitting pose, draw the torso upright, then bend the hip line so the thighs go forward and the lower legs drop down. The arms may rest on the knees or hang at the sides. For a standing pose, keep the torso vertical and the legs straight down from the hips. In both poses, maintain the head-to-torso ratio of one to two. Use the same facial feature placement.
Check the pose by comparing limb lengths to the head unit. In sitting, the visible thigh length may appear shorter due to foreshortening; that is acceptable. In standing, the ankle should be about two head heights below the hip. Adjust the construction lines before adding detail.
- Choose sitting or standing and block the torso with the head unit.
- For sitting, angle the thigh masses forward and place the lower legs below the knees.
- For standing, draw straight leg masses from hip to ankle, each about two units.
- Add arms according to the pose, keeping each about two and a half units from shoulder to wrist.
- Refine the face using the eye line, nose base, and mouth line conventions.
Worked example
Draw a standing generic primate with a head height of 2 cm. Use the lesson proportions to determine torso height, arm length, and leg length, and state where the eye line and nose base sit on the head.
Worked answer
Head height = 2 cm. Torso height = 2 head heights = 4 cm. Arm length (shoulder to wrist) = 2.5 head heights = 5 cm. Leg length (hip to ankle) = 2 head heights = 4 cm. Eye line is at the head's midpoint, 1 cm from the top. Nose base is at two-thirds of head height from the top, about 1.33 cm down. Mouth line is halfway between nose base and chin, about 1.67 cm from the top.
Four practice exercises
Exercise 1
A head oval is 3 cm tall. Using the lesson ratios, calculate the torso height and the standing leg length. Then state the distance from the top of the head to the eye line.
Show answer and check
Torso height = 6 cm; standing leg length = 6 cm; eye line is 1.5 cm from the top.
Why: Torso is two head heights: 2 × 3 = 6 cm. Standing legs are two head heights: 2 × 3 = 6 cm. Eye line is at the midpoint: 3 ÷ 2 = 1.5 cm.
Check: Verify each value by multiplying or dividing the head height by the stated ratio; confirm units are consistent in cm.
Exercise 2
A drawing has a head height of 4 cm and a torso height of 6 cm. Is the torso proportion correct according to the lesson? If not, what should the torso height be?
Show answer and check
No; the torso should be 8 cm.
Why: The lesson ratio is torso = 2 × head height. 2 × 4 = 8 cm, so 6 cm is too short.
Check: Multiply head height by 2 and compare to the given torso height.
Exercise 3
For a head oval 5 cm tall, find the distance from the top of the head to the nose base and to the mouth line. Use the convention that nose base is two-thirds down and mouth line is halfway between nose base and chin.
Show answer and check
Nose base is about 3.33 cm from the top; mouth line is about 4.17 cm from the top.
Why: Nose base = (2/3) × 5 ≈ 3.33 cm. Chin is at 5 cm. Mouth line is halfway between 3.33 and 5: (3.33 + 5) ÷ 2 ≈ 4.17 cm.
Check: Calculate two-thirds of head height, then average that value with the chin position; confirm the mouth line lies between nose base and chin.
Exercise 4
A sitting primate drawing uses a head height of 2 cm. The visible thigh length is drawn as 1 cm, and the lower leg is 2 cm. The torso is 4 cm. Check whether the torso proportion is correct and whether the leg lengths are plausible for a sitting pose under the lesson convention.
Show answer and check
Torso is correct (4 cm = 2 × 2 cm). The visible thigh of 1 cm is plausible due to foreshortening; the lower leg of 2 cm is consistent with the standing leg ratio of two head heights, though sitting poses may vary. Overall, the proportions are acceptable.
Why: Torso ratio checks: 2 × 2 = 4 cm. In sitting, thigh foreshortening can shorten the visible length; the lower leg can remain near two head heights. The key is that the pose reads as sitting and the head unit is respected.
Check: Confirm torso = 2 × head height; confirm the lower leg is roughly two head heights or adjusted consistently; check that the hip line is bent and thighs angle forward.
Common mistakes
- Making the head too large relative to the torso. Measure the torso height; it should be about twice the head height. Adjust the torso mass before adding details.
- Placing the eyes above or below the head's midpoint. Draw a horizontal eye line exactly at the midpoint of the head oval and place the eyes on it.
- Using different limb lengths for the same pose. Compare each arm and leg to the head unit; arms about two and a half units, legs about two units for standing.
- Ignoring foreshortening in the sitting pose. Shorten the visible thigh length and keep the lower leg vertical; check that the overall pose reads as sitting.
Self-check rubric
- Head height is used consistently as the unit for all proportions.
- Torso height is approximately twice the head height.
- Arm length is approximately two and a half head heights; leg length is approximately two head heights for standing.
- Eye line is at the head's midpoint; nose base at two-thirds down; mouth line halfway between nose base and chin.
- Ears attach at the eye line, just outside the head oval.
- Sitting pose shows bent hip line and foreshortened thighs; standing pose shows straight legs.
- Facial features are symmetrical around the midline.
- Valid alternatives are accepted if overall proportion and balance remain coherent.
Questions and answers
Do I have to follow the facial feature convention exactly?
No. The convention is a guide. You may adjust feature placement slightly as long as the face remains balanced and the overall proportions are coherent.
Can I use these proportions for any primate?
This lesson covers a generic primate. Specific species have different proportions, so treat these ratios as a starting point and measure your own reference if needed.
How do I check my drawing without a ruler?
Use the head height as a unit. Compare the torso height, limb lengths, and feature positions by eye against that unit.
What if my sitting pose looks like a standing pose?
Check that the hip line is bent and the thighs angle forward. The lower legs should drop below the knees, and the torso should remain upright.