Free original lessons
Raindrop Drawing: Falling and Splash Variants
Learn to draw raindrops in falling and splash forms using a teardrop breakdown, variant practice, and a clear shape convention with self-checks.
Free lesson
Four exercises
Worked answers
Object Drawing Lessons
This lesson teaches a simple, repeatable way to draw raindrops in two families: falling drops and splash-impact shapes. You will use a defined shape convention so that your drawings can be checked and compared, while still allowing personal style. The focus is on the raindrop itself, not on clouds, weather scenes, or water-cycle diagrams. All practice is done with pencil and paper. The resources described here are planned and free, but they are not yet built; this text gives you everything needed to start now.
Practice materials: Printable downloads are not available for this lesson yet. Use the instructions and four exercises below.
Reference illustration
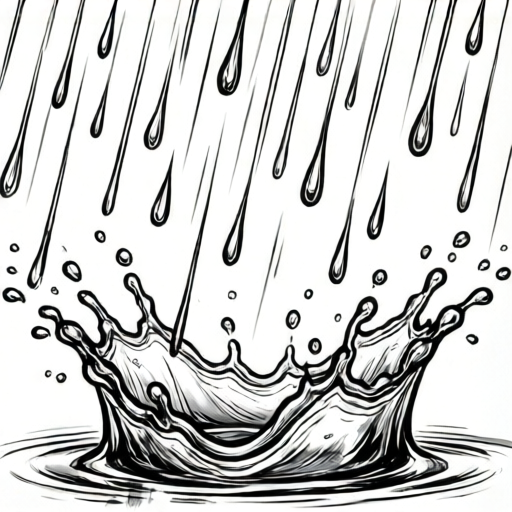
Use the stated measurements and conventions for each exercise.
The teardrop convention
A falling raindrop is drawn as a teardrop: a rounded lower body that narrows to a point at the top. In this lesson, the point is always at the top for a falling drop, because the drop is moving downward. The rounded part is at the bottom. This is a drawing convention, not a claim about the exact shape of real raindrops.
Use a light construction line first. Draw a vertical line for the drop's axis. Mark a top point and a bottom curve. The widest part of the drop sits about one-third of the way up from the bottom. Keep the two sides roughly mirror-symmetric unless you deliberately choose a leaning variant.
Letter styles and handwriting vary, and so do drawn drops. Your drop does not need to match a single universal template. What matters is that the point is clearly at the top, the body is rounded, and the shape reads as a falling drop at a glance.
- Draw a light vertical axis line about 4 cm long.
- Mark a top point and a bottom midpoint.
- Sketch a rounded bottom curve that is widest about one-third up from the bottom.
- Narrow the two sides smoothly to the top point.
- Darken the final outline and erase the axis line.
Falling variants
Once the basic teardrop is reliable, vary it in controlled ways. A slim drop has a narrower body; a plump drop has a wider body. A leaning drop tilts its axis by a small angle, for example 10 to 15 degrees, while the point still leads the motion. A trailing drop adds a short, thin tail above the point to suggest speed.
Keep each variant checkable. For a leaning drop, the axis tilt should be consistent from top point to bottom curve. For a trailing drop, the tail should be thinner than the body and centered on the axis. Avoid adding many extra lines; two or three clean variants are more useful than a crowded page.
- Draw the basic teardrop three times in a row.
- Make one slim, one plump, and one leaning by changing only one feature each time.
- Add a short trailing tail to one drop, keeping it thinner than the body.
- Label each variant with a single word: slim, plump, leaning, trailing.
Splash-impact shapes
A splash-impact shape shows a drop hitting a surface. Draw a short horizontal surface line first. Above it, place a small central dome or flattened drop body. From the dome, draw three to five short curved spikes fanning outward and slightly upward. The spikes are the splash arms.
Use a simple convention: the central dome sits on the surface line, and the splash arms do not cross each other. Arms can be uneven in length, but each arm should start at the dome and end in a clear tip. This makes the splash readable and easy to check.
You can also draw a crown variant: a low central dome with a ring of short arms, plus two or three tiny detached droplets above the tips. Detached droplets are optional and should be small, clearly separate, and placed above the arms.
- Draw a horizontal surface line about 5 cm long.
- Place a small dome or flattened drop body on the line.
- Draw three to five curved arms fanning outward from the dome.
- Keep arms from crossing and give each a clear tip.
- Optionally add two or three tiny detached droplets above the tips.
Checking your drawing
Use simple checks after each drawing. For a falling drop, confirm the point is at the top, the body is rounded, and the widest part is roughly one-third up from the bottom. For a splash, confirm the dome touches the surface line and the arms start at the dome without crossing.
Measure with a ruler only when a check needs a number. For example, if you choose a 4 cm axis, the widest part should be about 1.3 cm above the bottom. These numbers are hypothetical examples; measure your own paper and pencil work rather than assuming a standard.
A valid alternative is allowed. A drop with a slightly different curve or a splash with four arms instead of five can still pass if the convention is followed and the shape reads clearly.
- Check the point position and body roundness.
- Check the widest-part height against your chosen axis length.
- Check splash dome contact and arm separation.
- Circle one feature to improve and redraw only that part.
Worked example
Draw one falling drop with a 4 cm axis and one splash with a 5 cm surface line and four arms. Check both against the convention.
Worked answer
The falling drop has its point at the top, a rounded bottom, and its widest part about 1.3 cm above the bottom. The splash has a dome touching the surface line and four separated arms starting at the dome. Both pass the checks; the drop is slightly plump but still valid.
Four practice exercises
Exercise 1
Draw a basic falling teardrop with a 6 cm axis. Mark the widest part and state its height above the bottom.
Show answer and check
A teardrop with the point at the top, rounded bottom, and widest part about 2 cm above the bottom.
Why: One-third of 6 cm is 2 cm, so the widest curve sits near that height. The point is at the top and the body is rounded.
Check: Measure the axis and the widest-part height. Confirm the point is at the top and the height is close to 2 cm.
Exercise 2
Draw a leaning falling drop with a 5 cm axis tilted about 10 degrees. Keep the point leading the motion.
Show answer and check
A teardrop whose axis is tilted about 10 degrees, with the point at the upper end and the rounded body at the lower end.
Why: The tilt changes the axis direction but not the convention: the point leads and the body is rounded. A small angle keeps the shape readable.
Check: Check that the top point and bottom curve lie on the same tilted axis and that the tilt is consistent.
Exercise 3
Draw a splash-impact shape on a 5 cm surface line with a central dome and four arms. Do not let arms cross.
Show answer and check
A dome touching the surface line with four separated curved arms fanning outward and upward.
Why: The dome anchors the splash to the surface, and four arms fall within the three-to-five range. Separation keeps each arm clear.
Check: Confirm the dome touches the line, count four arms, and trace each arm from dome to tip without crossings.
Exercise 4
Draw a crown splash variant with a low dome, five short arms, and three tiny detached droplets above the tips. State one check you used.
Show answer and check
A low dome on the surface line, five separated short arms, and three small droplets above the arm tips. One check: each droplet is clearly separate from the arms.
Why: The crown variant adds detached droplets while keeping the dome and arm convention. Five arms are within the allowed range.
Check: Count five arms and three droplets, confirm the dome touches the line, and verify no droplet touches an arm tip.
Common mistakes
- Putting the point at the bottom of a falling drop. Redraw with the point at the top and the rounded body at the bottom, then compare the two.
- Making the splash arms cross or start away from the dome. Start every arm at the dome edge and fan them outward without crossing.
- Making the widest part too high or too low. Mark one-third of the axis height from the bottom and place the widest curve there.
- Adding too many tiny lines that blur the shape. Keep only the outline and one optional tail or detached droplet.
Self-check rubric
- Falling drop: point clearly at the top.
- Falling drop: rounded body with widest part near one-third up from the bottom.
- Splash: dome or flattened body touches the surface line.
- Splash: three to five arms start at the dome and do not cross.
- Variants: each change is deliberate and the shape remains readable.
- Checks: measurements use consistent units and match the chosen axis or surface line.
Questions and answers
Does every raindrop have to look the same?
No. The convention fixes the point position and rounded body, but curve shape, size, and small variants can differ.
How many splash arms should I draw?
Three to five is a practical range. Choose a number and keep the arms separated and starting at the dome.
Can I use a ruler for every line?
Use a ruler for the axis and surface line if you want checkable measurements. Freehand curves are fine for the body and arms.
What if my drop leans?
A leaning drop is valid if the axis tilt is consistent and the point still leads the motion.