Free original lessons
Realistic Cat Drawing: Fur Direction, Eye Shading, and Body Proportion
Learn to draw a realistic cat using fur-direction arrows, layered eye shading, and a simple proportion guide for head and full-body studies.
Free lesson
Four exercises
Worked answers
Object Drawing Lessons
Realistic cat drawing depends on three controllable skills: mapping body proportion before detail, letting fur direction follow anatomy, and shading the eye as a layered sphere rather than a flat symbol. This lesson uses a pencil-and-paper convention where x-height means the distance from baseline to midline in your own handwriting; letter styles vary, so use your natural x-height as a consistent unit. All numerical values below are hypothetical examples chosen for practice, not manufacturing standards. Measure your actual paper and pencil before starting.
Practice materials: Printable downloads are not available for this lesson yet. Use the instructions and four exercises below.
Reference illustration
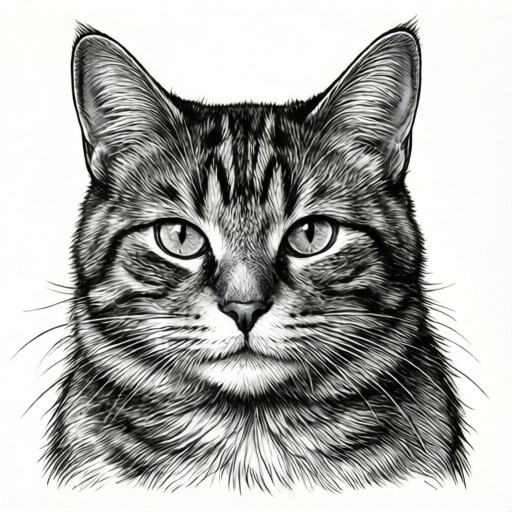
Use the stated measurements and conventions for each exercise.
Set a proportion guide before drawing fur
Begin with light construction lines. For a head study, draw an oval whose width is about one and one-quarter times its height. Place the midline horizontally through the oval and the baseline at the chin. Use your handwriting x-height as a unit: if your x-height measures 4 mm, the head oval might be 12 x-heights wide and 9 x-heights tall as a hypothetical example. Mark the eye line halfway between the top of the oval and the chin, then mark the nose line one-third of the way up from the chin.
For a full-body study, block three masses: head, chest, and hindquarters. The chest oval should be roughly the same width as the head oval; the hindquarters oval slightly wider. Connect them with a tapered spine line. Legs are simple columns whose length equals about two head heights. Keep these lines faint so fur can cover them later.
- Measure your x-height on scrap paper and write it down.
- Draw the head oval and mark midline, eye line, nose line, and chin baseline.
- Block chest and hindquarter ovals for the full-body study.
- Check that leg length equals about two head heights before adding detail.
Direct fur with arrows that follow anatomy
Fur is not random texture; it flows away from the face and down the body. On the head, draw short arrows from the nose bridge toward the ears, from the cheeks outward and slightly down, and from the forehead up between the ears. On the chest, arrows fan downward and outward. On the back, arrows run from neck to tail. On the tail, arrows follow the curve from base to tip.
Render fur as overlapping tapered strokes, not parallel lines. Each stroke starts at its root and ends in a point. Vary stroke length: short on the muzzle, medium on the cheeks, long on the chest and tail. Leave gaps between stroke groups so the underlying form shows through. Darker fur goes where forms turn away from the light; lighter fur stays on top planes.
- Draw five to seven direction arrows on the head study before any fur strokes.
- Add fur strokes in the arrow direction, starting at the root and tapering to a point.
- Vary stroke length by body region: short muzzle, medium cheek, long chest and tail.
- Leave small gaps between stroke clusters to preserve form.
Shade the eye as a layered sphere
A cat eye reads as realistic when it has four layers: lid shadow, iris gradient, pupil, and highlight. First shade a soft crescent under the upper lid. Then fill the iris with a gradient that is darker at the top and lighter at the bottom. Place the pupil as a vertical slit or oval, darker than the iris. Add one small, sharp highlight near the top of the iris and a faint reflected light at the bottom edge.
Keep the eye white minimal; most of the visible eye is iris. The eyelid rim should be a thin dark line, not a thick outline. Shade the fur around the eye socket slightly darker so the eye sits into the head rather than on top of it.
- Shade a crescent under the upper lid.
- Fill the iris with a top-dark, bottom-light gradient.
- Draw the pupil as a vertical slit or oval.
- Add one sharp highlight and a faint bottom reflected light.
- Darken the eye socket fur slightly to seat the eye.
Check proportion and fur consistency
Before finishing, compare your drawing to the construction lines. The eye line should still sit halfway between the top of the head oval and the chin. The nose should sit one-third up from the chin. On the full body, the chest and hindquarter ovals should remain roughly head-width. Fur arrows should all point away from the face or down the body; any arrow pointing toward the face is a direction error.
Use a simple arithmetic check: if your head oval is 9 x-heights tall, the eye line should be 4.5 x-heights from the top and 4.5 from the chin. If your leg length is 18 x-heights, that equals two head heights of 9 x-heights each. Adjust before adding final dark strokes.
- Measure eye-line distance from top and chin; they should match.
- Measure nose distance from chin; it should be one-third of head height.
- Compare chest and hindquarter widths to head width.
- Scan fur arrows for any that point toward the face.
Worked example
A head study uses a head oval 12 x-heights wide and 9 x-heights tall. The eye line is marked halfway down. Where should the eye line sit, and where should the nose line sit if it is one-third up from the chin?
Worked answer
The eye line sits 4.5 x-heights from the top and 4.5 x-heights from the chin. The nose line sits 3 x-heights above the chin, because one-third of 9 x-heights is 3 x-heights.
Four practice exercises
Exercise 1
A head oval is 10 x-heights tall. Mark the eye line halfway and the nose line one-third up from the chin. State both distances from the chin.
Show answer and check
Eye line: 5 x-heights from the chin. Nose line: 3.33 x-heights from the chin (one-third of 10).
Why: Half of 10 is 5. One-third of 10 is 3.33 when rounded to two decimal places. Both are measured upward from the chin baseline.
Check: Add the eye-line distance to the top distance: 5 + 5 = 10 x-heights. Multiply the nose distance by 3: 3.33 x 3 = 9.99, which rounds to 10.
Exercise 2
A full-body study uses a head height of 8 x-heights. Legs are drawn 16 x-heights long. Does the leg length match the two-head-height guide? Show the arithmetic.
Show answer and check
Yes. Two head heights equal 2 x 8 = 16 x-heights, which matches the drawn leg length.
Why: The guide sets leg length at about two head heights. Multiply head height by two and compare to the drawn length.
Check: Divide leg length by head height: 16 divided by 8 equals 2, confirming two head heights.
Exercise 3
On a head study, you draw fur arrows from the ears toward the nose bridge. Is this a direction error? Explain and give a corrected arrow direction.
Show answer and check
Yes, it is a direction error. Fur on the head should flow away from the face, so a corrected arrow runs from the nose bridge toward the ears.
Why: Fur direction follows anatomy and typically moves away from the face. Arrows pointing toward the face contradict that flow.
Check: Scan every arrow and ask whether it points away from the face or down the body. Any arrow pointing toward the face is reversed.
Exercise 4
An eye study has a lid crescent, an iris gradient, and a pupil, but no highlight. Name the missing layer and describe where to place it.
Show answer and check
The missing layer is the highlight. Place one small, sharp highlight near the top of the iris, and optionally a faint reflected light at the bottom edge.
Why: The four-layer eye convention requires lid shadow, iris gradient, pupil, and highlight. Without a highlight the eye looks flat.
Check: Count the layers: lid crescent, iris gradient, pupil, highlight. If any layer is absent, add it before finishing.
Common mistakes
- Drawing fur as parallel lines across the whole body. Replace parallel lines with tapered strokes that follow local direction arrows and vary in length by region.
- Making the eye a flat circle with a round pupil and no lid shadow. Add a lid crescent, an iris gradient, a vertical pupil, and one sharp highlight so the eye reads as a sphere.
- Skipping construction lines and guessing proportions. Block head, chest, and hindquarter ovals first, then verify eye line and nose line against the head oval before adding fur.
- Outlining the whole cat with a thick uniform line. Use thin lid rims and let fur strokes create edges; reserve dark lines for deep shadow and the eyelid rim.
Self-check rubric
- Construction lines are faint and proportion checks are visible or noted.
- Eye line sits halfway between head top and chin; nose line sits one-third up from chin.
- Fur direction arrows point away from the face and down the body; strokes taper and vary by region.
- Eye shows lid shadow, iris gradient, pupil, and at least one highlight.
- Full-body masses keep chest and hindquarter widths close to head width.
- Valid alternatives are accepted: pupil may be slit or round, fur stroke length may vary, and letter style may differ as long as one x-height unit is used consistently.
Questions and answers
Do I need special pencils?
No. A graphite pencil and ordinary paper work. Measure your own x-height and paper size so your proportion units stay consistent.
How long should fur strokes be?
Use short strokes on the muzzle, medium on the cheeks, and long on the chest and tail. The exact length is a choice; consistency with the direction arrows matters more than a fixed number.
Can the pupil be round instead of a slit?
Yes, some cats show a rounder pupil in low light. Choose one shape and keep it consistent within the drawing; the rubric accepts either as long as the iris gradient and highlight are present.
What if my x-height changes while writing?
Re-measure and note the new value. Use one recorded x-height per drawing so your proportion checks remain simple arithmetic.