Free original lessons
Draw a Realistic Spherical Ornament with Cap and Highlight
Learn to construct a sphere, add a metal cap, and place a convincing specular highlight using simple geometry and value control.
Free lesson
Four exercises
Worked answers
Object Drawing Lessons
This lesson teaches a repeatable method for drawing a realistic spherical ornament. You will build the sphere from a circle and center lines, attach a simple metal cap, and place a specular highlight that reads as reflected light. The approach uses a defined convention for x-height and lettering so that labels and notes remain legible, while allowing valid stylistic alternatives. All measurements are hypothetical examples; measure your own paper and tools before drawing. The focus is on construction and value, not on holiday scene composition or other ornament shapes.
Practice materials: Printable downloads are not available for this lesson yet. Use the instructions and four exercises below.
Reference illustration
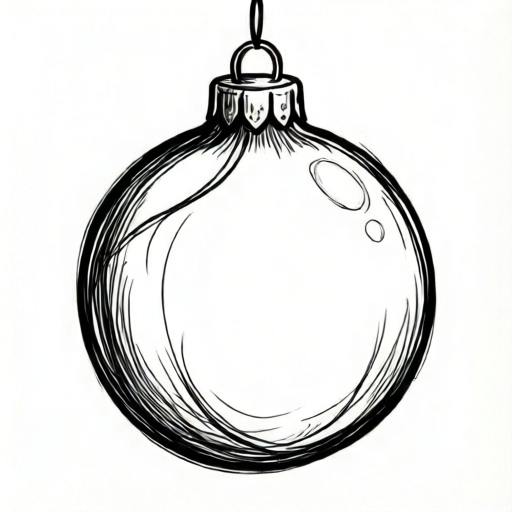
Use the stated measurements and conventions for each exercise.
Constructing the Sphere and Cap
Begin with a light circle drawn freehand or with a compass. Mark the vertical and horizontal center lines. The sphere's silhouette is the circle; the center lines help place the cap and highlight consistently.
The cap sits on top of the sphere. Draw a short vertical neck from the top of the circle, then a trapezoid or rounded rectangle for the cap body, and a small loop or ring above it. Keep the cap centered on the vertical axis. The cap's width should be roughly one-third of the sphere's diameter as a starting proportion; adjust after measuring your actual drawing.
Use a defined lettering convention for any labels: x-height is the distance from baseline to midline, and letter styles may vary as long as labels remain readable. This convention applies to notes and rubric checks, not to the ornament itself.
- Draw a circle and mark vertical and horizontal center lines.
- Add a short neck at the top center, then a cap body and a small loop.
- Check symmetry by folding the paper lightly or using a mirror; adjust the cap if it leans.
- Erase construction lines gently, keeping the sphere and cap outlines visible.
Placing the Specular Highlight
A specular highlight is the bright spot where the light source reflects most directly. For a glossy ornament, place it on the side facing the light, usually upper-left or upper-right. Keep it inside the sphere's silhouette and away from the cap.
The highlight shape can be a soft oval or a small irregular patch. Its size depends on the surface gloss: a shinier ornament has a smaller, sharper highlight; a satin finish has a broader, softer one. Mark the highlight lightly before shading so you can preserve it.
A secondary reflected highlight often appears opposite the main light, near the lower edge. Keep it dimmer than the main highlight. This helps the sphere read as round rather than flat.
- Choose a light direction and mark it with a small arrow outside the sphere.
- Draw the main highlight as a soft oval on the light-facing side.
- Add a smaller, dimmer reflected highlight near the opposite lower edge.
- Preserve both highlight areas while shading the rest of the sphere.
Shading for Volume and Metal
Shade the sphere in layers. Start with light pressure over the whole sphere except the highlights. Then darken the side away from the light and the area under the cap. The terminator, where light turns to shadow, should be soft on a glossy surface.
For the cap, use a metallic value pattern: a bright band near the top, a darker middle, and a reflected light near the bottom edge. Keep the cap's values distinct from the sphere so the materials read differently.
Blend gently with a tortillon or soft pencil to smooth transitions. Avoid over-blending the highlight edges; a slightly crisp edge suggests gloss. Check values by squinting or stepping back.
- Layer light shading over the sphere, leaving highlights untouched.
- Darken the shadow side and under-cap area.
- Add metallic bands to the cap: bright top, dark middle, reflected bottom.
- Blend softly and refine highlight edges.
Checking Proportions and Values
Measure your drawing against the reference proportions you chose. For example, if the sphere diameter is 8 cm, a cap width of about 2.5 to 3 cm is a reasonable hypothetical starting point. These numbers are examples only; measure your actual paper and tools.
Check that the cap is centered, the highlight is inside the sphere, and the darkest shadow is opposite the light. Use a value scale of five steps to compare the highlight, midtone, shadow, reflected light, and cap values.
If the sphere looks flat, increase contrast between the shadow side and the reflected highlight. If the cap looks like plastic, sharpen the bright band and darken the middle band.
- Measure sphere diameter and cap width; record actual values.
- Verify cap centering with a vertical line.
- Compare five value zones using a simple scale.
- Adjust contrast or highlight size as needed.
Worked example
A student draws a sphere with an 8 cm diameter and a cap 3 cm wide. The light comes from the upper left. Describe where to place the main highlight and one check to confirm the cap is centered.
Worked answer
Place the main highlight on the upper-left area of the sphere, inside the silhouette and away from the cap. To check centering, draw a vertical line through the sphere's center and confirm the cap's left and right edges are equal distances from that line.
Four practice exercises
Exercise 1
Draw a sphere with a 6 cm diameter and a cap 2 cm wide. Light comes from the upper right. Mark the main highlight and the reflected highlight.
Show answer and check
Main highlight on the upper-right area inside the sphere; reflected highlight near the lower-left edge, dimmer than the main highlight.
Why: The highlight faces the light source; the reflected highlight appears opposite the main light and is weaker.
Check: Measure the sphere diameter and cap width; confirm the cap is centered and both highlights are inside the silhouette.
Exercise 2
A drawing has a sphere diameter of 10 cm and a cap width of 5 cm. Is the cap proportion reasonable? Give a hypothetical adjusted width.
Show answer and check
No; 5 cm is half the diameter, which is wide for this construction. A hypothetical adjusted width is about 3 to 3.5 cm.
Why: The starting proportion is roughly one-third of the sphere diameter; 5 cm is too wide.
Check: Divide the sphere diameter by three and compare with the cap width; measure your actual drawing.
Exercise 3
Describe how to shade a glossy ornament so the highlight remains visible and the sphere reads as round.
Show answer and check
Leave the highlight as paper white, shade the light-facing side lightly, darken the shadow side and under-cap area, add a dim reflected highlight opposite the main light, and blend softly while keeping the highlight edge slightly crisp.
Why: Preserving the highlight and increasing contrast on the shadow side creates volume and gloss.
Check: Squint at the drawing; the highlight should stand out and the shadow side should be clearly darker than the midtone.
Exercise 4
Draw a cap with a metallic value pattern. List the three value bands and where each goes.
Show answer and check
Bright band near the top, dark band in the middle, reflected light band near the bottom edge.
Why: Metal reflects light in bands; a bright top and dark middle with a reflected bottom edge suggests a curved metallic surface.
Check: Compare the cap's values with the sphere's values; the cap should have a distinct band pattern and not match the sphere's midtone.
Common mistakes
- Drawing the cap off-center or too wide. Recheck the vertical center line and reduce cap width to about one-third of the sphere diameter, then measure your actual drawing.
- Placing the highlight at the center of the sphere. Move the highlight toward the light-facing side and keep it inside the silhouette.
- Shading over the highlight and losing the bright spot. Mask or outline the highlight lightly before shading, and erase back to paper white if needed.
- Making the cap and sphere the same value. Use a metallic band pattern on the cap with a bright top, dark middle, and reflected bottom.
Self-check rubric
- Sphere silhouette is round and closed.
- Cap is centered on the vertical axis and proportionally sized.
- Main highlight is inside the sphere on the light-facing side.
- Reflected highlight is present and dimmer than the main highlight.
- Shading shows at least three distinct values on the sphere.
- Cap shows a metallic value pattern distinct from the sphere.
- Labels follow the defined x-height convention and remain readable.
- Valid stylistic alternatives are accepted if construction and value logic hold.
Questions and answers
Do I need a compass?
A compass helps, but a freehand circle is acceptable if you check roundness by rotating the paper and comparing widths.
How large should the highlight be?
For a glossy ornament, a small oval about one-fifth of the sphere diameter is a hypothetical starting size. Adjust to your surface gloss.
Can I use any lettering style for labels?
Yes. The convention defines x-height as baseline to midline, but letter styles may vary as long as labels remain readable.
What if my ornament looks flat?
Increase the contrast between the shadow side and the reflected highlight, and soften the terminator.