Free original lessons
Draw a Reptile Body Outline: Scale and Limb Practice
Build a generic reptile body outline, place limbs at attachment points, and practice scale rows with a clear convention and rubric for valid alternatives.
Free lesson
Four exercises
Worked answers
Object Drawing Lessons
This lesson teaches a repeatable way to draw a generic reptile body outline, then add limbs and scale rows. It does not focus on one species; instead it gives a construction you can adapt. You will use a simple convention: x-height is measured from the baseline to the midline of a letter, and letter styles vary, so your own consistent unit is valid. All measurements are checkable arithmetic in the same units. The printable plate and worksheet are planned resources, not yet built; the text below is self-contained.
Practice materials: Printable downloads are not available for this lesson yet. Use the instructions and four exercises below.
Reference illustration
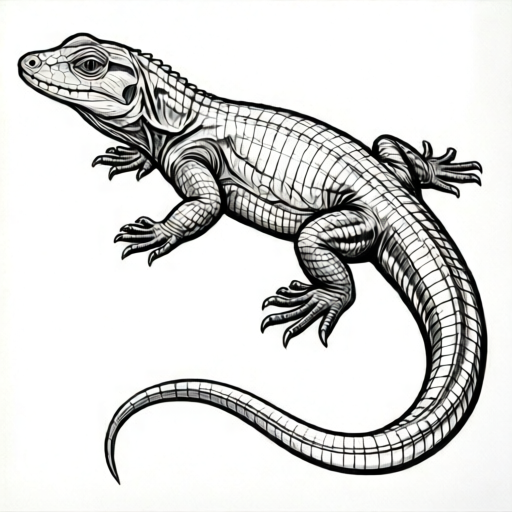
Use the stated measurements and conventions for each exercise.
Establish a consistent unit and body axis
Choose a unit you can repeat, such as the x-height of your own handwriting. Measure it once on your paper and write the value at the top. For example, if your x-height is 4 mm, use 4 mm as one unit; these numbers are hypothetical examples, so measure your actual equipment and paper.
Draw a light horizontal body axis. Mark a torso length of 6 units and a torso width of 3 units at the widest point. These proportions are a starting convention, not a species standard. Keep all measurements in the same unit.
- Measure your x-height and record it as one unit.
- Draw a horizontal axis and mark the torso length.
- Mark the widest torso width at the midpoint.
- Check that length divided by width equals 2 for this convention.
Construct the torso outline
Place a midpoint on the axis. Draw a smooth oval that passes through the length marks and the width marks. The outline should be symmetrical about the axis unless you deliberately adapt it later.
Add a tail taper behind the torso and a neck taper in front. For the generic outline, make the tail about 4 units long and the neck about 2 units long. Check that the tail length plus neck length plus torso length equals the total body length you intended.
- Draw the oval through the four marks.
- Taper the tail to a rounded point.
- Taper the neck to a rounded end.
- Verify total length arithmetic in your unit.
Place limbs at attachment points
Mark two limb attachment points on each side of the torso: one near the front third and one near the rear third. Use the axis to keep left and right points level. Draw each limb as a simple two-segment shape with a joint mark.
For practice, make each limb 2 units long from attachment to tip. Check that the distance between the front and rear attachment points on one side is about 3 units. Valid alternatives include slightly different limb angles, as long as the attachment points remain level and the lengths are consistent.
- Mark front and rear attachment points on both sides.
- Draw a joint mark at the midpoint of each limb.
- Keep limb length at 2 units for this exercise.
- Check left-right levelness against the axis.
Add scale rows with a defined convention
Define a scale row as a line of repeated marks spaced by half a unit. Draw rows across the torso from the axis outward, keeping spacing consistent. Letter styles vary, so your marks may be dots, short strokes, or small loops; the convention is consistent spacing and row direction, not one universal mark shape.
Count rows on one side and double it for the full torso. If you draw 5 rows on one side, the full count is 10. Check that row spacing times the number of gaps equals the torso width you measured.
- Choose one mark style and keep it consistent.
- Space marks by half a unit along each row.
- Draw rows from the axis outward on both sides.
- Verify row count and spacing arithmetic.
Worked example
Using a unit of 5 mm, construct a generic reptile outline with torso length 6 units, torso width 3 units, tail 4 units, neck 2 units, and limbs 2 units. State the total body length and the full scale-row count if 5 rows are drawn on one side.
Worked answer
Torso length is 30 mm, width 15 mm, tail 20 mm, neck 10 mm, limbs 10 mm each. Total body length is 30 + 20 + 10 = 60 mm. Five rows on one side give 10 rows total. Check: 30 divided by 15 equals 2, matching the convention.
Four practice exercises
Exercise 1
A learner uses a unit of 6 mm. Torso length is 5 units and torso width is 2.5 units. Calculate torso length and width in mm, and state the length-to-width ratio.
Show answer and check
Length is 30 mm; width is 15 mm; ratio is 2.
Why: Multiply each unit count by 6 mm. Then divide 30 by 15 to get 2.
Check: Reverse the calculation: 30 divided by 6 equals 5 units, and 15 divided by 6 equals 2.5 units.
Exercise 2
A body axis has front and rear limb attachment points 4 units apart on one side. Each limb is 1.5 units long. If the unit is 8 mm, give the attachment distance and limb length in mm, and the total of both limb lengths.
Show answer and check
Attachment distance is 32 mm; each limb is 12 mm; both limbs total 24 mm.
Why: Multiply 4 by 8 and 1.5 by 8. Then add 12 and 12.
Check: Divide 32 by 8 to recover 4 units, and 24 by 8 to recover 3 units total limb length.
Exercise 3
Scale marks are spaced by half a unit. The torso width is 3 units. How many gaps fit across the full width, and how many marks are needed if both ends are marked?
Show answer and check
Six gaps fit; seven marks are needed.
Why: Three units divided by half a unit equals 6 gaps. With a mark at both ends, marks equal gaps plus one.
Check: Count gaps between seven marks: six gaps. Multiply six by half a unit to recover 3 units.
Exercise 4
A learner draws 4 scale rows on one side of the axis and 4 on the other. Each row has 6 marks. State the total row count and total marks, then explain one valid alternative mark style.
Show answer and check
Total rows are 8; total marks are 48. A valid alternative is short strokes instead of dots, kept at the same spacing.
Why: Add 4 and 4 for rows. Multiply 8 by 6 for marks. The convention allows different mark shapes if spacing and direction stay consistent.
Check: Divide 48 by 8 to recover 6 marks per row, and divide 8 by 2 to recover 4 rows per side.
Common mistakes
- Using different units for length and width. Record one unit at the top and convert all measurements to that unit before drawing.
- Placing limbs at uneven heights. Mark attachment points against the body axis and check levelness before drawing limbs.
- Changing scale mark style mid-row. Choose one mark style for the whole plate and keep spacing consistent.
- Treating the generic proportions as a species standard. Label proportions as a convention and adapt them deliberately for a specific reptile.
Self-check rubric
- Unit is measured and recorded once; all measurements use the same unit.
- Torso outline passes through the length and width marks and is symmetrical about the axis.
- Limb attachment points are level and limb lengths are consistent.
- Scale rows use one mark style with consistent spacing and direction.
- Arithmetic checks are shown and correct.
- Valid alternatives are accepted when the convention is followed consistently.
Questions and answers
Do I need the printable plate to complete the lesson?
No. The plate is planned, not yet built. The text gives all measurements and steps so you can draw on blank paper.
What if my x-height differs from the example?
Use your measured x-height as the unit. The example numbers are hypothetical; your arithmetic should use your actual measurement.
Can I use different scale mark shapes?
Yes. The convention requires consistent spacing and row direction, not one universal mark shape.
How do I adapt the outline to a specific reptile?
Keep the construction method, then change torso length, tail length, or limb length deliberately and recheck the arithmetic.