Free original lessons
Draw a Realistic Semi Truck: Cab, Trailer, and Wheel Detail
Learn to draw a realistic semi truck using box construction, perspective, and wheel detail. Includes a worked example, practice tasks, and a fair rubric.
Free lesson
Four exercises
Worked answers
Object Drawing Lessons
Drawing a realistic semi truck is mostly a problem of proportion and perspective. A semi truck is a long, tall box on wheels, with a cab at one end and a trailer at the other. If you can draw boxes in perspective and place wheels correctly, you can draw a convincing truck. This lesson uses a simple convention: x-height is the distance from the baseline to the midline of lowercase letters, and letter styles vary. That convention helps you judge vertical proportions on your page. All measurements here are hypothetical examples; measure your own paper and tools. The goal is a clear, believable truck, not a single universal answer.
Practice materials: Printable downloads are not available for this lesson yet. Use the instructions and four exercises below.
Reference illustration
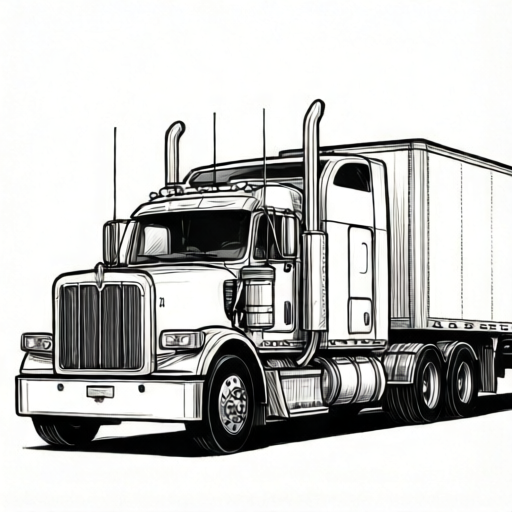
Use the stated measurements and conventions for each exercise.
Start with the big boxes
Begin by drawing the trailer as a long rectangular box in perspective. In a three-quarter view, the front face is a smaller rectangle and the side face is a long parallelogram. Keep the top and bottom edges converging slightly toward a vanishing point. The cab is a shorter, taller box attached to the front of the trailer. The gap between cab and trailer is the hitch area; leave a small space there.
Use light construction lines. Check that the trailer length is about three to four times the cab length in side view. In three-quarter view, the trailer side will appear shorter because of foreshortening. Do not worry about exact numbers; compare lengths by eye and adjust.
- Draw a horizon line and choose one vanishing point for a simple perspective.
- Draw the trailer as a long box: front rectangle, then side edges receding to the vanishing point.
- Draw the cab box in front of the trailer, slightly taller than the trailer box.
- Mark the hitch gap between cab and trailer with two short vertical lines.
- Lightly sketch a centerline along the trailer side to help place wheels later.
Shape the cab and trailer
A conventional cab has a hood in front of the windshield; a cab-over cab is flat-faced. Choose one style and keep it consistent. For a conventional cab, add a smaller box for the hood and a slanted windshield. For a cab-over, the windshield is nearly vertical and the cab front is flat. The trailer box is mostly plain, but you can add a subtle roof curve and side ribs.
Round the corners slightly. Real trucks are not perfect boxes; edges have small radii. Use short curved lines at corners to suggest thickness. Keep the trailer top edge straight and parallel to the bottom edge in side view.
- Decide cab style: conventional (with hood) or cab-over (flat front).
- Add the windshield as a slanted rectangle on the cab front.
- Draw the hood box if using a conventional cab, and connect it to the cab.
- Add small corner curves to cab and trailer to suggest rounded edges.
- Draw a vertical line for the trailer front and a horizontal line for the trailer floor.
Place wheels and hitch
Wheels are the most common place for proportion errors. A semi truck typically has a front axle under the cab and rear axles under the trailer. In side view, draw wheels as circles; in three-quarter view, draw them as ellipses. The ellipse height stays the same, but the width changes with perspective. Keep all wheel centers on a line parallel to the ground.
The hitch is the connection point between cab and trailer. Draw a small horizontal plate under the trailer front and a matching plate on the cab rear. Add a short vertical pin between them. Keep the hitch low, near the trailer floor line.
- Draw a ground line and mark wheel centers along it.
- Draw front wheels as circles or ellipses, slightly smaller than rear wheels.
- Draw rear trailer wheels as a pair or tandem pair, keeping spacing even.
- Add the hitch plate under the trailer front and the cab rear plate.
- Check that all wheels touch the ground line and that the hitch sits between cab and trailer.
Add realistic detail
Detail makes the truck believable, but too much detail can hide construction errors. Add a grille, headlights, mirrors, and a fuel tank. Keep details simple: a few rectangles and lines. For the trailer, add side ribs as evenly spaced vertical lines and a rear door outline. Use a darker line for the final outline and erase construction lines lightly.
Shading can suggest metal and rubber. Use light hatching on the trailer side and darker shading under the truck. Keep the light direction consistent. A simple shadow under the wheels helps ground the truck.
- Draw the grille as a rectangle with horizontal lines.
- Add headlights as small circles or rectangles on the cab front.
- Draw mirrors as small shapes attached to the cab sides.
- Add trailer side ribs as evenly spaced vertical lines.
- Shade under the truck and on one side of the trailer to suggest form.
Worked example
Draw a semi truck in side view with a conventional cab and a long trailer. Use a ground line, place one front wheel and two rear trailer wheels, and add a hitch plate. Keep proportions believable.
Worked answer
A completed side-view drawing shows a long trailer box about three times the cab length. The cab has a hood, slanted windshield, and a small grille. The front wheel sits under the cab, and two rear wheels sit under the trailer rear. All wheels touch the ground line. A small hitch plate connects cab and trailer near the trailer floor. Light shading under the truck grounds it.
Four practice exercises
Exercise 1
Draw a side-view semi truck with a cab-over cab. Use a ground line. Show one front wheel and two rear trailer wheels. Add a hitch plate. Keep the trailer about three times the cab length.
Show answer and check
A side-view drawing with a flat-front cab, a long trailer, one front wheel under the cab, two rear wheels under the trailer, and a hitch plate near the trailer floor. All wheels touch the ground line.
Why: The cab-over style uses a flat front and vertical windshield. The trailer is longer than the cab. Wheels are placed on the ground line, and the hitch connects cab and trailer.
Check: Check that the trailer looks at least twice as long as the cab, all wheel bottoms touch the ground line, and the hitch sits between cab and trailer near the trailer floor.
Exercise 2
Draw a three-quarter-view semi truck with a conventional cab. Show two front wheels and four rear trailer wheels. Use ellipses for wheels. Keep ellipse height constant and vary width with perspective.
Show answer and check
A three-quarter-view drawing with a hooded cab, a long trailer receding to a vanishing point, two front wheel ellipses, and four rear wheel ellipses. Ellipse heights are similar; widths vary with distance.
Why: Three-quarter view requires foreshortening. The trailer side is a parallelogram. Wheels are ellipses; height stays constant while width changes with perspective.
Check: Check that receding trailer edges converge consistently, all wheel ellipses have similar height, and wheel bottoms align with the ground line.
Exercise 3
Draw a side-view semi truck and add a simple shadow under the wheels. Use one light direction. Add a grille and two headlights. Keep details simple.
Show answer and check
A side-view truck with a grille rectangle, two headlight shapes, and a shadow under the wheels. Shading is consistent with one light direction.
Why: Details should support the form without hiding construction. A shadow grounds the truck. Consistent light direction makes shading believable.
Check: Check that the shadow is under the truck, the grille and headlights are on the cab front, and shading does not contradict the chosen light direction.
Exercise 4
Draw a three-quarter-view semi truck with a cab-over cab. Add trailer side ribs as evenly spaced vertical lines. Show a hitch plate. Use a ground line and check wheel placement.
Show answer and check
A three-quarter-view drawing with a flat-front cab, a trailer with evenly spaced side ribs, a hitch plate between cab and trailer, and wheels touching the ground line.
Why: Side ribs help show trailer length and perspective. The hitch plate connects cab and trailer. Ground line checks wheel placement.
Check: Check that side ribs are evenly spaced and follow the trailer side perspective, the hitch is near the trailer floor, and all wheels touch the ground line.
Common mistakes
- Making the trailer too short compared with the cab. Compare lengths by eye: the trailer should look much longer than the cab. In side view, aim for a trailer about three to four times the cab length.
- Drawing wheels that do not touch the ground line. Draw a ground line first and place all wheel centers on a line parallel to it. Check each wheel bottom touches the ground line.
- Using the same ellipse width for all wheels in three-quarter view. Keep ellipse height constant but vary width with perspective. Wheels farther from the viewer appear narrower.
- Putting the hitch too high or too low. Place the hitch near the trailer floor line. Draw a short horizontal plate under the trailer front and match it on the cab rear.
Self-check rubric
- Proportions: trailer length is clearly greater than cab length; cab height is believable relative to trailer height.
- Perspective: in three-quarter view, receding edges converge consistently; wheel ellipses vary in width but keep constant height.
- Wheel placement: all wheels touch the ground line; spacing is even; front and rear wheels are distinguishable.
- Hitch: hitch plate is placed between cab and trailer near the trailer floor line.
- Detail: grille, lights, mirrors, and trailer ribs are simple and consistent with the chosen cab style.
- Line quality: final outline is clear; construction lines are light or erased; shading is consistent with one light direction.
- Valid alternatives: cab-over or conventional cab, different wheel counts, and varied detail are acceptable if proportions and perspective remain coherent.
Questions and answers
Do I need to use a vanishing point?
A single vanishing point helps keep the trailer sides consistent. You can also use parallel receding lines if you are careful. The key is that top and bottom edges converge slightly in three-quarter view.
How many wheels should I draw?
A simple side view can show one front wheel and two rear trailer wheels. A three-quarter view can show two front wheels and four rear wheels. Choose a configuration and keep spacing even.
What does x-height mean here?
X-height is the distance from the baseline to the midline of lowercase letters. Use it as a visual unit to compare vertical proportions, such as cab height versus trailer height. Letter styles vary, so treat it as a guide, not a fixed measurement.
Can I draw a cab-over instead of a conventional cab?
Yes. Choose one style and keep it consistent. A cab-over has a flat front and nearly vertical windshield; a conventional cab has a hood and slanted windshield.