Free original lessons
Contour Line Sneaker Drawing: Edge-Only Study
Learn to draw a sneaker using only contour lines. Practice blind contour, continuous line, and edge-only observation with clear steps and checks.
Free lesson
Four exercises
Worked answers
Object Drawing Lessons
Contour line drawing captures the visible edges of a form without shading or interior modeling. For a sneaker, this means tracing the outer silhouette, the seams, the sole edge, and the lace openings as single, deliberate lines. This lesson builds observation skills through three short exercises: an edge-only plate, a blind-contour box, and a continuous-line strip. You will use a simple convention: draw only edges you can see, keep the line unbroken where possible, and avoid filling areas with tone. Letter styles and handwriting vary, so the rubric rewards consistent edge selection and proportional accuracy rather than a single correct line. All measurements below are hypothetical examples; measure your own paper and sneaker before starting.
Practice materials: Printable downloads are not available for this lesson yet. Use the instructions and four exercises below.
Reference illustration
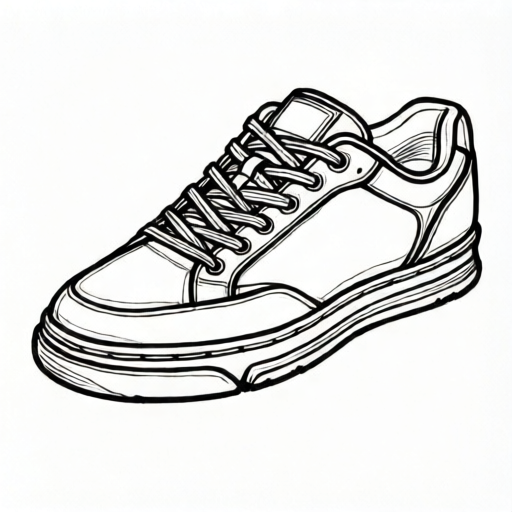
Use the stated measurements and conventions for each exercise.
Set Up and Define Your Edge Convention
Place your sneaker on a plain surface at eye level. Use one sheet of paper and a pencil or fine-tip pen. Define your convention before drawing: a contour line is any visible boundary where two surfaces meet or where the form turns away from you. Do not draw shadows, laces as filled shapes, or logos as solid blocks. If a seam is faint, draw it as a single thin line; if it is bold, keep the same line weight for consistency. This convention makes your drawing checkable and allows valid stylistic variation.
Measure your paper and sneaker with a ruler. For example, if your paper is 15 cm by 20 cm and the sneaker is 28 cm long, you will draw at roughly half scale. Mark a light bounding box on the paper that matches the sneaker’s length-to-height ratio. A hypothetical sneaker might be 28 cm long and 12 cm high, giving a ratio of about 2.3 to 1. Use your own measurements; do not assume these numbers apply to your shoe.
- Place the sneaker at eye level and choose a single viewing angle.
- Measure the sneaker’s length and height with a ruler; record the ratio.
- Draw a light bounding box on your paper using the same ratio.
- State your edge convention: only visible boundaries, no shading, consistent line weight.
Blind-Contour Box: Train Your Eye to Follow Edges
Blind contour means you look only at the sneaker, not at your paper, while your pencil follows the edges. Start with a small box on your paper, about 8 cm by 8 cm. Place your pencil at one corner of the sneaker’s silhouette and move it slowly along the edge. Imagine the line you are drawing. Do not lift the pencil unless the edge breaks completely. This exercise is not about accuracy; it is about slowing down and recording edge changes.
After one pass, compare your blind contour to the sneaker. You will likely see distortions. That is expected. The goal is to notice where your hand hesitated or jumped. Repeat the blind contour once more, focusing on the sole edge and the toe curve. Keep the box small so the exercise stays manageable.
- Draw an 8 cm by 8 cm box on your paper.
- Look only at the sneaker; place your pencil at the toe edge.
- Move the pencil slowly along the silhouette without looking at the paper.
- Do not lift the pencil unless the edge ends completely.
- After one full pass, compare the blind line to the sneaker and note two places where the line jumped.
Continuous-Line Strip: Keep the Edge Unbroken
A continuous-line strip is a narrow rectangle, about 4 cm by 15 cm, where you draw the sneaker’s main edges without lifting the pencil. Start at the heel, follow the sole edge to the toe, then move up the toe box, across the lace opening, and back to the heel. If you must cross an interior seam, let the line travel to it and return. The strip forces you to plan a path through the edges.
Keep the line weight even. Do not retrace edges to darken them. If the line becomes tangled, finish the strip and start a new one. Two strips are enough for this lesson. The strip is a planning tool, not a final drawing.
- Draw a 4 cm by 15 cm rectangle on your paper.
- Choose a starting edge, such as the heel.
- Draw the main silhouette and two interior seams without lifting the pencil.
- Keep line weight even; do not shade or fill areas.
- Complete two strips, noting which edge path was easier to follow.
Edge-Only Sneaker Plate: Final Contour Study
On a fresh sheet, draw the sneaker using only contour lines. Begin with the bounding box from your measurements. Lightly mark the toe, heel, sole top edge, and lace opening. Then draw the outer silhouette as one continuous line where possible. Add interior seams as single lines: the toe cap seam, the side panel seam, and the heel counter seam. Draw the lace openings as open loops, not filled shapes. Do not add shading, cross-hatching, or solid logos.
Check your plate against the sneaker by holding it at arm’s length. The silhouette should match the length-to-height ratio you measured. Interior seams should connect to the silhouette at the same relative positions. If a seam floats, redraw it so it meets an edge. Keep the drawing edge-only; any tone or fill violates the brief.
- Draw a light bounding box using your measured ratio.
- Mark toe, heel, sole top edge, and lace opening with small dots.
- Draw the outer silhouette as a continuous line where possible.
- Add three interior seams as single lines that meet the silhouette.
- Check the plate at arm’s length for proportional match and edge-only content.
Worked example
A sneaker measures 30 cm long and 12 cm high. You draw a bounding box 15 cm long and 6 cm high. Is the box ratio correct? Show the arithmetic.
Worked answer
Yes. Sneaker ratio: 30 ÷ 12 = 2.5. Box ratio: 15 ÷ 6 = 2.5. The ratios match, so the bounding box is proportional.
Four practice exercises
Exercise 1
A sneaker is 24 cm long and 10 cm high. You draw a bounding box 12 cm long and 5 cm high. Check the ratio and state whether the box is proportional.
Show answer and check
Sneaker ratio: 24 ÷ 10 = 2.4. Box ratio: 12 ÷ 5 = 2.4. The box is proportional.
Why: Divide length by height for both the sneaker and the box. Equal ratios mean the box matches the sneaker’s proportions.
Check: Recompute both divisions with a calculator or by hand; confirm the two results are equal.
Exercise 2
You draw a continuous-line strip 4 cm by 15 cm. You lift the pencil twice. According to the lesson, what should you do?
Show answer and check
Finish the strip and start a new one; do not patch the same strip.
Why: The continuous-line strip is a planning exercise. Lifting breaks the continuous line, so the strip no longer meets the exercise rule.
Check: Count pencil lifts on the strip. If more than zero, the strip is invalid for the exercise; begin a fresh strip.
Exercise 3
A contour plate shows a shaded sole and a filled logo. Name two rubric items this violates and state the fix.
Show answer and check
It violates edge-only content and line consistency. Fix: erase the shading and fill, redraw the sole and logo as single contour lines only.
Why: The brief excludes shading and filled areas. The rubric requires only visible contour lines with even line weight.
Check: Inspect the plate for any area darker than a single line. If found, remove it and redraw as a single line.
Exercise 4
You measure a sneaker at 28 cm long and 11 cm high. You want a drawing 14 cm long. What height should the bounding box be, and what is the ratio?
Show answer and check
Height = 14 ÷ (28 ÷ 11) = 14 ÷ 2.545 ≈ 5.5 cm. Ratio = 28 ÷ 11 ≈ 2.55.
Why: First find the sneaker ratio (length ÷ height). Then divide the chosen drawing length by that ratio to get the matching height.
Check: Multiply the box height by the ratio: 5.5 × 2.55 ≈ 14.0 cm. Confirm the result is close to 14 cm.
Common mistakes
- Adding shading or filled areas to suggest form. Erase or omit any tone. Use only single lines for visible edges; if an area feels empty, add a seam line instead of shading.
- Lifting the pencil repeatedly during the continuous-line strip. Plan the edge path before starting. If you must lift, finish the strip and begin a new one; do not patch the same strip.
- Drawing interior seams that do not connect to the silhouette. Trace each seam to the nearest outer edge and redraw it so it meets that edge. Floating seams are not contour lines.
- Ignoring the measured length-to-height ratio. Re-measure the sneaker and redraw the bounding box. Compare the box ratio to the sneaker before drawing any edges.
Self-check rubric
- Edge-only content: no shading, fill, or tone; only visible contour lines.
- Proportional accuracy: silhouette matches the measured length-to-height ratio within about 10 percent.
- Seam connection: at least three interior seams meet the outer silhouette.
- Line consistency: line weight is even and lines are single, not retraced.
- Blind-contour and continuous-line exercises completed as described.
- Valid alternatives: different line styles and handwriting are acceptable if edge selection and proportion are consistent.
Questions and answers
Can I use a pen instead of a pencil?
Yes. A pen makes lifting the pencil impossible, which suits continuous-line practice. Use a fine tip so seams stay single lines.
How many interior seams should I include?
Three is enough for this study: toe cap, side panel, and heel counter. Add more only if they are clearly visible edges.
What if my blind contour looks nothing like the sneaker?
That is normal. Blind contour trains observation, not accuracy. Compare the blind line to the sneaker and note where your hand jumped.
Do I need to draw laces?
Draw the lace openings as open loops. Do not draw individual laces as filled shapes; keep them as single contour lines if you include them.