Free original lessons
Draw a Sopwith Camel Biplane: Wings, Struts, and Cockpit
Learn a repeatable construction for the Sopwith Camel biplane, focusing on wing stacking, strut placement, and cockpit detail using a simple scale box.
Free lesson
Four exercises
Worked answers
Object Drawing Lessons
This guide teaches a construction order for drawing a Sopwith Camel biplane that emphasizes the relationships among the upper wing, lower wing, interplane struts, and cockpit. You will use a scale practice box to keep proportions consistent and a defined convention for line weight and lettering so that valid stylistic alternatives remain acceptable. The goal is not a single universal rendering but a checkable drawing process: establish a centerline, block the fuselage, place the two wings, connect them with struts, then add cockpit and simple surface detail. All measurements are hypothetical examples; measure your own paper and tools before drawing.
Practice materials: Printable downloads are not available for this lesson yet. Use the instructions and four exercises below.
Reference illustration
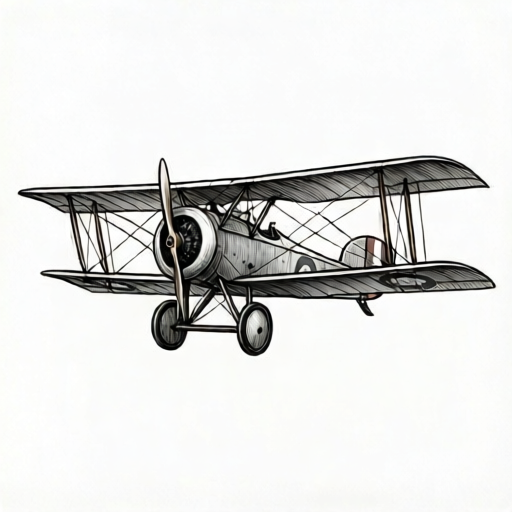
Use the stated measurements and conventions for each exercise.
Set up a scale box and centerline
Begin by drawing a light rectangular scale box on your paper. For this exercise, assume a box 18 cm wide and 12 cm tall; these are hypothetical values, so measure your actual paper and adjust. Mark the horizontal midline and a vertical centerline. The centerline will anchor the fuselage and cockpit; the midline will help you compare upper and lower wing heights.
Use a light pencil for construction lines and a darker pencil for final lines. Define your convention now: construction lines are thin and may be erased; final outlines are slightly heavier; lettering for labels is optional and, if used, sits outside the drawing area. This convention lets you and a reviewer distinguish planning from finished work.
- Measure your paper and draw a light scale box; label its width and height in centimeters.
- Draw a vertical centerline and a horizontal midline inside the box.
- Mark a fuselage length along the centerline, for example 14 cm, leaving margins at both ends.
- Decide your line-weight convention and keep it consistent.
Block the fuselage and tail
The Camel has a compact fuselage with a rounded engine cowling at the front and a tapered tail. Block the fuselage as a long rounded rectangle centered on the vertical centerline. A hypothetical fuselage length of 14 cm and a maximum height of 3 cm gives a workable proportion inside the 18 by 12 cm box. Keep the nose slightly rounded and the tail narrower.
Add a simple tail unit: a horizontal stabilizer and a vertical fin. These can be drawn as light trapezoids. Do not add wing detail yet; the fuselage and tail establish the reference for wing placement.
- Draw a rounded rectangle for the fuselage along the centerline.
- Taper the rear third toward the tail.
- Add a horizontal stabilizer as a light trapezoid at the rear.
- Add a vertical fin above the rear fuselage.
Place lower and upper wings
The biplane configuration is defined by two wings stacked vertically. Draw the lower wing first as a long, slightly tapered shape crossing the fuselage near its lower third. Then draw the upper wing above the fuselage, longer and with a gentle curve. Use the horizontal midline to compare their heights: for example, the lower wing might sit 2 cm below the midline and the upper wing 3 cm above it, measured on your own drawing.
Keep both wings roughly parallel in plan view. The upper wing typically extends slightly beyond the lower wing on each side. Check symmetry by measuring from the centerline to each wingtip; the left and right distances should match within your chosen tolerance, for example 0.5 cm.
- Draw the lower wing as a tapered horizontal shape crossing the lower fuselage.
- Draw the upper wing above the fuselage, slightly longer and gently curved.
- Measure wingtip distances from the centerline and adjust for symmetry.
- Lightly indicate the wing thickness with a second line if your convention uses double lines.
Add interplane struts and cockpit
Interplane struts connect the upper and lower wings. On each side, draw two short vertical or slightly angled lines between the wings, positioned about one-third and two-thirds along the wing span. Keep the strut pairs mirrored across the centerline. Struts should be thin and evenly spaced; a hypothetical spacing of 3 cm between struts on each side is a starting point, but measure your own wing length and divide it sensibly.
The cockpit sits on the fuselage between the wings, slightly behind the upper wing's leading edge. Draw a small rounded opening with a simple windscreen shape. Add a headrest fairing behind the cockpit if you wish. Finish with minimal surface detail: a few lines for the engine cowling and wing ribs, keeping detail subordinate to the main construction.
- Mark two strut positions on each side of the lower wing.
- Draw thin strut lines connecting lower and upper wings at those positions.
- Check that left and right strut pairs are mirrored.
- Draw the cockpit opening and windscreen on the fuselage centerline.
- Add light cowling and rib lines, then darken final outlines according to your convention.
Worked example
Using an 18 cm by 12 cm scale box, place a fuselage 14 cm long on the centerline, a lower wing 2 cm below the midline, and an upper wing 3 cm above the midline. Mark two strut positions on each side at one-third and two-thirds of the wing span. Describe the check for symmetry.
Worked answer
The fuselage runs along the vertical centerline with 2 cm margins at each end. The lower wing crosses the fuselage 2 cm below the horizontal midline; the upper wing sits 3 cm above it. On each side, struts are placed at one-third and two-thirds of the wing span. To check symmetry, measure from the centerline to each wingtip and to each strut; left and right distances should match within 0.5 cm.
Four practice exercises
Exercise 1
In a 16 cm by 10 cm scale box, draw a centerline and a fuselage 12 cm long. Mark a lower wing 1.5 cm below the midline and an upper wing 2.5 cm above it. State the margin at each end of the fuselage.
Show answer and check
The fuselage is centered on the 16 cm width, so each end margin is (16 - 12) / 2 = 2 cm. The lower wing is 1.5 cm below the midline; the upper wing is 2.5 cm above it.
Why: Centering the fuselage divides the remaining width equally. The wing heights are measured from the midline as given.
Check: Measure the left and right margins; both should be 2 cm. Measure wing heights from the midline; they should be 1.5 cm and 2.5 cm.
Exercise 2
A lower wing spans 14 cm total. You want two strut pairs per side at one-third and two-thirds of the span from the centerline. Calculate the distance from the centerline to each strut on one side.
Show answer and check
Half the span is 7 cm. One-third of 7 cm is about 2.33 cm; two-thirds is about 4.67 cm. So the struts on one side sit approximately 2.33 cm and 4.67 cm from the centerline.
Why: Strut positions are fractions of the half-span measured from the centerline. Multiply the half-span by each fraction.
Check: Add the two distances: 2.33 + 4.67 = 7 cm, which equals the half-span. Mirror the same distances on the other side.
Exercise 3
Your upper wing is 16 cm long and the lower wing is 14 cm long, both centered. How far does the upper wing extend beyond the lower wing on each side?
Show answer and check
Half of 16 cm is 8 cm; half of 14 cm is 7 cm. The upper wing extends 8 - 7 = 1 cm beyond the lower wing on each side.
Why: Compare half-spans because both wings are centered on the same centerline.
Check: Measure from the centerline to each wingtip on one side; the difference should be 1 cm. Repeat on the other side.
Exercise 4
You place the cockpit 1 cm behind the upper wing leading edge on the centerline. The upper wing leading edge is 5 cm forward of the midline. Where is the cockpit relative to the midline?
Show answer and check
The cockpit is 5 - 1 = 4 cm forward of the midline, on the centerline.
Why: Moving 1 cm rearward from a point 5 cm forward of the midline reduces the forward distance by 1 cm.
Check: Measure from the midline forward to the cockpit; it should be 4 cm. Confirm the cockpit lies on the vertical centerline.
Common mistakes
- Drawing the upper wing shorter than the lower wing. Measure both wing spans from the centerline and extend the upper wing slightly beyond the lower wing on each side.
- Placing struts at uneven intervals or only on one side. Mark strut positions on both sides before drawing, using equal divisions of the wing span and mirroring across the centerline.
- Putting the cockpit too far forward or off the centerline. Anchor the cockpit on the vertical centerline and position it between the wings, slightly behind the upper wing leading edge.
- Using heavy construction lines that obscure the final drawing. Keep construction lines light and erase or leave them thin; darken only final outlines according to your stated convention.
Self-check rubric
- Scale box and centerline are present and labeled with measured dimensions.
- Fuselage is centered on the vertical centerline and tapered toward the tail.
- Lower and upper wings are both drawn, with the upper wing slightly longer and roughly parallel.
- Two strut pairs connect the wings, evenly spaced and mirrored across the centerline.
- Cockpit is on the centerline between the wings and includes a simple windscreen.
- Line-weight convention is stated and followed; construction lines remain light.
- Symmetry checks are recorded with measured distances and a stated tolerance.
Questions and answers
Do I need to draw a perfect Sopwith Camel?
No. The goal is a checkable construction that shows wings, struts, and cockpit in consistent relationships. Stylistic variation in line weight and lettering is acceptable if your convention is stated and followed.
What if my paper is a different size?
Measure your actual paper and scale the hypothetical values proportionally. The 18 by 12 cm box is only an example; the construction steps remain the same.
How many struts should I draw?
Draw two strut pairs, one on each side, as described. You may add more if your wing length suggests it, but keep them evenly spaced and mirrored.
Can I use a ruler for all lines?
Yes, for construction lines. Final outlines may be drawn freehand if you prefer, as long as your line-weight convention is consistent.