Free original lessons
Spiral Shell Drawing: Coiling Curve and Ridge Construction
Learn to draw a spiral shell by building a coiling curve, placing ridge steps, and checking proportions with simple measurements and a clear convention.
Free lesson
Four exercises
Worked answers
Object Drawing Lessons
This lesson teaches a repeatable construction for a spiral shell using a coiling curve and ridge steps. You will set a center, grow the coil in measured increments, place ridges at consistent intervals, and verify the result with arithmetic checks. The convention is explicit: x-height means the vertical distance from baseline to midline of a letter or shape; letter styles vary, so valid alternatives are allowed when the construction logic and measurements hold. All numerical values here are hypothetical examples chosen for practice, not manufacturing standards. Measure your own paper and tools, label your chosen values, and keep units consistent.
Practice materials: Printable downloads are not available for this lesson yet. Use the instructions and four exercises below.
Reference illustration
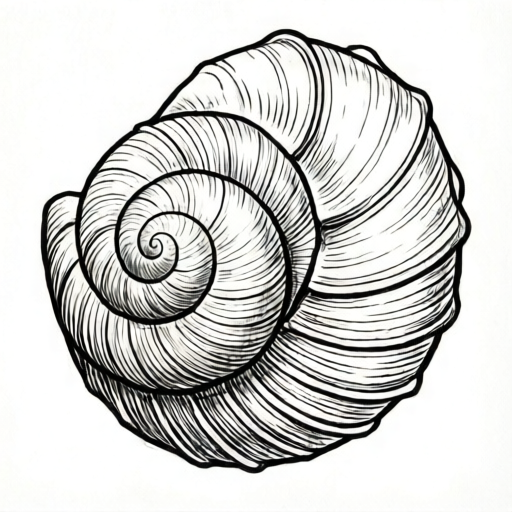
Use the stated measurements and conventions for each exercise.
Set the center and the first coil
Begin by marking a center point on your paper. Decide a unit for the drawing, for example 1 cm, and label it as a hypothetical practice unit. The coiling curve grows outward from the center in quarter-turn segments. Each segment is a smooth arc that connects to the next without a sharp corner.
Choose a starting radius, such as 0.5 units, and an increment, such as 0.25 units per quarter turn. These are example values; measure your actual paper to confirm the full coil fits. Record your chosen values at the top of the page so every later step can be checked.
- Mark the center point and label your unit and starting radius.
- Draw the first quarter-turn arc at the starting radius.
- Add the increment to the radius and draw the next quarter-turn arc, joining smoothly.
- Repeat until the coil reaches the planned outer size, counting each quarter turn.
Place ridge steps along the coil
Ridges are short raised lines that cross the coil at regular intervals. Place them where the coil changes direction or at counted positions along the curve. A simple convention is one ridge per quarter turn, offset slightly from the joint so the ridge reads as a separate feature.
Keep ridge length proportional to the local coil width. If the coil width at a point is 0.5 units, a ridge of about 0.2 units is a reasonable hypothetical example. Check that ridges do not cross the center or each other.
- Count the quarter turns from the center and mark ridge positions at your chosen interval.
- Draw each ridge as a short line crossing the coil, angled to follow the shell surface.
- Compare ridge spacing with the coil increment and adjust before inking.
- Label any changed values so the construction remains checkable.
Check proportions with simple arithmetic
Use arithmetic to confirm the coil grows as planned. If the starting radius is 0.5 units and the increment is 0.25 units per quarter turn, then after four quarter turns the radius is 0.5 + 4 × 0.25 = 1.5 units. After eight quarter turns it is 0.5 + 8 × 0.25 = 2.5 units.
Measure the actual drawn radius at two or three points with a ruler and compare with the calculated values. Small differences are acceptable when the curve remains smooth and the ridge spacing stays consistent. Record the measured values beside the calculated ones.
- Write the formula: radius = starting radius + (quarter turns × increment).
- Calculate expected radii at two checkpoints.
- Measure the drawn radii at the same checkpoints.
- Note differences and decide whether to adjust the next arc or accept the variation.
Finish the outline and review
Complete the outer edge of the shell by continuing the coiling curve to the planned size, then close the outline with a smooth lip. Keep the ridge steps visible and evenly spaced. Review the drawing against your recorded values and the convention for x-height and letter styles.
Valid alternatives are allowed: a tighter coil, a wider lip, or a different ridge interval can all be correct if the construction logic is clear and the arithmetic checks are documented. The goal is a checkable spiral shell drawing, not a single universal answer.
- Continue the coil to the outer size and close the lip smoothly.
- Confirm ridge positions and lengths against your chosen interval.
- Recheck two radii with the formula and record results.
- Label the drawing with unit, starting radius, increment, and ridge interval.
Worked example
A student sets a center, chooses a starting radius of 0.6 units and an increment of 0.2 units per quarter turn. After six quarter turns, what radius should the coil reach, and what should the student check?
Worked answer
Radius = 0.6 + 6 × 0.2 = 0.6 + 1.2 = 1.8 units. The student should measure the drawn radius at the sixth quarter turn, compare it with 1.8 units, and confirm that ridge spacing matches the chosen interval.
Four practice exercises
Exercise 1
Starting radius 0.4 units, increment 0.3 units per quarter turn. Calculate the radius after five quarter turns.
Show answer and check
0.4 + 5 × 0.3 = 0.4 + 1.5 = 1.9 units.
Why: Use radius = starting radius + (quarter turns × increment). Substitute 0.4, 5, and 0.3, then add.
Check: Recalculate with the same formula and confirm the multiplication and addition are correct.
Exercise 2
A coil has a starting radius of 0.5 units and reaches 2.1 units after eight quarter turns. What increment was used?
Show answer and check
Increment = (2.1 − 0.5) ÷ 8 = 1.6 ÷ 8 = 0.2 units per quarter turn.
Why: Rearrange the formula: increment = (final radius − starting radius) ÷ quarter turns.
Check: Substitute back: 0.5 + 8 × 0.2 = 2.1 units.
Exercise 3
You plan one ridge per quarter turn for twelve quarter turns. If the first ridge is at the first quarter turn, how many ridges are placed in total?
Show answer and check
Twelve ridges.
Why: One ridge per quarter turn for twelve quarter turns gives 12 × 1 = 12 ridges.
Check: Count the quarter turns and multiply by the ridge interval; confirm the count matches the planned total.
Exercise 4
A drawn coil measures 1.4 units at the fourth quarter turn. The starting radius was 0.6 units and the increment was 0.2 units. Is the drawing consistent with the plan?
Show answer and check
Yes. Expected radius = 0.6 + 4 × 0.2 = 1.4 units, which matches the measured value.
Why: Calculate the expected radius with the formula and compare it with the measurement.
Check: Repeat the calculation and measure again at the same checkpoint to confirm the match.
Common mistakes
- Making each arc a sharp corner instead of a smooth join. Slow down at the joint and redraw the last part of the arc so the tangent direction matches the next arc.
- Changing the increment without recording it. Write every change at the top of the page and recalculate expected radii before continuing.
- Placing ridges at uneven intervals. Count quarter turns and mark ridge positions before drawing, then compare spacing with the coil increment.
- Using mixed units such as centimeters and inches in one calculation. Choose one unit, label it, and convert all measurements before calculating.
Self-check rubric
- Center is marked and the unit, starting radius, and increment are labeled.
- Coiling curve joins smoothly at each quarter turn without sharp corners.
- Ridge steps are placed at a recorded interval and do not cross the center or each other.
- At least two radii are calculated with the formula and compared with measured values.
- Valid alternatives are accepted when construction logic and arithmetic checks are documented.
Questions and answers
What does x-height mean in this lesson?
X-height is the vertical distance from baseline to midline of a letter or shape. Letter styles vary, so use it as a consistent reference rather than a fixed universal measure.
Are the numerical values standards?
No. All values are hypothetical examples for practice. Measure your own paper and tools, label your chosen values, and keep units consistent.
Can I use a different ridge interval?
Yes. Any interval is valid if you record it, keep spacing consistent, and check that ridges do not cross the center or each other.
How do I know the coil is correct?
Use the formula radius = starting radius + (quarter turns × increment), measure two checkpoints, and compare calculated with measured values.