Free original lessons
Draw a Swimming Shark with Water-Motion Cues
Learn to draw a shark in motion using a clear body pose, fin placement, water-line and wake cues, plus a convention-based rubric for valid alternatives.
Free lesson
Four exercises
Worked answers
Object Drawing Lessons
This lesson teaches a single focused skill: drawing a swimming shark whose pose and surrounding water cues read as motion. You will use a simple body-axis method, place fins relative to that axis, and add a water line and wake lines that agree with the shark's direction. The drawing convention is explicit: x-height means the distance from baseline to midline in your own lettering, used here only as a proportional guide for spacing cues. Letter styles vary, so treat x-height as a personal unit, not a universal measurement. All numerical values below are hypothetical examples chosen for checkable arithmetic; measure your own paper and tools if you adapt them.
Practice materials: Printable downloads are not available for this lesson yet. Use the instructions and four exercises below.
Reference illustration
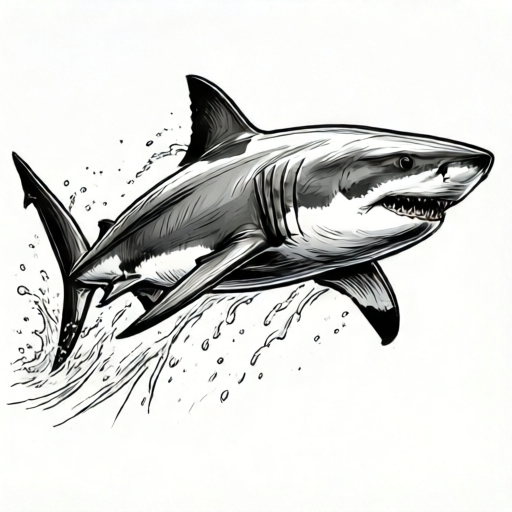
Use the stated measurements and conventions for each exercise.
Set the body axis and pose
Begin with a single curved line for the body axis, running from the snout to the tail. A swimming shark reads best when the axis curves gently, suggesting the body flexing through the water. Keep the curve shallow: a deep S-shape looks like a turning fish, not a cruising shark.
Mark three points on the axis: snout, midpoint, and tail base. The midpoint is where the dorsal fin will sit. Use your own x-height as a spacing unit: for example, if your x-height is 5 mm, place the dorsal fin peak about two x-heights above the axis. This is a hypothetical example, not a standard.
- Draw a gentle curve for the body axis, about 12 cm long on A4 paper (hypothetical example).
- Mark snout, midpoint, and tail base on the axis.
- Sketch the body outline as a tapered oval around the axis, wider at the midpoint.
- Check that the outline is symmetric about the axis at the midpoint.
Place fins relative to the axis
Fins anchor the pose. The dorsal fin sits at the midpoint, angled slightly backward to suggest forward motion. Pectoral fins sit just behind the midpoint and below the axis, angled outward. The tail fin connects at the tail base and should align with the axis direction.
Use the fin placement inset from the planned printable as a reference once it exists; for now, rely on the axis method. A common error is placing the dorsal fin too far forward, which makes the shark look like it is diving.
- Draw the dorsal fin as a triangle with its base on the body outline at the midpoint.
- Angle the dorsal fin tip backward by about one x-height horizontally.
- Draw two pectoral fins below the axis, each about one x-height long.
- Draw the tail fin as a crescent aligned with the axis.
Add water line and wake cues
The water line is a horizontal line across the drawing that represents the surface. Place it so the dorsal fin tip breaks the line slightly, showing the shark swimming near the surface. Wake lines are short curved strokes behind the tail and along the body, following the direction of travel.
Keep wake lines parallel to the body axis and spaced about one x-height apart. Vary their length to suggest turbulence. Do not add other fish or underwater scenery; the boundary of this task is the shark and its motion cues only.
- Draw a horizontal water line across the page.
- Position the shark so the dorsal fin tip crosses the water line by about half an x-height.
- Add three to five wake lines behind the tail, curving gently.
- Add two short surface ripple lines at the water line near the dorsal fin.
Check proportions and motion read
Before finishing, check that the body axis, fin placement, and wake lines all agree on one direction of travel. If the dorsal fin angles backward but the wake lines curve forward, the motion read is confused. Adjust the wake lines to match the fin angle.
Use simple arithmetic to check spacing: if your x-height is 5 mm and you planned wake lines 5 mm apart, five lines create four gaps and span 20 mm between first and last. Measure with a ruler to confirm consistency. These values are hypothetical examples; substitute your own measurements.
- Confirm the dorsal fin tip crosses the water line.
- Confirm wake lines are parallel to the body axis.
- Measure wake line spacing and compare to your chosen unit.
- Erase any cue that contradicts the direction of travel.
Worked example
Draw a shark swimming left to right near the surface. Use a 5 mm x-height (hypothetical). Place the dorsal fin at the midpoint, angle it backward, add a water line crossing the fin tip, and add four wake lines behind the tail spaced 5 mm apart.
Worked answer
The body axis curves gently from left snout to right tail base. The dorsal fin sits at the midpoint with its tip angled backward by about 5 mm horizontally. The water line crosses the dorsal fin tip by about 2.5 mm. Four wake lines behind the tail are spaced 5 mm apart, spanning 15 mm between first and last, and curve parallel to the axis. The motion read is consistent: fin angle, wake lines, and water line all agree on left-to-right travel.
Four practice exercises
Exercise 1
Draw a shark swimming right to left. Use a 4 mm x-height (hypothetical). Place the dorsal fin at the midpoint, angle it backward, and add three wake lines behind the tail spaced 4 mm apart. Describe where the water line crosses the shark.
Show answer and check
The body axis curves gently from right snout to left tail base. The dorsal fin sits at the midpoint with its tip angled backward by about 4 mm horizontally. Three wake lines behind the tail are spaced 4 mm apart, creating two gaps and spanning 8 mm between first and last. The water line crosses the dorsal fin tip by about 2 mm.
Why: The axis sets direction, the midpoint anchors the dorsal fin, and the wake spacing uses the chosen unit. The water line crossing the fin tip shows surface proximity without submerging the body.
Check: Measure wake line spacing with a ruler; confirm three lines span 8 mm. Check that the dorsal fin tip crosses the water line and that wake lines curve in the same direction as the fin angle.
Exercise 2
Draw a shark swimming fully below the water line. Use a 6 mm x-height (hypothetical). Place the dorsal fin at the midpoint, add four wake lines behind the tail spaced 6 mm apart, and add two surface ripple lines above the shark. Describe the motion read.
Show answer and check
The body axis curves gently from left snout to right tail base. The dorsal fin sits at the midpoint with its tip angled backward by about 6 mm horizontally. Four wake lines behind the tail are spaced 6 mm apart, creating three gaps and spanning 18 mm between first and last. Two surface ripple lines sit above the shark at the water line. The motion read is consistent left-to-right travel.
Why: A fully submerged shark is a valid alternative. The wake lines and fin angle still establish direction, while surface ripples show the water line without requiring the fin to break it.
Check: Measure wake line spacing; confirm four lines span 18 mm. Check that surface ripples are above the shark and that wake lines are parallel to the body axis.
Exercise 3
Draw a shark swimming left to right with a 3 mm x-height (hypothetical). Place the dorsal fin at the midpoint, angle it backward, and add five wake lines behind the tail spaced 3 mm apart. Add one short surface ripple line at the water line near the dorsal fin. Describe the total span of the wake lines.
Show answer and check
The body axis curves gently from left snout to right tail base. The dorsal fin sits at the midpoint with its tip angled backward by about 3 mm horizontally. Five wake lines behind the tail are spaced 3 mm apart, creating four gaps and spanning 12 mm between first and last. One short surface ripple line sits at the water line near the dorsal fin. The motion read is consistent left-to-right travel.
Why: Five wake lines at 3 mm spacing give a total span of 12 mm, which is checkable arithmetic. The single ripple line keeps the surface cue minimal and consistent with the fin tip.
Check: Measure wake line spacing; confirm five lines span 12 mm. Check that the ripple line is at the water line and that the dorsal fin tip crosses the water line.
Exercise 4
Draw a shark swimming right to left with a 5 mm x-height (hypothetical). Place the dorsal fin at the midpoint, angle it backward, and add three wake lines behind the tail spaced 5 mm apart. Add two surface ripple lines at the water line near the dorsal fin. Describe one valid alternative that still reads as motion.
Show answer and check
The body axis curves gently from right snout to left tail base. The dorsal fin sits at the midpoint with its tip angled backward by about 5 mm horizontally. Three wake lines behind the tail are spaced 5 mm apart, creating two gaps and spanning 10 mm between first and last. Two surface ripple lines sit at the water line near the dorsal fin. A valid alternative is to draw the shark fully below the water line with the same wake lines and fin angle, keeping the motion read consistent.
Why: The rubric allows valid alternatives when motion cues agree. Submerging the shark changes the water line relationship but preserves direction through fin angle and wake lines.
Check: Measure wake line spacing; confirm three lines span 10 mm. Check that the alternative keeps wake lines parallel to the body axis and fin angle consistent with right-to-left travel.
Common mistakes
- Drawing the body axis as a deep S-curve. Flatten the curve so it reads as a cruising shark, not a turning fish.
- Placing the dorsal fin too far forward. Move the dorsal fin base to the midpoint mark on the axis.
- Wake lines that curve opposite to the fin angle. Redraw wake lines parallel to the body axis and fin direction.
- Water line crossing the body instead of the dorsal fin tip. Raise or lower the shark so only the dorsal fin tip breaks the water line.
Self-check rubric
- Body axis is a gentle curve, not a deep S-shape.
- Dorsal fin base sits at the midpoint of the axis.
- Pectoral fins are below the axis and angled outward.
- Tail fin aligns with the axis direction.
- Water line crosses the dorsal fin tip, not the body.
- Wake lines are parallel to the body axis and consistent in direction.
- Spacing cues use a consistent unit, such as x-height.
- Valid alternatives are accepted if motion cues agree.
Questions and answers
Do I need to measure x-height exactly?
No. X-height is your own lettering unit from baseline to midline. Use it as a proportional guide; letter styles vary, so any consistent unit works.
Can I draw the shark below the water line entirely?
Yes, that is a valid alternative. Keep the wake lines and fin angles consistent with the direction of travel.
How many wake lines should I add?
Three to five is a useful range. More lines can clutter the motion read; fewer may not suggest movement clearly.
Are the numerical examples standards?
No. All numbers here are hypothetical examples for checkable arithmetic. Measure your own paper and tools if you adapt them.