Free original lessons
Draw a Throne: Seat, Backrest and Armrest Proportions
Learn to draw a throne using clear proportion guides for seat height, backrest height and armrest width, with front and three-quarter view practice.
Free lesson
Four exercises
Worked answers
Object Drawing Lessons
This lesson teaches you to construct a single throne as a furniture object using simple proportion guides. You will set a seat height, build a backrest to a chosen ratio, and place armrests at a consistent width. The method uses checkable arithmetic and a defined drawing convention so you can verify your work. All measurements are hypothetical examples; measure your own paper and tools. The focus is proportion, not decoration, and royal figures, crowns, castles or room scenes are excluded.
Practice materials: Printable downloads are not available for this lesson yet. Use the instructions and four exercises below.
Reference illustration
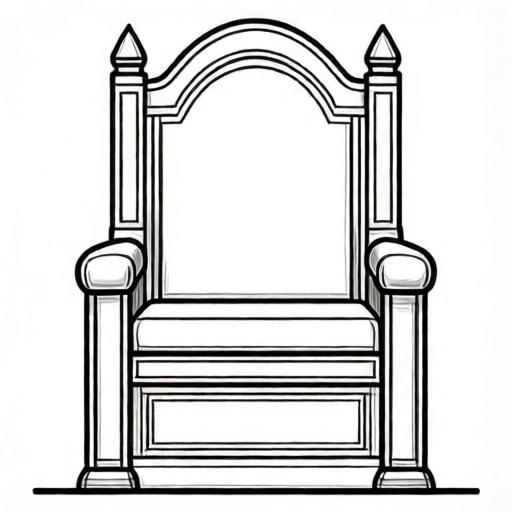
Use the stated measurements and conventions for each exercise.
Set the seat and backrest proportions
Begin by choosing a seat height in drawing units. For this lesson, use a hypothetical seat height of 4 units. The backrest height is set as a ratio to the seat: a common furniture proportion is backrest height equal to 1.5 times the seat height, giving 6 units. Total height from floor to top of backrest is therefore 10 units. These numbers are examples only; you may choose other simple ratios, but keep them consistent.
Draw a vertical center line and mark the floor line. Mark the seat line at 4 units above the floor. Mark the top of the backrest at 10 units above the floor. Use a ruler or a marked strip of paper to transfer these distances. The seat depth is a separate horizontal measure; for the front view, seat depth is not visible, so it is set in the three-quarter view.
- Draw a vertical center line and a horizontal floor line.
- Mark the seat line at 4 units above the floor.
- Mark the top of the backrest at 10 units above the floor.
- Check that the backrest height (6 units) is 1.5 times the seat height (4 units).
Place armrests and seat width
Armrest width is the horizontal distance from the center line to the outer edge of each armrest. For this lesson, use a hypothetical armrest width of 3 units from the center line, so the total width across both armrests is 6 units. The seat width should be slightly less than the armrest width so the armrests sit outside the seat. Use a seat width of 2.5 units from the center line, giving a total seat width of 5 units.
Draw the seat as a horizontal rectangle in the front view: 5 units wide and 4 units above the floor. Draw the backrest as a vertical rectangle centered on the center line, 5 units wide and extending from the seat line to 10 units. Draw the armrests as horizontal bars at seat height, extending from the seat edge to 3 units from the center line on each side. Check that the armrest outer edge is 0.5 units beyond the seat edge on each side.
- Mark 2.5 units left and right of the center line for the seat width.
- Mark 3 units left and right of the center line for the armrest outer edges.
- Draw the seat rectangle between the seat width marks at the seat line.
- Draw the backrest rectangle from the seat line to the top mark, using the seat width.
- Draw armrest bars from the seat edge to the armrest outer edge at seat height.
Construct the three-quarter view
The three-quarter view adds depth. Choose a hypothetical seat depth of 4 units. Draw a diagonal depth line from the front seat corners, receding at about 30 degrees. Mark the back seat line 4 units along the depth direction. The backrest sits at the back seat line, so its base is shifted along the depth direction. Keep the same vertical heights: seat at 4 units, backrest top at 10 units.
For the three-quarter view, draw the seat as a parallelogram using the front seat width and the depth line. Draw the backrest as a vertical rectangle at the back seat line, keeping the same width and height. Draw the armrests as bars from the front seat edge to the back seat line, maintaining the 3-unit armrest width from the center line. Check that the vertical heights match the front view and that the depth is 4 units.
- Draw a depth line at about 30 degrees from each front seat corner.
- Mark 4 units along the depth line for the back seat line.
- Draw the seat as a parallelogram using the front width and depth.
- Draw the backrest at the back seat line with the same height and width.
- Draw armrests from the front seat edge to the back seat line, keeping the 3-unit width.
Use a consistent drawing convention
For this lesson, use the convention that x-height is measured from baseline to midline. This means lowercase letters and small features are sized between the baseline and the midline, not the full cap height. Apply this convention to any labels or notes on your drawing. Letter styles vary, so do not force a single handwriting style; instead, keep your labels legible and consistent in size.
When checking proportions, measure actual distances on your paper with a ruler. Label any numerical values you choose as hypothetical examples. Do not assume printer tolerances or hardware standards; measure your own equipment. The rubric below allows valid alternatives, such as different simple ratios, as long as the relationships are consistent and checkable.
- Mark a baseline and a midline on your paper for any labels.
- Keep label x-height between baseline and midline.
- Measure actual distances with a ruler to verify proportions.
- Record your chosen ratios and label them as hypothetical examples.
Worked example
Using the lesson ratios, calculate total height and armrest overhang for a throne with seat height 5 units, backrest height 1.5 times seat height, seat width 3 units from center, and armrest width 3.5 units from center.
Worked answer
Backrest height = 1.5 × 5 = 7.5 units. Total height = 5 + 7.5 = 12.5 units. Armrest overhang = 3.5 − 3 = 0.5 units on each side. Total width across armrests = 7 units; total seat width = 6 units.
Four practice exercises
Exercise 1
A throne has seat height 4 units and backrest height 1.5 times the seat height. Calculate the total height from floor to top of backrest.
Show answer and check
Total height = 4 + (1.5 × 4) = 4 + 6 = 10 units.
Why: Multiply seat height by 1.5 to get backrest height, then add seat height.
Check: Verify that 6 ÷ 4 = 1.5 and that 4 + 6 = 10.
Exercise 2
Seat width is 2.5 units from the center line and armrest width is 3 units from the center line. Calculate the overhang on each side and the total width across armrests.
Show answer and check
Overhang = 3 − 2.5 = 0.5 units per side. Total width across armrests = 2 × 3 = 6 units.
Why: Subtract seat half-width from armrest half-width for overhang; double armrest half-width for total width.
Check: Check that 2.5 + 0.5 = 3 and that 3 + 3 = 6.
Exercise 3
In a three-quarter view, seat depth is 4 units and the depth line is drawn at 30 degrees. If the front seat width is 5 units, describe how to check that the backrest base is correctly placed.
Show answer and check
Mark 4 units along the depth line from each front seat corner to locate the back seat line. The backrest base should sit on that line and keep the same 5-unit width and 10-unit total height as the front view.
Why: Depth is transferred along the depth line; vertical heights and widths remain consistent between views.
Check: Measure 4 units along the depth line and confirm the backrest width and height match the front view marks.
Exercise 4
A student draws a throne with seat height 3 units, backrest height 6 units, seat width 2 units from center, and armrest width 2 units from center. Identify the proportion error and state a fix using a simple ratio.
Show answer and check
The backrest ratio is 6 ÷ 3 = 2, which is steeper than the lesson example of 1.5; also armrest width equals seat width, so there is no overhang. Fix by choosing a stated ratio, for example backrest = 1.5 × seat = 4.5 units, and armrest width = seat width + 0.5 = 2.5 units from center.
Why: Check ratios and overhang arithmetic; adjust to consistent, checkable values.
Check: Verify 4.5 ÷ 3 = 1.5 and 2.5 − 2 = 0.5.
Common mistakes
- Making the backrest too short relative to the seat. Use a simple ratio such as backrest height = 1.5 times seat height, and check the total height arithmetic.
- Placing armrests inside the seat width. Set armrest width greater than seat width, for example 3 units versus 2.5 units from the center line, and check the 0.5-unit overhang.
- Inconsistent heights between front and three-quarter views. Keep the same vertical marks (seat at 4 units, backrest top at 10 units) in both views and measure to confirm.
- Using a single handwriting style as a universal answer. Apply the baseline-to-midline x-height convention for labels, but allow varied letter styles as long as labels are legible and consistent.
Self-check rubric
- Seat height is marked and measurable.
- Backrest height follows a stated ratio to seat height and the arithmetic is correct.
- Armrest width is greater than seat width and the overhang is measurable.
- Front and three-quarter views use consistent vertical heights.
- Labels use the baseline-to-midline x-height convention and are legible.
- Valid alternative ratios are accepted if relationships are consistent and checkable.
Questions and answers
Do I have to use the example numbers?
No. The numbers are hypothetical examples. Choose simple ratios that you can check with arithmetic, and keep them consistent across views.
How do I check armrest width?
Measure from the center line to the outer armrest edge. In the example, this is 3 units, while the seat edge is 2.5 units, giving a 0.5-unit overhang on each side.
What does x-height mean here?
For this lesson, x-height is the distance from baseline to midline. Use it for labels and small features, and keep letter styles legible and consistent.
Can I add decoration?
Yes, but keep the proportion guides visible and checkable. The lesson focuses on seat, backrest and armrest proportions, not decorative details.