Free original lessons
Draw a Layered Thundercloud with Lightning
Build a thundercloud from stacked cloud masses, add shading, and attach lightning bolts using a clear convention and a fair rubric.
Free lesson
Four exercises
Worked answers
Object Drawing Lessons
This lesson teaches a repeatable way to draw a thundercloud as a layered form: a broad base mass, a mid mass, and a top lobe, with lightning bolts attached at chosen anchor points. You will use a simple convention for shading and bolt shape so that different valid styles can still be checked. All measurements are hypothetical examples; measure your own paper and tools before drawing. The goal is a readable silhouette, clear layering, and bolts that look attached rather than floating.
Practice materials: Printable downloads are not available for this lesson yet. Use the instructions and four exercises below.
Reference illustration
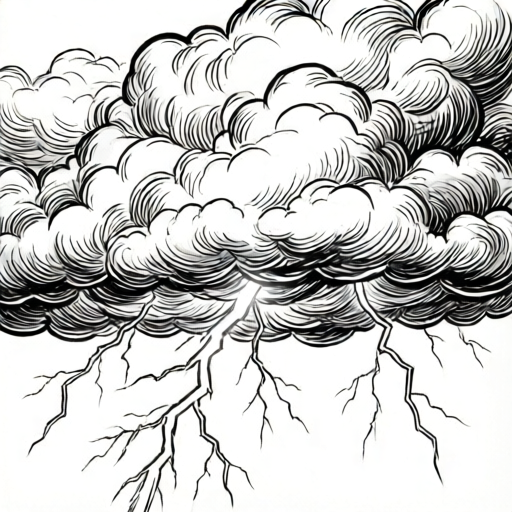
Use the stated measurements and conventions for each exercise.
Build the cloud in three masses
Start with a light pencil outline. Draw a wide base mass that is flatter on the bottom and rounded on top. Above it, draw a mid mass that overlaps the base by about one third of its height. Above that, draw a top lobe that overlaps the mid mass by about one third. Overlap is what creates the layered look; gaps make the cloud read as separate blobs.
Keep the bottom edge of the base mass slightly irregular so it does not look like a bowl. The top lobe should be the smallest mass. If your paper is 20 cm wide, a hypothetical base width of 12 cm, mid width of 9 cm, and top width of 6 cm gives a stable pyramid-like stack. These numbers are examples only; adjust to your paper.
- Lightly mark the base mass width and height.
- Draw the base mass with a flatter bottom and rounded top.
- Draw the mid mass overlapping the base by about one third.
- Draw the top lobe overlapping the mid mass by about one third.
- Check that the three masses share clear overlap zones.
Shade with a defined convention
Use one convention: light comes from the upper left. Shade the lower right of each mass with parallel strokes, leaving the upper left unshaded. Where masses overlap, add a slightly darker band just under the upper mass to show the seam. This convention is a choice, not a universal rule; if you choose a different light direction, state it and keep it consistent.
Keep shading inside the silhouette. A common error is shading past the outline, which weakens the layered read. Use a soft pencil for shading and a darker pencil for the final outline so the layers stay visible.
- Decide and state your light direction.
- Shade the lower right of each mass with parallel strokes.
- Darken the seam under each overlapping mass.
- Keep all shading inside the outline.
- Check that the light direction is consistent across all three masses.
Attach lightning bolts at anchor points
Choose anchor points on the lower edge of the base mass. A bolt should start at an anchor point and travel downward with two or three sharp turns. The first segment should touch the cloud edge so the bolt looks attached. Bolt length can vary; a hypothetical bolt of 5 cm on a 20 cm page is easy to check.
You may draw one bolt or several. If you draw several, keep them from crossing each other and keep their turns sharp rather than rounded. A bolt that starts inside the cloud mass and exits through the edge also reads as attached, but the exit point must be clear.
- Mark one to three anchor points on the lower edge.
- Start each bolt exactly at an anchor point.
- Draw two or three sharp turns downward.
- Keep bolts from crossing.
- Check that every bolt touches the cloud edge.
Check the whole drawing
Step back and check three things: the silhouette reads as one cloud, the three masses are visible through overlap and seam shading, and every bolt is attached. If the silhouette looks like separate circles, increase overlap. If the bolts look floating, move their start points to the edge.
Use the rubric below to score your own drawing. Valid alternatives include different light directions, different bolt counts, and different turn counts, as long as the convention is stated and consistent.
- Check the silhouette as one cloud form.
- Check that three masses are visible.
- Check that every bolt touches the edge.
- Score with the rubric and note one improvement.
Worked example
On a 20 cm wide page, draw a thundercloud with a 12 cm base, 9 cm mid, and 6 cm top, shade from the upper left, and attach two bolts of about 5 cm each.
Worked answer
The base is drawn 12 cm wide with a flatter bottom. The mid mass is 9 cm wide and overlaps the base by about one third of its height. The top lobe is 6 cm wide and overlaps the mid by about one third. Shading is on the lower right of each mass, with darker seams under overlaps. Two bolts start at anchor points on the lower edge, each about 5 cm long with two sharp turns, and they do not cross. The silhouette reads as one cloud, three masses are visible, and both bolts touch the edge.
Four practice exercises
Exercise 1
Draw a thundercloud on a 15 cm wide page using a 9 cm base, 7 cm mid, and 5 cm top. State your light direction and attach one bolt of about 4 cm.
Show answer and check
A layered cloud with three overlapping masses and one attached bolt. Exact shape varies.
Why: The sizes are hypothetical examples that fit a 15 cm page. Overlap by about one third keeps the masses visible. The bolt must start at the lower edge.
Check: Measure the three widths, confirm overlaps, confirm the stated light direction is consistent, and confirm the bolt touches the edge.
Exercise 2
Draw a thundercloud with light from the upper right and two bolts that do not cross. Use any page size and state your measurements.
Show answer and check
A layered cloud shaded on the lower left with two attached, non-crossing bolts.
Why: Changing light direction is a valid alternative if stated and consistent. Two bolts are valid if each touches the edge and they do not cross.
Check: Check that shading is on the lower left of each mass, that both bolts touch the edge, and that the bolts do not cross.
Exercise 3
Draw a thundercloud where one bolt starts inside the base mass and exits through the lower edge. Explain how the exit point shows attachment.
Show answer and check
A layered cloud with a bolt whose visible exit point is on the lower edge.
Why: A bolt can begin inside the mass if the exit point is clear. The exit point is the anchor that shows attachment.
Check: Trace the bolt to its exit point and confirm the exit point lies on the lower edge.
Exercise 4
Draw a thundercloud with three bolts of different lengths. Keep all bolts attached and non-crossing, and state one measurement for each bolt.
Show answer and check
A layered cloud with three attached bolts of stated lengths.
Why: Different lengths are valid. The check is attachment and non-crossing, not equal length.
Check: Measure each bolt, confirm each starts at an anchor point on the edge, and confirm no two bolts cross.
Common mistakes
- Drawing the three masses with gaps instead of overlaps. Redraw so each upper mass overlaps the one below by about one third of its height.
- Shading outside the outline. Erase stray shading and keep strokes inside the silhouette.
- Starting bolts away from the cloud edge. Move each bolt start point to an anchor point on the lower edge.
- Using rounded turns for bolts. Redraw turns as sharp angles with two or three segments.
Self-check rubric
- Silhouette reads as one cloud form: 0-2 points.
- Three masses are visible through overlap: 0-2 points.
- Seam shading is present under overlaps: 0-2 points.
- Light direction is stated and consistent: 0-2 points.
- Every bolt touches the cloud edge: 0-2 points.
- Bolt turns are sharp and bolts do not cross: 0-2 points.
- Valid alternatives are accepted when the convention is stated and consistent.
Questions and answers
How many bolts should I draw?
One to three is easy to check. Any count is valid if each bolt touches the cloud edge and bolts do not cross.
Must light come from the upper left?
No. Upper left is the convention used here. You may choose another direction if you state it and keep it consistent.
How much overlap is enough?
About one third of the upper mass height is a checkable example. More overlap is fine if the masses remain visible.
Can I use a ruler for bolts?
Yes. A ruler helps keep segments straight, but freehand is also valid if turns are sharp.