Free original lessons
Tropical Flower Drawing: Compare Hibiscus, Bird-of-Paradise and Orchid Forms
Learn to draw three tropical blooms by comparing petal shapes, centers and structural cues, with construction steps, a worked example and four practice tasks.
Free lesson
Four exercises
Worked answers
Object Drawing Lessons
Tropical flowers reward close looking because their silhouettes differ sharply. A hibiscus opens wide with a flat disc and a protruding column. A bird-of-paradise stacks pointed petals above a beak-like bract. An orchid presents a bilateral face with a modified lower petal. This lesson teaches a repeatable construction method for each form, then asks you to compare them side by side. You will use simple shape blocks, a defined x-height convention for lettering labels, and checkable proportions. All drawing is done with pencil and paper; no special tools are required beyond a ruler and an eraser.
Practice materials: Printable downloads are not available for this lesson yet. Use the instructions and four exercises below.
Reference illustration
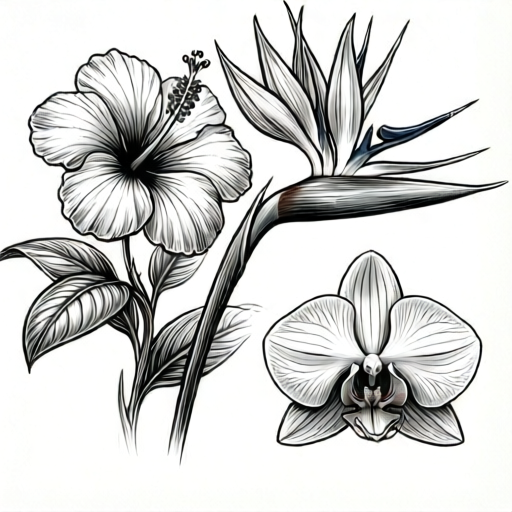
Use the stated measurements and conventions for each exercise.
Set up a comparison page and define your conventions
Divide a sheet into three equal columns and label them Hibiscus, Bird-of-Paradise and Orchid. Use a lettering convention where x-height is measured from the baseline to the midline of lowercase letters; capital letters may rise above the midline. Letter styles vary, so choose one clear style and keep it consistent across all three labels.
Draw a light horizontal midline across each column. This line marks the flower's facing direction and helps you compare how each bloom opens. Keep all construction lines light so they can be erased later.
- Fold or lightly rule the page into three columns of equal width.
- Write the three flower names at the top of each column using the x-height convention.
- Draw a faint midline in each column to indicate the flower's facing direction.
- Mark a center point on each midline where the bloom will attach to its stem.
Construct the hibiscus as a radial disc
The hibiscus reads as a flat, five-petaled disc with a long central column. Begin with a circle for the petal spread, then divide it into five equal wedges. Each petal overlaps its neighbor slightly, so draw petal edges as gentle curves that cross the wedge lines.
The column projects forward from the center. Draw it as a narrow tapered line ending in small anther clusters. Because the disc faces the viewer, the column appears foreshortened; keep it shorter than you expect.
- Draw a circle for the petal spread and mark its radius; this radius is the reference for checking the foreshortened column length.
- Divide the circle into five equal wedges using light radial lines.
- Draw five overlapping petals whose edges curve past the wedge lines.
- Add a tapered central column from the disc center, ending in small dots for anthers.
- Erase construction lines and darken the final petal edges.
Construct the bird-of-paradise as stacked pointed forms
The bird-of-paradise is built from a boat-shaped bract that opens along one side, revealing pointed petals stacked in a fan. Start with an elongated teardrop for the bract, tilted so its opening faces upward and outward. Inside the opening, draw three or four narrow pointed petals that radiate from a common base.
The bract's beak-like tip should point away from the stem. Keep the petals shorter than the bract so the silhouette stays compact. Compare this column to the hibiscus: the bird-of-paradise is vertical and asymmetric, while the hibiscus is flat and radial.
- Draw an elongated teardrop for the bract, tilted with the opening facing up and out.
- Mark the bract's beak-like tip pointing away from the stem.
- Inside the opening, draw three or four narrow pointed petals radiating from a common base.
- Keep petals shorter than the bract to preserve the compact silhouette.
- Erase construction lines and darken the bract edge and petal tips.
Construct the orchid as a bilateral face
The orchid has bilateral symmetry: two upper petals, two side petals and a modified lower petal called the lip. Begin with a vertical oval for the face, then place the upper petals as rounded shapes at the top. The side petals extend outward and slightly down. The lip sits at the bottom center and is often broader and more elaborate.
Draw a light vertical axis through the oval to keep symmetry. Compare the orchid to the other two: it is neither a flat disc nor a stacked fan, but a face-like arrangement with a distinct lower lip. Check that the lip is the widest single element.
- Draw a vertical oval for the orchid face and a light vertical axis through it.
- Place two rounded upper petals at the top of the oval.
- Add two side petals extending outward and slightly down.
- Draw the lower lip as a broad shape at the bottom center, wider than any single petal.
- Erase construction lines and darken the final petal edges, keeping the axis faint.
Worked example
A student draws a hibiscus with a disc radius of 4 cm and a column length of 6 cm. The column looks too long. Using the foreshortening rule, suggest a corrected column length and explain the check.
Worked answer
A corrected column length is about 2 cm, roughly half the disc radius. Check by measuring the drawn column against the disc radius; if the column exceeds the radius, shorten it until it is clearly less than the radius.
Four practice exercises
Exercise 1
Draw a hibiscus with a disc radius of 3 cm. Add a foreshortened column. State the column length you chose and why.
Show answer and check
A column length of about 1.5 cm is appropriate because it is half the disc radius, keeping the column clearly shorter than the radius.
Why: The hibiscus disc faces the viewer, so the column is foreshortened. A column shorter than the radius preserves the flat disc read.
Check: Measure the column against the disc radius with a ruler; the column should be less than the radius.
Exercise 2
Draw a bird-of-paradise bract 10 cm long. Draw three pointed petals inside the opening. State the petal length you chose and check it against the bract.
Show answer and check
Petals of about 6 cm are appropriate because they are shorter than the 10 cm bract, preserving the compact stacked silhouette.
Why: The bract encloses the petals; petals longer than the bract would break the boat-like form.
Check: Measure each petal tip against the bract tip; no petal should extend beyond the bract.
Exercise 3
Draw an orchid face 8 cm tall. Place two upper petals, two side petals and a lower lip. State the lip width you chose and compare it to a side petal.
Show answer and check
A lip width of about 4 cm is appropriate because it is wider than a side petal of about 2.5 cm, making the lip the widest single element.
Why: The orchid lip is a modified lower petal that dominates the lower half of the face; it should be broader than the side petals.
Check: Measure the lip width and the widest side petal; the lip should be wider.
Exercise 4
On one page, draw all three blooms side by side at the same overall height. Label each using the x-height convention. Then list one structural difference between each pair.
Show answer and check
A complete response shows three blooms of equal height, consistent labels, and differences such as: hibiscus is radial with a column; bird-of-paradise is asymmetric with stacked pointed petals; orchid is bilateral with a broad lower lip.
Why: Equal height allows fair comparison of silhouette and internal structure. The differences follow from the construction rules for each form.
Check: Measure the overall height of each bloom with a ruler; they should match within 1 cm. Check that each label's lowercase letters share the same baseline-to-midline height.
Common mistakes
- Drawing the hibiscus column too long because it is imagined as fully extended. Foreshorten the column when the disc faces the viewer; keep it shorter than the disc radius.
- Making the bird-of-paradise petals longer than the bract. Keep petals shorter than the bract so the compact stacked silhouette reads clearly.
- Treating the orchid as radially symmetric like the hibiscus. Use a vertical axis and place the lip at the bottom center as the widest single element.
- Using inconsistent lettering x-height across the three labels. Measure baseline to midline for lowercase letters and keep one letter style across all labels.
Self-check rubric
- Hibiscus shows five overlapping petals arranged radially around a central disc.
- Hibiscus column is foreshortened and shorter than the disc radius.
- Bird-of-paradise bract is elongated with a beak-like tip pointing away from the stem.
- Bird-of-paradise petals are pointed, stacked in a fan and shorter than the bract.
- Orchid uses a vertical axis with two upper petals, two side petals and a broad lower lip.
- Orchid lip is the widest single element and sits at the bottom center.
- Labels use a consistent lettering style with x-height measured baseline to midline.
- Construction lines are light and erased or faint in the final drawing.
Questions and answers
Do I need colored pencils?
No. Graphite pencil and an eraser are enough. Color can be added later, but the lesson focuses on form and proportion.
How large should each drawing be?
Choose a size that fits your column, for example a hypothetical 8 cm wide bloom, and keep the same size across all three for fair comparison.
What if my lettering style differs from the example?
Any clear style is acceptable as long as x-height is measured baseline to midline and the style is consistent across labels.
Can I draw the flowers from memory?
Yes, but compare your memory drawing to the construction steps and check the key proportions listed in the rubric.