Free original lessons
Draw a Viking Longship: Curved Hull, Dragon Prow, and Even Oar Row
Learn to draw a side-view Viking longship with a smooth hull curve, a stylized dragon-head prow, and evenly spaced oars using simple guides and checks.
Free lesson
Four exercises
Worked answers
Object Drawing Lessons
This lesson teaches a side-view Viking longship: a curved hull, a dragon-head prow, and an evenly spaced row of oars along the side. You will use a baseline, a midline, and a few measured guides to keep proportions consistent. The convention is simple: the hull's top edge (gunwale) sits near the midline, and the bottom curve dips toward the baseline. Letter styles and decorative details vary, so the rubric rewards clear structure and deliberate spacing rather than one exact shape. All measurements below are hypothetical examples; measure your own paper and tools before drawing.
Practice materials: Printable downloads are not available for this lesson yet. Use the instructions and four exercises below.
Reference illustration
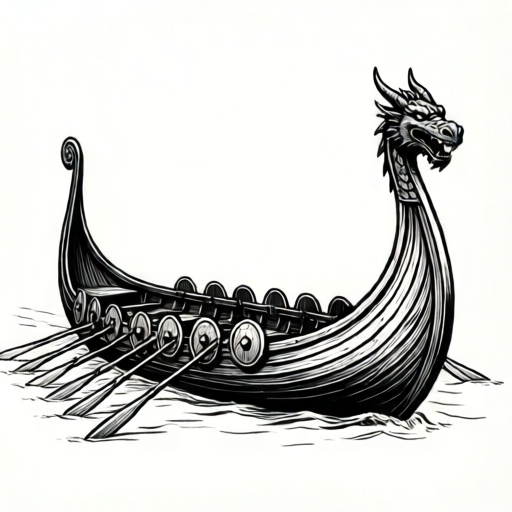
Use the stated measurements and conventions for each exercise.
Set the frame and hull curve
Place your paper in landscape orientation. Draw a light baseline near the bottom and a midline about halfway up the page. These two lines are your reference for the hull: the gunwale (top edge of the hull) runs close to the midline, and the lowest point of the hull curve approaches the baseline without touching it.
Mark the ship's length along the midline. For example, on a 20 cm wide drawing area, place the bow at 2 cm from the left edge and the stern at 18 cm. These numbers are hypothetical; adjust to your paper. The hull is a long, shallow curve, not a deep bowl.
- Draw a light baseline and a midline across the page.
- Mark bow and stern points on the midline, leaving equal margins.
- Sketch a shallow curve from bow to stern that dips toward the baseline at the middle.
- Add a second, slightly higher curve for the gunwale, keeping the gap between curves narrow at the ends and wider at the middle.
- Check that the lowest hull point stays above the baseline by about one finger width.
Build the dragon-head prow
The dragon prow is a stylized shape, not a realistic animal. Break it into three parts: a neck rising from the bow, a head with a snout, and a small crest or horn. Keep the neck thick enough to read at a glance, and angle the snout forward and slightly up.
Use the bow point as the base of the neck. Draw the neck as a tapered curve rising above the gunwale. Then add the head as a rounded wedge, with the snout extending forward. A simple eye dot and a curved crest are enough; avoid tiny details that disappear at small sizes.
- From the bow point, draw a tapered neck curve rising above the gunwale.
- Add a rounded wedge for the head, with the snout pointing forward.
- Draw a small crest or horn on top of the head.
- Add one eye dot and a short mouth line.
- Check that the neck connects cleanly to the hull and that the head is larger than the neck's width.
Space the oars evenly
Oars run along the side of the hull below the gunwale. Even spacing is the key visual cue. Decide how many oars you want, then divide the hull's side into equal intervals. For example, with 8 oars across a 16 cm hull side, place them every 2 cm. These values are hypothetical; choose numbers that fit your drawing.
Each oar is a straight line angled slightly downward and back, with a small blade at the end. Keep the angle consistent across the row. The oars should not cross the hull curve; start each oar just below the gunwale and extend it outward.
- Mark equal intervals along the hull side below the gunwale.
- Draw each oar as a straight line at the same angle.
- Add a small rectangular or oval blade at the outer end of each oar.
- Check that the gaps between oars are equal within a small tolerance.
- Erase guide marks lightly and keep the oar row parallel to the gunwale.
Add shields and final checks
Shields hang along the gunwale in many longship drawings. Place them between or above the oar positions, using the same equal spacing. A simple circle with a center boss is enough. Keep shield size consistent; for example, a 1.5 cm diameter on a 20 cm drawing is a hypothetical starting point.
Finish by checking the three main structures: the hull curve is smooth and shallow, the dragon prow reads clearly, and the oar row is evenly spaced. Adjust line weight: heavier for the hull and prow, lighter for shields and oars.
- Mark shield positions along the gunwale at equal intervals.
- Draw consistent circles with a small center dot for each shield.
- Check that shields do not overlap the oars awkwardly.
- Strengthen the hull and prow outlines.
- Review spacing and curve smoothness before finalizing.
Worked example
On a 20 cm wide drawing area, place the bow at 2 cm and the stern at 18 cm. Draw a shallow hull curve, a dragon prow, and 8 evenly spaced oars along the hull side.
Worked answer
The hull spans 16 cm. With 8 oars, mark intervals every 2 cm along the hull side below the gunwale. Draw the neck from the bow point, add a wedge head with snout and crest, then draw each oar at the same downward angle with a small blade. Add shields at the same 2 cm spacing along the gunwale. Check that the lowest hull point stays about one finger width above the baseline and that oar gaps are equal.
Four practice exercises
Exercise 1
A drawing area is 24 cm wide. Place the bow at 3 cm and the stern at 21 cm. You want 9 oars evenly spaced along the hull side. What is the spacing between oar marks?
Show answer and check
2 cm
Why: Hull length is 21 minus 3 equals 18 cm. Divide 18 cm by 9 oars to get 2 cm per interval.
Check: Multiply 9 by 2 cm to get 18 cm, then add the 3 cm left margin to confirm the stern at 21 cm.
Exercise 2
On a 16 cm hull side, you place oar marks at 0, 2, 4, 6, 8, 10, 12, and 14 cm. How many oars are marked, and what is the spacing?
Show answer and check
8 oars, spaced 2 cm apart.
Why: Count the marks: eight positions. Each consecutive mark differs by 2 cm.
Check: Subtract consecutive marks: 2 minus 0 equals 2, 4 minus 2 equals 2, and so on through 14 minus 12 equals 2.
Exercise 3
A shield circle has a 1.5 cm diameter. You place 6 shields along a gunwale with equal gaps of 1 cm between shield edges. What total length do the shields and gaps occupy?
Show answer and check
14 cm
Why: Six shields occupy 6 × 1.5 cm = 9 cm. Five gaps between six shields occupy 5 × 1 cm = 5 cm. Total is 9 + 5 = 14 cm.
Check: Add shield widths and gap widths separately: 9 cm plus 5 cm equals 14 cm. Confirm there are five gaps for six shields.
Exercise 4
Your hull's lowest point is 2 cm above the baseline. The gunwale is 6 cm above the baseline. What is the vertical gap between the gunwale and the hull bottom at the middle?
Show answer and check
4 cm
Why: Subtract the hull bottom height from the gunwale height: 6 cm minus 2 cm equals 4 cm.
Check: Add the gap to the hull bottom height: 4 cm plus 2 cm equals 6 cm, matching the gunwale height.
Common mistakes
- Making the hull too deep, like a bowl. Keep the lowest hull point close to the baseline and the gunwale near the midline; the hull should be long and shallow.
- Drawing the dragon head as a tiny detail. Make the head clearly larger than the neck width and simplify to a wedge, snout, crest, and eye.
- Spacing oars by eye so gaps vary. Mark equal intervals along the hull side first, then draw each oar from those marks.
- Letting oars cross the hull curve. Start each oar just below the gunwale and angle it outward, away from the hull.
Self-check rubric
- Hull curve is smooth, shallow, and sits between the midline and baseline.
- Gunwale and hull bottom are clearly separated and connected at bow and stern.
- Dragon prow has a visible neck, head, snout, and crest or horn.
- Oars are evenly spaced within a small tolerance and share a consistent angle.
- Shields, if included, are consistent in size and placed along the gunwale.
- Line weight distinguishes main hull and prow from secondary details.
- Valid alternatives are accepted: different oar counts, shield styles, or slight curve variations that preserve structure.
Questions and answers
Do I need to draw a realistic dragon head?
No. A stylized wedge with a snout, crest, and eye is enough. The rubric rewards a clear, readable shape, not realism.
How many oars should I draw?
Choose a number that fits your hull length and keeps equal spacing. Eight to twelve oars is a practical range for a side view.
Can I change the hull curve?
Yes, as long as the curve is smooth, shallow, and consistent with the gunwale. Valid alternatives include slightly different dip depths.
Where do shields go?
Along the gunwale, using the same equal spacing as the oars. They can sit between oar positions or directly above them.