Free original lessons
Draw a Wrestling Shoe: High-Top, Strap, and Tread
Learn to draw a wrestling shoe with a high-top silhouette, ankle strap, and sole tread using proportion guides, placement rules, and checkable steps.
Free lesson
Four exercises
Worked answers
Object Drawing Lessons
This lesson teaches you to draw a wrestling shoe as a standalone object, without feet, legs, or athletes. You will build the high-top silhouette, place the ankle strap, and design a sole tread pattern. The method uses simple proportions and a defined drawing convention so you can check your work and accept valid stylistic alternatives. All measurements are hypothetical examples; measure your own paper and tools if you scale the drawing.
Practice materials: Printable downloads are not available for this lesson yet. Use the instructions and four exercises below.
Reference illustration
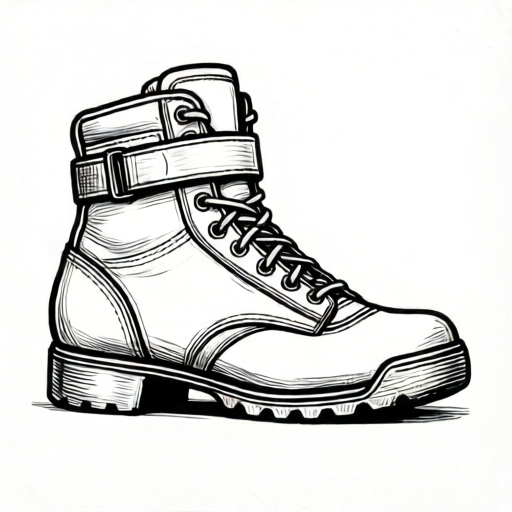
Use the stated measurements and conventions for each exercise.
Set the drawing convention and proportions
Use a side-view rectangle as your proportion guide. Draw a light rectangle 12 units long and 6 units high. The shoe length runs left to right; the height runs baseline to midline. Mark the baseline as the bottom of the sole and the midline as the top of the high-top collar. This convention keeps the silhouette checkable without implying a universal shoe size.
Divide the length into four equal 3-unit parts: toe box (front 3 units), lacing area (next 3 units), heel counter (next 3 units), and rear collar and strap end (last 3 units). The strap line is a horizontal line one unit below the midline, independent of the length quarters. The sole tread occupies the bottom one unit of the rectangle. These are hypothetical proportions for practice, not manufacturing standards.
- Draw a 12 by 6 unit rectangle lightly.
- Mark the baseline and midline.
- Divide the length into four equal parts.
- Mark the sole zone as the bottom one unit.
- Mark the strap line one unit below the midline.
Build the high-top silhouette
Start with the sole outline: a gentle curve from toe to heel inside the bottom unit. Then draw the upper from the toe box up to the collar. The high-top shape rises above the ankle area and wraps around the heel. Keep the collar opening visible as a curved line so the shoe reads as high-top rather than low-cut.
Use the four-part division to place features along the length. The toe box occupies the front 3 units. The lacing area runs through the next 3 units. The heel counter occupies the following 3 units, and the rear collar and strap end occupy the last 3 units. The ankle strap crosses the upper opening at the horizontal strap line one unit below the midline. The heel counter curves down to the sole. Letter styles and line weights vary; the convention only fixes the baseline-to-midline height and the strap line.
- Draw the sole curve inside the bottom unit.
- Draw the toe box in the front quarter.
- Raise the upper to the midline at the collar.
- Draw the collar opening as a curved line.
- Add the heel counter curve down to the sole.
Place the ankle strap and design the tread
The ankle strap is a horizontal band across the upper opening, one unit below the midline. Draw it as two parallel lines with a small overlap at the closure. The strap should cross the lacing area and end at the heel side. Keep the strap width consistent, about half a unit, so it reads clearly at small scale.
Design the sole tread inside the bottom unit. Use a repeating pattern such as alternating chevrons or short bars. The pattern should follow the sole curve and leave a thin margin at the edge. Count the repeats so the pattern is checkable: for example, six chevrons across the length. Vary the pattern if you wish, but keep the repeats evenly spaced and inside the sole zone.
- Draw two parallel lines for the strap one unit below the midline.
- Add a small closure overlap at the strap end.
- Draw the sole margin inside the bottom unit.
- Add six evenly spaced tread repeats.
- Check that the strap crosses the opening and the tread stays inside the sole.
Check the drawing against the convention
Check the silhouette first: the collar must reach the midline, and the sole must stay inside the bottom unit. Check the strap: it must sit on the horizontal line one unit below the midline and cross the upper opening. Check the tread: repeats must be evenly spaced and inside the sole margin. These checks are arithmetic and visual, not dependent on a single correct style.
Valid alternatives include different tread patterns, strap closures, and line weights, as long as the high-top height, strap placement, and tread zone remain consistent with the convention. If you scale the drawing, measure your paper and label your chosen units as hypothetical examples.
- Measure collar height against the midline.
- Measure strap line against the one-unit mark.
- Count tread repeats and check spacing.
- Confirm the sole stays inside the bottom unit.
- Record any style choices that remain valid.
Worked example
Draw a side-view wrestling shoe using a 12 by 6 unit rectangle. Place the collar at the midline, the strap one unit below the midline, and six tread repeats inside the bottom unit.
Worked answer
The finished drawing shows a high-top silhouette reaching the midline, a strap crossing the upper opening one unit below the midline, and six evenly spaced tread repeats inside the sole margin. The toe box stays in the front quarter, and the heel counter curves to the sole.
Four practice exercises
Exercise 1
Using a 12 by 6 unit rectangle, mark the midline and the horizontal strap line. State the strap line position in units below the midline, and state the length of each of the four equal length divisions.
Show answer and check
The strap line is one unit below the midline. Each of the four equal length divisions is 3 units long.
Why: The convention places the strap one unit below the midline so it crosses the upper opening consistently. A 12-unit length divided into four equal parts gives 3 units per part.
Check: Measure the distance from the midline to the strap line and confirm it equals one unit. Measure each length division and confirm it equals 3 units.
Exercise 2
A sole zone is the bottom one unit of a 6-unit-high rectangle. If you draw six tread repeats, what is the spacing between repeat centers across a 12-unit length?
Show answer and check
Two units between repeat centers.
Why: Twelve units divided by six repeats gives two units per repeat interval.
Check: Count six repeats and measure that each interval is two units.
Exercise 3
Your collar reaches 5 units above the baseline in a 6-unit-high rectangle. Does it meet the midline convention? Explain.
Show answer and check
No. The midline is 6 units above the baseline, so a 5-unit collar is one unit short.
Why: The convention requires the collar to reach the midline for a high-top silhouette.
Check: Measure collar height against the midline and confirm it equals 6 units.
Exercise 4
You draw a strap two units below the midline and a tread pattern with uneven spacing. Identify the two convention errors and state the fixes.
Show answer and check
The strap is too low; move it to one unit below the midline. The tread spacing is uneven; redraw evenly spaced repeats inside the sole margin.
Why: The convention fixes the strap at one unit below the midline and requires even tread spacing inside the sole zone.
Check: Measure the strap line against the one-unit mark and count tread intervals for equal spacing.
Common mistakes
- Drawing a low-cut collar that stops below the midline. Raise the collar curve to the midline and redraw the opening so the high-top shape is visible.
- Placing the ankle strap too high or too low. Measure one unit below the midline and redraw the two parallel strap lines at that mark.
- Letting the tread pattern spill outside the sole zone. Draw a thin margin inside the bottom unit and keep all tread repeats within it.
- Making the toe box too long and crowding the lacing area. Keep the toe box within the front quarter and start the lacing area at the next division.
Self-check rubric
- High-top collar reaches the midline within one unit.
- Ankle strap sits on the horizontal line one unit below the midline and crosses the upper opening.
- Sole tread repeats are evenly spaced and inside the sole margin.
- Toe box stays within the front quarter.
- Drawing excludes feet, legs, and athletes.
- Valid style alternatives are accepted if the convention checks pass.
Questions and answers
Do I need to draw a foot inside the shoe?
No. This lesson draws the shoe as a standalone object. Exclude feet, legs, and athletes.
Can I use a different tread pattern?
Yes. Any evenly spaced pattern inside the sole margin is valid. Count the repeats so the pattern is checkable.
Are the 12 by 6 unit proportions required?
They are hypothetical examples for practice. If you scale the drawing, measure your paper and label your chosen units.
How do I know the strap is in the right place?
The strap sits one unit below the midline and crosses the upper opening. Measure that line and check the overlap at the closure.